
Elevate Your Workspace: The Ultimate DIY Desktop Chalkboard Guide
In our increasingly digital world, it’s easy for our workspaces to become sterile and uninspiring. Yet, a truly functional and motivating environment is paramount for productivity and creativity. It all begins with a desk that not only provides ample surface and space but also sparks innovation. While many of us keep a digital notepad open or a physical pad of paper nearby for jotting down ideas, reminders, and the occasional doodle, there’s a charming and incredibly effective alternative gaining popularity: the built-in desktop chalkboard.
Imagine a dedicated, eye-catching, and sustainable space right on your desk where you can sketch, plan, list, and brainstorm with the simple stroke of chalk. This innovative DIY project offers a delightful juxtaposition of classic functionality with modern tech gadgets like laptops, iPhones, and iPads, adding both character and efficiency to your personal or professional hub.
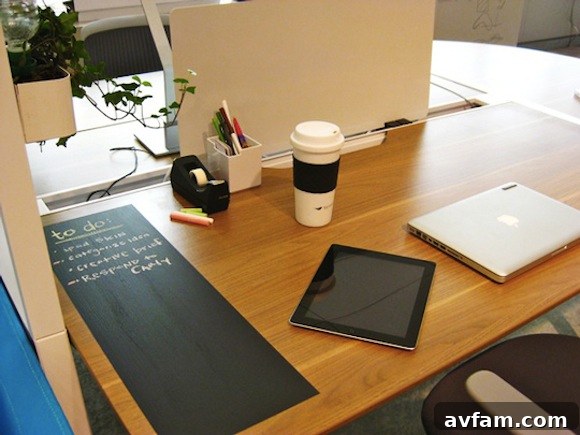
Intrigued by the prospect of transforming your ordinary desk into a dynamic, interactive canvas? This weekend project is surprisingly simple to tackle and offers immense rewards in terms of organization, creativity, and aesthetic appeal. Thanks to insightful guides from resources like Turnstone (via ApartmentTherapy), creating your own desktop chalkboard is well within reach. Let’s dive into how you can bring this fantastic idea to life and revolutionize your daily grind.
Why a Desktop Chalkboard is a Game-Changer for Your Workspace
Beyond its undeniable charm, integrating a chalkboard panel into your desk offers a multitude of benefits that can significantly enhance your work or creative process. It’s more than just a surface for notes; it’s a strategic tool for a more organized, creative, and eco-friendly workspace.
Boosted Productivity and Organization
Forget fumbling through sticky notes or endless digital tabs. A desktop chalkboard provides an immediate, always-visible surface for key information. You can use it for:
- To-Do Lists: Keep your daily tasks and priorities front and center, allowing for easy updates and satisfaction as you check items off.
- Brainstorming & Mind Mapping: Visually connect ideas, outline projects, or develop complex concepts without the limitations of a small notebook. The expansive surface encourages free-flowing thought.
- Quick Reminders: Jot down phone numbers, meeting times, or essential notes that you need to remember in the immediate future.
- Reducing Digital Distractions: By moving quick notes and drafts to an analog surface, you reduce the need to switch between applications, keeping your focus on the primary task at hand.
Unleashing Creativity and Inspiration
A blank chalkboard isn’t just for tasks; it’s an invitation to create. Whether you’re an artist, writer, student, or professional, having a dedicated space for spontaneous expression can be incredibly liberating:
- Doodling & Sketching: Take short creative breaks by sketching designs, patterns, or characters that clear your mind and spark new ideas.
- Visualizing Ideas: Sometimes, drawing a concept helps clarify it better than words alone. Use your chalkboard to illustrate workflows, diagrams, or architectural sketches.
- Personalized Expression: Change your desk’s aesthetic as often as you like, writing daily affirmations, inspirational quotes, or even temporary art that reflects your mood or current projects.
Sustainable and Eco-Friendly Note-Taking
One of the most compelling advantages of a desktop chalkboard is its environmental impact. By adopting this reusable surface, you dramatically reduce your reliance on paper products:
- Minimize Paper Waste: Say goodbye to stacks of discarded notepads and loose sheets. Your chalkboard desk serves as an infinite canvas.
- Long-Term Cost Savings: Over time, the investment in a single can of chalkboard paint will save you money on purchasing countless pads of paper and sticky notes.
Aesthetic Appeal and Unique Personalization
In a world of mass-produced office furniture, a DIY chalkboard desk stands out. It offers a unique blend of vintage charm and modern functionality:
- Customizable Design: You get to decide the size, shape, and placement of your chalkboard panel, making it perfectly tailored to your workflow and desk layout.
- Modern Meets Classic: The striking contrast of a traditional chalkboard surface against sleek laptops, monitors, and smartphones creates a visually engaging and sophisticated workspace.
- Adds Character: Transform a plain, generic desk into a statement piece that reflects your personality and creative spirit.
Gathering Your Toolkit: Essential Supplies for Your Desktop Chalkboard Project
Embarking on this DIY adventure requires a few key materials. The beauty of this project lies in its simplicity and the relatively inexpensive nature of the supplies. Here’s a detailed list of what you’ll need, along with some tips for selection:
- Rust-Oleum Chalkboard Paint: This is the star of the show. Rust-Oleum is a popular and reliable brand known for its durable and easy-to-apply chalkboard paint. It typically comes in classic black, but some brands offer other colors like dark green or even customizable tint bases. Ensure you choose a paint designed for interior use and for surfaces like wood, metal, or laminate.
- Ruler or Measuring Tape: Precision is paramount for clean lines. A sturdy metal ruler or a retractable measuring tape will help you define the exact dimensions of your chalkboard panel.
- Masking Tape (Painter’s Tape): Invest in good quality painter’s tape. Brands like FrogTape are excellent for creating crisp, bleed-free lines, which is crucial for a professional-looking finish. Choose a width that is easy to work with for your desired panel size.
- Pencil: A standard pencil for marking out your initial dimensions on the desk surface before applying the tape.
- Paintbrush or Foam Brush/Roller:
- Paintbrush: A high-quality synthetic brush with soft bristles will give you a smooth finish. Opt for a brush size appropriate for your panel’s dimensions.
- Foam Brush: These can also provide a smooth, streak-free finish and are great for minimizing brush strokes. They are often disposable, making cleanup easier.
- Small Foam Roller: For larger panels, a small foam roller can offer the smoothest, most even coverage and speed up the painting process.
- Optional but Recommended Additions:
- Drop Cloth or Newspaper: To protect the rest of your desk and surrounding workspace from paint drips.
- Fine-Grit Sandpaper (220-grit): For lightly scuffing very smooth surfaces (like laminate) to improve paint adhesion, or for smoothing out any imperfections after the first coat (if needed).
- Tack Cloth: To wipe away any dust after sanding, ensuring a perfectly clean surface for painting.
- Primer: If your desk surface is exceptionally slick (e.g., highly glossy laminate) or very porous (e.g., unfinished wood), a good quality primer designed for adhesion can make a significant difference in the final result and durability.
- Small Container for Paint: A disposable container like a plastic cup or an old food container makes it easier to work with the paint.
- Clean Rags: For any spills or wiping down tools.
Step-by-Step Guide: Transforming Your Desk into a Functional Chalkboard
With your supplies ready, it’s time to roll up your sleeves and get creative. Follow these detailed steps to achieve a durable and beautiful desktop chalkboard.
1. Preparation: Clean, Clear, and Protect Your Workspace
A successful paint job hinges on meticulous preparation. Take your time with this crucial first stage:
- Clear Your Desk: Remove everything from your desk. You want a completely clear surface to work on.
- Clean the Surface: Thoroughly clean the area where you intend to paint. Use a mild all-purpose cleaner to remove dust, grime, and any oily residue. For stubborn grease, a degreaser might be necessary. Rinse with clean water and allow the surface to dry completely.
- Sand (If Necessary): If your desk has a very smooth, glossy finish (like some laminate or painted wood), a light sanding with fine-grit sandpaper (220-grit) will create a better “tooth” for the paint to adhere to. Wipe away all sanding dust with a tack cloth or a slightly damp rag.
- Apply Primer (If Necessary): If you sanded, or if your surface is particularly challenging (e.g., melamine, raw wood), apply a thin, even coat of an appropriate primer. Allow it to dry completely according to the manufacturer’s instructions.
- Protect Your Surroundings: Lay down a drop cloth or newspaper under your desk and on any parts of the desk you don’t intend to paint, to catch accidental drips or splatters.
2. Precise Marking and Taping
This step defines the shape and size of your chalkboard panel, so accuracy is key:
- Decide the Size and Placement: Use your ruler and pencil to carefully mark out the desired dimensions for your chalkboard panel. Consider your workflow – where would a chalkboard be most useful without interfering with your monitor, keyboard, or mouse? Would you prefer a large central panel, a strip along the back, or a section to the side?
- Apply Masking Tape: Once you’re satisfied with your markings, carefully apply the painter’s tape along the outer edges of your penciled lines. Press the tape down firmly and thoroughly, especially along the inner edge (the edge that will be painted). This ensures a sharp, clean border and prevents paint from bleeding underneath. You can even run a credit card or a plastic scraper along the tape edge for extra security.
3. Painting Techniques for a Flawless Finish
Now for the fun part – applying the chalkboard paint:
- Prepare the Paint: Crack open your can of chalkboard paint and stir it extremely well. Chalkboard paint often has fine pigments that settle at the bottom, so thorough mixing is crucial for consistent color and texture.
- Apply the First Coat: Load your paintbrush, foam brush, or roller with a moderate amount of paint. Apply a thin, even coat using long, continuous strokes that cover the length or width of your masked area. Avoid overloading your brush to prevent drips and uneven coverage. The goal for the first coat is even coverage, not opacity.
- Allow to Dry: Let the first coat dry completely according to the paint manufacturer’s instructions, typically 2-4 hours. It might feel dry to the touch sooner, but allowing full dry time prevents lifting or unevenness when applying subsequent coats.
- Apply Subsequent Coats: Once the first coat is dry, apply a second thin, even coat. Most chalkboard paints recommend at least two coats for optimal durability and chalkboard functionality. For heavy use, or if you notice any thin spots, a third or even fourth coat might be beneficial. Ensure each coat dries fully before applying the next.
4. The Waiting Game: Curing and Revealing Your Chalkboard
Patience is a virtue, especially with paint projects:
- Crucial Curing Time: This is perhaps the most critical step for the longevity and functionality of your chalkboard. Allow the final coat of paint to dry and cure for at least 48 hours before removing the masking tape and, more importantly, before writing on it. Some manufacturers even recommend 3-7 days. Curing allows the paint to harden completely, preventing damage when you remove the tape and ensuring the surface is ready for chalk.
- Remove Masking Tape: Once the paint is fully cured, carefully and slowly peel off the masking tape. For the cleanest lines, pull the tape at a 45-degree angle away from the painted surface. If you waited until the paint was completely dry, you should get a crisp, clean edge. If you remove it too soon, the paint might peel. If you remove it too late, the paint might adhere to the tape and tear. The 48-hour mark is generally a good balance.
5. Seasoning Your New Chalkboard
This step is often overlooked but essential for preventing “ghosting” or permanent marks on your new chalkboard surface:
- Seasoning Process: Before writing with chalk for the first time, take a piece of white chalk (not colored chalk markers) and rub the side of it over the entire painted surface. Cover every inch of the chalkboard panel with a light layer of chalk dust.
- Wipe Clean: Using a soft, damp cloth or a chalkboard eraser, gently wipe away the excess chalk dust. This process primes the surface, making it ready for use and ensuring that any future chalk marks can be fully erased without leaving faint impressions.
Voila! You now have a beautiful, built-in chalkboard on your desk! Grab some chalk and let your inner schoolteacher, artist, or super-organizer out.
Maintaining and Maximizing Your Desktop Chalkboard
To ensure your new chalkboard desk remains a functional and attractive feature for years to come, consider these maintenance tips:
- Cleaning: For everyday cleaning, a standard chalkboard eraser works well. For a deeper clean, use a soft, damp cloth. Avoid harsh chemical cleaners as they can damage the paint. Occasionally, a vinegar-water solution can help remove stubborn chalk residue.
- Chalk Selection: Opt for high-quality, dustless chalk if possible, as it creates less mess. While chalk markers offer vibrant colors, they can sometimes be more difficult to erase completely from chalkboard paint surfaces, so test them in an inconspicuous area first if you choose to use them.
- Protecting the Surface: While chalkboard paint is durable, direct scratches from sharp objects should be avoided.
- Creative Uses: Beyond daily notes, think about rotating inspirational quotes, drawing small temporary art pieces, or even using it for collaborative brainstorming sessions if your desk is large enough.
Beyond the Desk: Other Chalkboard Paint Ideas
If you love your desktop chalkboard, you might find yourself inspired to incorporate chalkboard paint into other areas of your home:
- Kitchen Backsplash: Create a customizable menu board or grocery list.
- Wall Section in a Playroom: Give kids a dedicated space for creativity.
- Cabinet Doors: Label contents or add decorative touches.
- Planters or Coasters: Label herbs or create personalized drinkware.
- Entryway Organizer: A perfect spot for family messages or keys.
Conclusion: Embrace the Power of a Personalized, Functional Workspace
Transforming your desk with a DIY chalkboard panel is more than just a craft project; it’s an investment in a more organized, creative, and inspiring workspace. It offers a tangible, immediate way to capture ideas, manage tasks, and express your personality in an eco-friendly manner. The satisfaction of creating something functional and beautiful with your own hands is immense, and the daily benefits to your productivity and mental well-being are undeniable.
This simple yet impactful upgrade merges the timeless appeal of analog tools with the demands of a modern workflow, proving that sometimes, the best innovations are those that bring us back to basics. So, will this fantastic project make it to your to-do list? We certainly hope so! Get ready to enjoy a personalized, dynamic, and endlessly useful desktop chalkboard.
Photo via ApartmentTherapy