
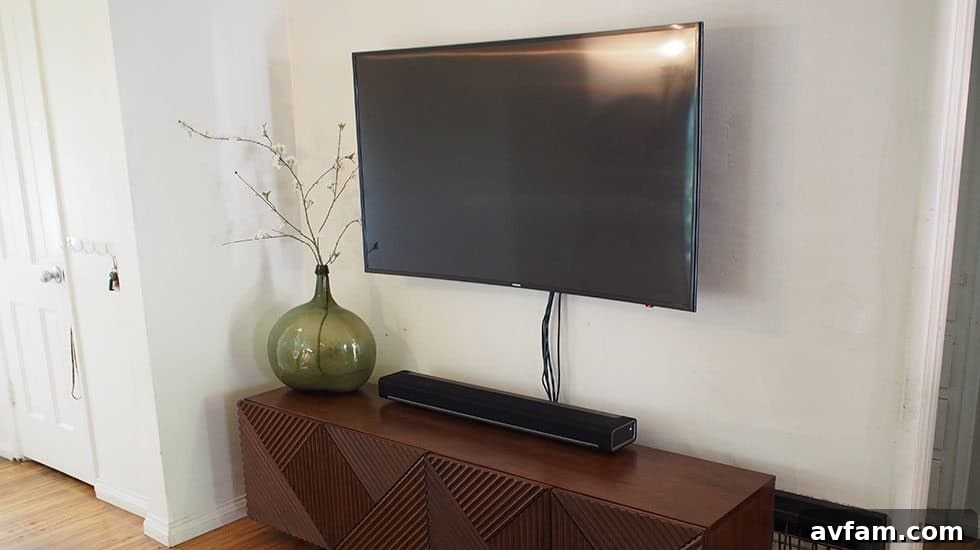
In today’s dynamic home entertainment landscape, larger television screens are no longer a luxury but a common expectation. As our desire for immersive viewing experiences grows, so does the physical size of our screens. While a massive new television can transform any living space, the practical challenge of securely displaying such a significant investment often arises. The last thing any homeowner wants is to spend hundreds or thousands of dollars on a state-of-the-art curved LCD TV, only to have it precariously perched on furniture, risking damage to itself and everything around it. This comprehensive guide will walk you through the process of how to mount a curved LCD TV safely and securely to your wall, ensuring both peace of mind and an enhanced viewing experience.
Why Wall Mount Your Curved TV? Unlocking Space and Style
Wall mounting a television, especially a modern curved LCD model, offers a multitude of benefits that extend beyond mere aesthetics. Firstly, it’s a critical safety measure. Large TVs, particularly those with expansive curved screens, can be heavy and prone to tipping if not properly secured, posing a significant hazard, especially in homes with children or pets. Wall mounting eliminates this risk entirely by fixing the TV directly to the wall structure.
Secondly, wall mounting dramatically frees up floor space. Removing the need for a bulky TV stand or media console can make a room feel larger, more open, and less cluttered. This is particularly advantageous in smaller living areas where every square foot counts. Visually, a wall-mounted TV creates a sleek, minimalist look, transforming the television from a piece of electronics into a focal point of modern design. The clean lines and floating appearance contribute to a sophisticated and contemporary interior.
Lastly, mounting allows for optimal viewing angles. With the right mount, you can position your TV at the perfect height and even adjust its tilt and swivel, minimizing glare and maximizing the immersive qualities that curved screens are renowned for. This level of customization is difficult, if not impossible, to achieve with a traditional TV stand.
The Planning Phase: Envisioning Your Ultimate Home Theater Upgrade
Our journey to an improved home entertainment setup began with a desire for something more substantial than our existing 45-inch Toshiba flat panel LCD TV. While it served its purpose mounted on a swing-out arm above our Design Within Reach credenza and Sonos Soundbar, the allure of a larger, more immersive display grew stronger. The opportunity arose when SANUS presented their new 55-inch Samsung curved LCD TV and a specially designed curved television mount, an offer too enticing to decline.
This upgrade wasn’t just about the television; it was an entire room transformation. We had been contemplating replacing our DWR credenza, a relic from a spacious New York office loft, which, while beautiful, felt somewhat oversized for our Los Angeles bungalow. We discovered a West Elm media center that perfectly matched our aesthetic and spatial requirements. Its compact design allowed us to lower the television, achieving a more comfortable and ergonomic viewing angle, a crucial consideration for long-term comfort and enjoyment. This thoughtful planning ensured that the new TV, mount, and furniture worked harmoniously to elevate our home theater experience.
Choosing the Ideal TV Mount for Your Curved Screen
Selecting the correct TV mount is paramount for both security and functionality, especially for a curved display. While many standard flat-panel mounts can technically support a curved TV, a mount specifically designed for curved televisions often provides superior aesthetics and adjustability. Considerations for choosing your mount include:
- VESA Compatibility: All modern TVs adhere to the Video Electronics Standards Association (VESA) mounting interface standard. This defines the pattern of screw holes on the back of your TV. Ensure your chosen mount supports your TV’s VESA pattern (e.g., VESA 400x400mm).
- Mount Type:
- Fixed Mounts: Keep the TV flush against the wall for a minimalist look. Offers no tilt or swivel.
- Tilting Mounts: Allow vertical angle adjustment to reduce glare or improve viewing from various heights.
- Full-Motion (Articulating) Mounts: Provide the most flexibility, allowing the TV to extend, tilt, and swivel in multiple directions. These are often ideal for curved TVs, enhancing the immersive experience and allowing viewers to find the perfect angle, regardless of their seating position.
- Weight Capacity: Always verify that the mount’s weight capacity exceeds the weight of your TV.
- Brand Reputation: Opt for reputable brands like SANUS, known for their robust construction and comprehensive installation instructions.
The SANUS TV mount we selected was explicitly designed for curved televisions, which was a significant advantage. While other universal mounts might work, this particular SANUS model allowed for smooth swiveling, a feature crucial for fully appreciating the immersive qualities of a curved screen from various points in the room. This specialized design ensured a perfect fit and optimal performance.
Essential Tools and Materials for a Seamless Installation
Before you begin the physical installation, gather all the necessary tools and materials. Having everything on hand will streamline the process and prevent interruptions:
- Stud Finder: Absolutely critical for locating wall studs, which are the only safe points for anchoring the mount. Electronic stud finders are highly recommended for accuracy.
- Drill: A power drill with appropriate drill bits for pilot holes (wood or masonry, depending on your wall type).
- Spirit Level: A high-quality level (or even a laser level) is essential to ensure your TV mount is perfectly horizontal. Even a slight tilt can be noticeable and visually distracting.
- Tape Measure: For precise measurements of height and stud spacing.
- Pencil: For marking drill points and stud locations.
- Socket Wrench/Adjustable Wrench: To securely tighten lag bolts.
- Screwdriver Set: For attaching TV brackets and other smaller components.
- Safety Glasses: Always wear eye protection when drilling.
- Helper: Wall mounting a large TV is definitely a two-person job, especially when lifting the TV onto the mount.
The Installation Process: A Step-by-Step Guide
The installation process, though seemingly daunting, is straightforward with proper planning and execution. Our first step involved the practical logistics of moving the old DWR credenza and carefully positioning our new West Elm media cabinet. This allowed us to accurately determine the ideal horizontal and vertical placement for the television.
1. Locating Wall Studs and Marking Placement
The most critical aspect of any wall mount installation is securely attaching the mount to wall studs. Studs are the vertical wooden or metal framing members behind your drywall, providing the necessary structural integrity to hold heavy objects. Most mounts, including the SANUS model, come with a helpful stud-finding tool, often a simple pin, but an electronic stud finder is always more reliable. Since we had a previous wall mount in place, we used its location as a reference point, knowing that studs are typically spaced 16 or 24 inches apart on-center. We measured 16 inches from each side of the previous mount to locate the adjacent studs accurately.
Once the studs are located, use a pencil to mark their centers. Then, hold the wall plate of your mount against the wall, aligning it with the marked stud centers and using your spirit level to ensure it’s perfectly horizontal. Mark the exact drill points for the lag bolts through the pre-drilled holes on the mount’s wall plate.
2. Drilling Pilot Holes and Securing the Wall Plate
With your drill points marked, it’s time to drill pilot holes. The size of the pilot bit is crucial – it should be slightly smaller than the diameter of your lag bolts to allow the bolts to bite firmly into the wood without splitting it. Consult your mount’s instructions for the recommended drill bit size. Drill slowly and steadily to ensure clean, straight holes.
Once pilot holes are drilled, position the wall plate over the holes and insert the lag bolts. Using a socket wrench, slowly tighten each bolt. Do not overtighten, as this can strip the wood. Tighten until the mount feels absolutely secure and flush against the wall. Double-check the level one last time to confirm no shifting occurred during tightening.
3. Attaching Brackets to the TV
The next step involves attaching the TV brackets to the back of your curved television. Lay the TV face down on a soft, clean blanket or surface to protect the screen. Locate the VESA mounting holes. The curved attachment of the SANUS mount secured to four anchor points on our Samsung TV. Ensure you use the correct screws and spacers provided with your mount, as using screws that are too long can damage internal components of the TV.
Tighten these screws firmly, but avoid excessive force. These brackets are what will actually hook onto the wall plate, so their secure attachment is paramount.
4. Lifting and Mounting the TV
This is where your helper becomes indispensable. With one person on each side, carefully lift the television and align the brackets on the back of the TV with the wall plate. Gently hook the TV onto the wall plate, following the specific instructions of your mount (some slide in, others simply hook over). Once the TV is securely seated, engage any safety clips or locking mechanisms provided by the mount to prevent accidental dislodgement. The Samsung TV, despite being very thin, offered sufficient space with its curved sides and the rotating mount for easy access to cables after mounting.
5. Fine-Tuning and Adjustments
Once the TV is mounted, most quality mounts offer a degree of post-installation adjustment. Our SANUS mount, for example, features two adjustment screws located on the top of the mount, allowing for fine-tuning of the height and level. This is an incredibly valuable feature, as even the most meticulous initial mounting can sometimes be slightly off-kilter. Take your time to make these final adjustments until the TV is perfectly level and at your desired viewing height.
Transforming Your Space: The Final Reveal and Optimizing Your Viewing Experience
With the new 55-inch Samsung curved LCD TV securely mounted and the West Elm media center perfectly aligned, our living space underwent a remarkable transformation. The fear of the television being too dominant quickly dissipated as we settled in to enjoy an episode of Game of Thrones, witnessing every gory detail with unparalleled clarity and immersion. The slim profile of the mount creates the illusion that the television is almost fused with the wall, with no visible hardware detracting from its elegant design. The aesthetic is clean, modern, and captivating.
One of the standout features of the SANUS curved mount is its ability to swivel the television up to 11 degrees in each direction. This flexibility is a game-changer for maintaining an ideal viewing position. Whether you’re watching from the center of the couch, a side armchair, or even while moving around the room, you can effortlessly adjust the screen to face you directly, enhancing the immersive qualities of the curved display and reducing any off-angle distortions. This adaptability ensures that every seat in the room can become the “best seat.”
We are particularly pleased that we coordinated the installation of both the television and the new media center simultaneously. This holistic approach allowed us to design the room around these central elements, ensuring a cohesive and functional aesthetic. The lowered television height, combined with the new console, creates a more comfortable and natural viewing plane, contributing significantly to the overall enjoyment of our upgraded home entertainment system.
Cable Management for a Seamless Look
While the slim mount provides an elegant profile, the final touch for a truly seamless look is effective cable management. Visible cables can quickly detract from the clean aesthetic of a wall-mounted TV. Options for concealing wires include:
- In-Wall Cable Management: The most discreet solution involves routing cables behind the wall through specialized kits. This requires some DIY skill and potentially cutting into drywall, but results in an invisible wire setup.
- On-Wall Cable Concealers: For a less invasive approach, plastic raceways or cable channels can be painted to match your wall, effectively hiding the wires while keeping them accessible.
- Vertical Cable Guides: Simple, open channels that neatly bundle and guide cables vertically down from the TV to your media console.
SANUS offers various solutions for cable management, which we plan to explore to complete our setup and achieve that perfectly polished look.
DIY vs. Professional Installation: Making the Right Choice
If you’re considering a larger television but feel apprehensive about the mounting process, you always have the option to hire a professional installer. They possess the expertise, specialized tools, and insurance to ensure a flawless and secure installation. However, for those comfortable with basic DIY tasks and possessing the right tools, mounting your TV yourself is a rewarding and money-saving choice.
By following a clear guide, taking precise measurements, and using a high-quality mount recommended for your specific television (like those found using the SANUS Mount Finder), you can achieve professional results at a fraction of the cost. The satisfaction of transforming your living space with your own hands is an added bonus.
For additional guidance and visual demonstrations, Sanus provides excellent resources. Here’s a great video that offers more information and details about using their mounts to securely attach your curved LCD TV to your wall: