
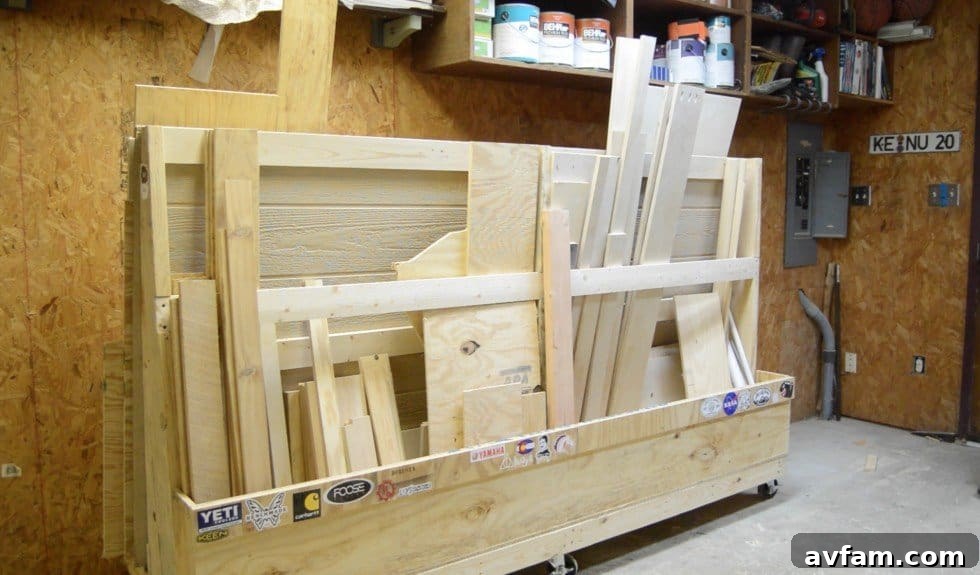
Optimize Your Workshop: Build a DIY Rolling Lumber Rack for Ultimate Organization
As your passion for woodworking flourishes, so too will your collection of plywood sheets, dimensional lumber, and an ever-growing pile of invaluable cut-offs. While this accumulation is a testament to your dedication, it can quickly lead to a cluttered, inefficient, and even unsafe workshop. The solution? A meticulously designed and incredibly versatile rolling lumber rack. This essential piece of workshop furniture is engineered to accommodate the needs of most avid DIY woodworkers, fitting snugly into a corner while providing unparalleled organizational benefits and mobility.
Imagine a woodworking sanctuary where every piece of wood has its designated place, easily accessible and safely stored. This rolling lumber rack transforms that vision into a tangible reality. It’s not merely a storage unit; it’s a strategic investment in your productivity, enhancing workshop safety, and extending the longevity of your valuable materials. Designed for practicality and built with robust materials, this project offers a cost-effective and immensely rewarding way to bring order and efficiency to your creative space, making your woodworking journey smoother and more enjoyable.
The Indispensable Benefits of a Rolling Lumber Rack for Woodworkers
A well-organized workshop is not just a pleasant aesthetic; it’s the bedrock of an efficient, safe, and productive woodworking practice. Beyond mere tidiness, a rolling lumber rack delivers a multitude of functional advantages that significantly elevate your entire woodworking experience.
Maximize Your Workshop Space with Vertical Storage
One of the most immediate and profound benefits of a dedicated lumber rack, especially one on wheels, is its exceptional ability to optimize valuable workshop space. Instead of having lumber scattered across the floor, consuming precious square footage, or leaning precariously against walls, a vertical rack consolidates your materials into a compact, organized footprint. This ingenious design frees up substantial floor space, instantly making your workshop feel larger, more open, and allowing for unhindered movement around machinery and workbenches. By effectively utilizing vertical space, you can store a surprising volume of wood in a relatively small area, making this solution perfect for workshops of any size, from a spacious dedicated garage to a compact basement corner.
Enhanced Organization and Superior Material Protection
Disorganized lumber is a significant source of wasted time, damaged materials, and mounting frustration. A well-designed rolling lumber rack empowers you to categorize your wood supply systematically – by species (e.g., oak, maple, pine), by size (e.g., 2x4s, 1x6s), or even by specific project. This intuitive organization makes locating the exact piece you need effortless, cutting down on search time and allowing you to focus on your craft. Furthermore, keeping wood elevated off the cold, damp concrete floor is crucial. This practice prevents moisture absorption, dramatically reduces the risk of warping, and protects your stock from potential damage from spills, accidental kicks, or pests. Proper air circulation around your lumber, facilitated by the open design of a rack, also plays a vital role in maintaining its long-term stability and usability.
Significantly Improved Workshop Safety
Lumber lying haphazardly on the floor constitutes a major tripping hazard, and unstable stacks of wood can pose a serious risk of collapse, leading to injury or property damage. A sturdy, purpose-built lumber rack provides a secure and stable home for all your materials, virtually eliminating these prevalent safety concerns. By maintaining a clear, organized workspace, you inherently minimize the chances of accidents, thereby creating a much safer environment for yourself and anyone else in your shop. With your focus squarely on your craftsmanship, rather than on navigating obstacles, your woodworking endeavors become both more enjoyable and considerably safer.
Unmatched Mobility and Operational Flexibility
The “rolling” aspect of this lumber rack is truly a game-changer, offering a level of versatility that fixed storage simply cannot match. Equipped with heavy-duty casters, your entire lumber supply becomes effortlessly maneuverable. This mobility proves invaluable for several key workshop scenarios:
- Effortless Workshop Reconfiguration: Easily relocate the rack to accommodate new tools, prepare for larger projects, or simply re-arrange your shop layout for optimal workflow and efficiency.
- Simplified Cleaning: No more struggling to move heavy, unwieldy stacks of wood just to sweep or vacuum your workshop floor. Simply roll the rack aside, clean the area thoroughly, and return it to its position.
- Proximity to Projects: Bring your lumber supply directly to your table saw, miter saw, or workbench. This proximity dramatically reduces the effort involved in transporting individual pieces, streamlining your cutting, milling, and assembly processes, saving both time and physical exertion.
Anatomy of a Robust Rolling Lumber Rack: Smart Design and Durable Materials
This particular lumber rack design strikes an excellent balance between simplicity of construction and robust, long-lasting functionality. It leverages readily available and affordable materials, making it an entirely accessible project for most DIY enthusiasts seeking a superior woodworking storage solution.
Core Structural Components for Enduring Strength
The inherent strength and unwavering stability of this rolling lumber rack are derived from a thoughtful combination of robust, commonly available materials:
- Three 2x12s: These substantial pieces of dimensional lumber form the crucial main angled uprights, providing exceptional support for even the heaviest loads of lumber. Cutting them at a carefully calculated angle serves not just an aesthetic purpose; it allows for much easier loading and, critically, prevents lumber from accidentally sliding out or falling off the rack. The inherent strength, rigidity, and generous width of 2x12s make them an ideal choice for bearing significant weight over time.
- 2x4s: These incredibly versatile pieces of dimensional lumber are typically utilized for constructing the foundational base frame. They establish a solid platform upon which the entire structure rests, ensuring superior rigidity and effectively distributing the considerable weight of stored lumber evenly across the casters.
- A Sheet of Plywood: Plywood plays a crucial role in tying the entire structure together, often forming the sturdy bottom of the base and/or reinforcing side panels. Its application adds tremendous overall stability, preventing racking (sideways wobble) and enhancing the structural integrity of the unit. Furthermore, plywood can be creatively employed to fashion additional shelves or dedicated compartments, perfect for organizing smaller cut-offs, sheet goods, or even specific project components.
Heavy-Duty Casters: The Key to Superior Mobility
The true essence and practical advantage of a “rolling” rack undeniably reside in its casters. It is absolutely vital to invest in high-quality, heavy-duty casters, and ideally, ones equipped with reliable locking mechanisms. Standard light-duty casters, while cheaper initially, will inevitably fail quickly and dramatically under the substantial, concentrated weight of accumulated lumber. Heavy-duty casters, conversely, guarantee smooth, effortless maneuverability even when the rack is fully loaded, allowing you to glide your entire lumber supply with ease. The integrated locking casters are equally important, preventing any unintended movement of the rack when you are loading, unloading, or working in close proximity, thereby significantly enhancing overall workshop safety.
Precision Joinery: The Half-Lap Advantage for Lasting Durability
To ensure the long-term durability, structural integrity, and safety of your lumber rack, employing strong and reliable joinery techniques is paramount. This particular design specifically highlights the use of half-lap joints to securely and robustly attach the 2×12 uprights to the base frame. Half-lap joints are an excellent choice for creating incredibly strong, flush connections where two pieces of wood intersect. They offer a significantly larger glue surface area compared to simple butt joints, providing exceptional resistance to racking and superior shear strength. These characteristics make half-lap joints perfectly suited for heavy-duty applications like this lumber rack, ensuring it can withstand years of rigorous use.
While a table saw equipped with a dado blade set greatly simplifies the process of cutting precise half-lap joints quickly and efficiently, do not be deterred if you do not own such specialized tooling. Several viable alternatives exist to achieve strong joints:
- Multiple Passes with a Standard Saw Blade: A standard table saw blade can be used to make a series of precise, overlapping cuts to create the recess for the half-lap. This method requires more careful setup, accurate measurements, and patience but yields excellent results.
- Router with a Straight Bit: A handheld or table-mounted router, fitted with a straight bit and guided by a fence or jig, can precisely cut the rebates required for half-lap joints. This method often offers excellent precision and clean cuts.
- Reinforced Butt Joints: For those without advanced tooling or who prefer a simpler approach, sturdy butt joints can be constructed. These should be heavily reinforced with ample wood glue, large-gauge deck screws, and potentially supplemented with metal plates, corner braces, or wooden gussets to achieve sufficient strength and stability, though they may not possess the same inherent strength or clean aesthetic as half-lap joints.
Essential Tools for an Efficient Construction Process
Beyond the primary lumber and hardware, possessing a few key woodworking tools will render the construction process smooth, accurate, and highly efficient:
- Table Saw: Indispensable for accurately cutting all dimensional lumber to precise lengths and angles. With the addition of a dado blade, it becomes invaluable for creating the half-lap joints swiftly.
- Cordless Drill/Driver: This versatile tool will be your workhorse for driving all the necessary deck screws that bind the entire structure together. Ensure you have the appropriate driver bits and fully charged batteries on hand.
- Jigsaw: Extremely useful for trimming any necessary cutouts or notches in the plywood panels, such as shaping around uprights, or creating specific shapes for custom storage compartments.
- Measuring Tape, Pencil, and Speed Square: These fundamental measuring and marking tools are absolutely essential for ensuring accurate measurements, precise marking, and verifying that your rack is perfectly square and stable at every stage of assembly.
- Safety Gear: Always prioritize safety. Wear appropriate personal protective equipment (PPE), including safety glasses to protect your eyes, hearing protection when operating noisy power tools, and sturdy gloves.
Building Your Custom Rolling Lumber Rack: A Practical and Rewarding Approach
This DIY project is not only remarkably affordable, with an estimated material cost of roughly $120 (though this can naturally fluctuate based on local lumber prices and specific material choices), but it is also incredibly rewarding. A significant advantage of undertaking a DIY project like this is the inherent flexibility to custom design it, ensuring it perfectly fits your unique workshop space and precisely addresses your specific lumber storage needs.
Step-by-Step Construction Overview (Conceptual Guide)
- Design and Precise Measurement: Begin by thoroughly measuring the specific area where your lumber rack will be located. Critically consider the longest, widest, and heaviest pieces of lumber you anticipate storing. Sketch out your preliminary design, meticulously determining the exact dimensions for your base, the height and angle of your uprights, and the overall dimensions of the rack.
- Material Acquisition and Preparation: Procure all your necessary lumber (2x12s, 2x4s, plywood) and the heavy-duty casters. With your design in hand, carefully cut all your dimensional lumber to the precise lengths and angles you determined. This initial cutting phase is where your table saw will prove invaluable.
- Construct the Base Frame: Assemble the robust 2×4 frame that will form the foundational base of your rack. Utilize strong deck screws and high-quality wood glue for maximum rigidity and durability. Ensure the base is perfectly square and incredibly robust.
- Install Heavy-Duty Casters: Securely attach the heavy-duty, locking casters to the underside of the base frame. Pay meticulous attention to their placement, ensuring optimal balance and even weight distribution for stability when fully loaded.
- Prepare and Attach Uprights: Precisely cut the angled ends of your 2×12 uprights. Subsequently, create the half-lap joints (or your chosen alternative joinery method) in both the uprights and the corresponding base members. Dry-fit all components to confirm a snug, accurate fit before applying a generous amount of wood glue and securing everything firmly with deck screws.
- Integrate Plywood Panels: Cut the plywood panels to the required sizes. These panels can be strategically incorporated for the bottom of the base, as reinforced side panels, or even as a back panel, all of which significantly enhance the rack’s overall stability and structural integrity, while also providing additional storage surfaces. Attach them securely using screws.
- Final Checks and Optional Finishing: Conduct a thorough final inspection, verifying that all joints are secure, all screws are tight, and the entire rack is perfectly stable. Consider gently sanding any rough edges or sharp corners for a smoother, safer finish. While optional, applying a durable wood sealant, stain, or paint can protect the wood from moisture, dings, and general workshop wear and tear, thereby extending the life and improving the aesthetics of your custom-built rack.
Tips for Maximizing Your Lumber Rack’s Efficiency and Longevity
Once your robust rolling lumber rack is meticulously built and ready for action, implementing a few strategic organizational practices can help you extract the utmost utility and efficiency from it for years to come:
- Systematic Stock Categorization: Implement a clear organization system for your lumber. Group materials by species (e.g., hardwoods, softwoods, exotic woods), by dimensional size (e.g., 2x4s, 1x6s, 4/4 stock), or even by project-specific needs. This structured approach makes finding specific pieces lightning-fast and greatly reduces decision fatigue.
- Optimize Sheet Goods Storage: If your design incorporates vertical storage for full sheets of plywood, MDF, or particleboard, ensure they are stable, easily accessible, and can be retrieved without the laborious task of moving multiple heavy sheets.
- Smart Cut-Off Management: Designate a specific section, bin, or shelf within your rack solely for smaller, yet still usable, cut-offs. This prevents valuable material from being prematurely discarded and encourages a more sustainable use of wood.
- Regular Maintenance Schedule: Periodically perform routine maintenance. Check that all screws remain tight, especially after loading heavy lumber. Ensure the casters are functioning smoothly and are free of debris. Regularly clean accumulated dust and wood chips from the rack to maintain good air circulation and prevent fire hazards.
- Implement a Labeling System: For particularly large or diverse lumber collections, consider adopting a simple but effective labeling system. Labels on different sections, specific bins, or even directly on the lumber can save considerable time and effort in identifying exactly what you need.
Beyond the Basics: Customization and Future Enhancements
The inherent beauty of any DIY project lies in its unparalleled flexibility and adaptability. Once you have constructed the fundamental structure of your rolling lumber rack, consider these thoughtful enhancements to further tailor it perfectly to your evolving needs and workshop demands:
- Adjustable Shelving Integration: Incorporate adjustable shelves within the plywood sections or between uprights. This allows you to accommodate varying sizes of offcuts, store project-specific materials, or even hold hand tools that are frequently used in conjunction with your lumber.
- Integrated Tool Storage Solutions: Add robust hooks or small baskets to the sides or ends of your rack. These can be used for conveniently hanging clamps, measuring tapes, pencils, or other frequently accessed hand tools, keeping them within easy reach when working with lumber.
- Convenient Power Strip Mount: If your rack is frequently moved near various power tools, consider securely mounting a multi-outlet power strip to its frame. This provides convenient and easily accessible electrical outlets, reducing reliance on long extension cords and enhancing safety.
- Protective and Aesthetic Finishing Touches: Apply a durable paint, stain, or clear polyurethane finish to your completed rack. This not only enhances its aesthetic appeal, making it a proud addition to your shop, but also crucially protects the wood from dings, moisture fluctuations, and the general wear and tear inherent in a busy woodworking environment, thus extending its lifespan.
- Embrace a Modular Design Philosophy: If you anticipate your lumber collection growing significantly over time, design your initial rack with a modular approach in mind. This allows for the seamless construction and connection of additional sections in the future, providing scalability without having to rebuild entirely.
Safety First: Ensuring a Secure and Reliable Lumber Storage Solution
While a well-designed lumber rack significantly enhances overall workshop safety, it is absolutely paramount to ensure that the rack itself is both constructed and utilized with stringent safety considerations in mind:
- Stable and Broad Foundation: Always ensure that the base of your lumber rack is sufficiently wide and stable enough to prevent any possibility of tipping, especially when it is heavily or unevenly loaded. A wider footprint generally equates to greater stability.
- Respect Weight Capacity Limits: Never overload the rack beyond the combined weight capacity of your heavy-duty casters and the structural integrity of the lumber used in its construction. Overloading can lead to structural failure, caster damage, and potential injury.
- Engage Locking Casters Religiously: Always engage the locking mechanism on your casters whenever you are loading, unloading, or performing any work in the vicinity of the rack. This prevents any accidental movement of the rack, which could cause instability or lead to accidents.
- Employ Proper Lifting Techniques: Even with the convenience of a rack, remember to consistently use proper lifting techniques when handling heavy lumber to prevent back injuries or strains. Bend your knees, keep your back straight, and lift with your legs.
- Secure All Fasteners Thoroughly: Utilize high-quality deck screws and appropriate wood glue for all joints and connections. Ensure that all fasteners are driven securely and are fully seated to provide maximum strength and unwavering durability to the entire structure.
Conclusion: An Essential Addition to Any Woodworker’s Sanctuary
A DIY rolling lumber rack transcends the definition of a mere storage solution; it represents a fundamental and transformative upgrade to any woodworking workshop. It proficiently addresses common challenges of clutter, inefficiency, and safety by providing a robust, mobile, and meticulously organized home for your invaluable wood stock. With an estimated material cost of approximately $120 and the unparalleled flexibility to customize its design to your precise requirements, this project offers exceptional value and an outstanding return on your investment of time and effort. By dedicating the resources to build and integrate this essential piece of shop furniture, you will unequivocally free up crucial floor space, meticulously protect your valuable materials from damage, streamline your entire workflow, and ultimately cultivate a significantly more productive, enjoyable, and safer woodworking experience. Embrace the empowering spirit of DIY and actively transform your workshop into an environment where creativity can truly flourish, unhindered by the frustrations of disorganization and clutter.