
My grandmother, a truly passionate gardener with an innate ability to bring verdant life to every nook of her property, held a special fondness for her window boxes. Gracefully affixed to the front windows of her home, these vibrant displays perpetually overflowed with a dazzling array of brightly colored flowers, most notably her beloved geraniums. These simple yet profoundly charming installations weren’t merely containers for plants; they were living works of art, a testament to her dedication, and the backdrop for countless cherished family memories.
Window boxes stand as a remarkable element in exterior home design, offering far more than just a place to grow plants. They are an immediate and effective way to infuse your home’s facade with vibrant cheer and inviting color, dramatically boosting its curb appeal. Perfect for cultivating a diverse range of flowers, fragrant herbs, or various smaller plants, they provide endless possibilities for creative expression. Furthermore, for urban dwellers or those with limited yard space, maintaining window boxes offers an ideal solution to indulge your gardening passion, allowing you to cultivate your favorite flora regardless of property size.
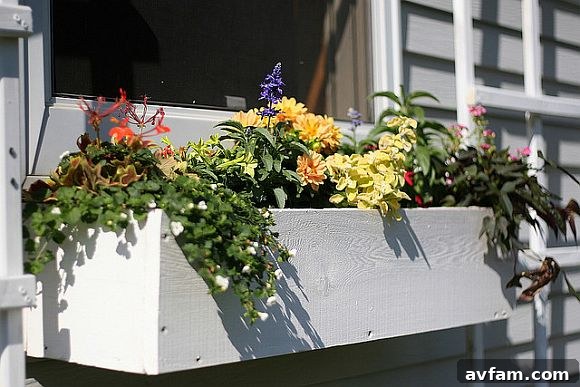
Build Your Own Custom Window Box: A Rewarding DIY Project for Home Gardeners
While the convenience of purchasing pre-made window boxes from a retailer is undeniable, there’s an extraordinary sense of accomplishment and unique charm that only comes from crafting something with your own hands. Embarking on a DIY window box project transcends mere cost savings; it’s an opportunity to create a bespoke piece that perfectly aligns with your home’s architectural style and your personal aesthetic. This rewarding weekend endeavor allows for complete customization, from the precise dimensions and choice of materials to the final protective finish. We’ve meticulously compiled a comprehensive, easy-to-follow guide to empower you to construct durable, beautiful window boxes that will bring vibrant life and joy to your home for many seasons to come.
Why Opt for a DIY Window Box? Unleash Creativity and Value
Choosing to build your own window boxes offers a multitude of compelling advantages that extend beyond mere aesthetics:
- Unparalleled Customization: Design a window box that precisely fits your window’s dimensions, harmonizes with your home’s exterior palette, and reflects your unique style. Select specific wood types, custom paints, or stains to achieve a truly integrated look.
- Significant Cost-Effectiveness: Building your own often proves to be considerably more affordable than investing in high-quality, pre-fabricated window boxes, especially if you plan to install multiple units around your home.
- Superior Quality and Longevity: By hand-selecting premium, weather-resistant materials and exercising careful craftsmanship, you can construct a window box designed for exceptional durability and longevity, frequently surpassing the quality of mass-produced alternatives.
- Immense Personal Satisfaction: There’s an undeniable sense of pride and accomplishment in displaying a piece you’ve crafted yourself. This personal touch adds character and warmth, enhancing your home’s curb appeal with a story and a soul.
- Eco-Conscious Choice: Embrace sustainability by selecting wood from responsibly managed forests or even repurposing existing materials, making your project an environmentally friendly endeavor.
- Enhanced Curb Appeal: Custom-built window boxes instantly elevate your home’s visual appeal, making it more inviting and potentially increasing its market value.
Strategic Planning: The Foundation of Your Window Box Project
Before you even pick up a saw, meticulous planning is the cornerstone of a successful, aesthetically pleasing, and long-lasting window box. Consider these crucial aspects to ensure your project goes smoothly and yields the best results:
1. Determining the Optimal Size and Placement
Accurate measurements are paramount. Begin by carefully measuring the width of your window frame and its surrounding trim. This dimension will be your primary guide for the length of your window box. A common design guideline suggests the box should be either slightly narrower than the exterior window trim, matching its width precisely, or extending just a few inches beyond it for a more expansive visual impact. Crucially, always ensure your chosen length will not impede the functionality of your window.
- Length Calculation: Precisely measure the overall width of your window from one outer trim edge to the other. Decide if you prefer the box to be flush with the trim, slightly shorter, or slightly longer.
- Depth and Height for Plant Health: These dimensions are vital for accommodating healthy root growth and sufficient soil volume. Aim for a minimum box depth and height of 8-10 inches. Deeper boxes hold more soil, which translates to better moisture retention and less frequent watering—a significant advantage. If your window features a ledge, accurately measure its depth to ensure the box can rest securely without protruding excessively or being unstable.
- Anticipating Weight: A fully saturated window box, filled with wet soil and mature plants, can become surprisingly heavy. Factor this significant weight into your design from the outset, especially when selecting materials and, most importantly, when planning your mounting hardware and installation method.
2. Selecting Durable Materials for Longevity and Style
The durability, maintenance requirements, and overall appearance of your window box are heavily dependent on your material choices. Given constant exposure to outdoor elements, weather-resistant options are non-negotiable.
- Premium Wood Options:
- Cedar: An outstanding choice renowned for its natural resistance to rot, decay, and insect infestation. Cedar possesses a beautiful natural hue that gracefully weathers to a sophisticated silvery-grey if left untreated. It is relatively lightweight, easy to cut, and pleasant to work with.
- Redwood: Similar to cedar in its inherent resistance and aesthetic appeal, redwood is another premium option. While exceptionally durable and beautiful, it can often be pricier and less universally available than cedar.
- Pressure-Treated Pine: A widely accessible and cost-effective material. This wood undergoes a chemical treatment process that renders it highly resistant to rot, fungal decay, and insect damage. When using pressure-treated pine, ensure it is specifically rated for ground contact or outdoor use and allow it to dry thoroughly before applying any paint or stain, as newly treated wood can retain significant moisture.
- Composite Wood: Engineered from a blend of wood fibers and recycled plastics, composite lumber offers exceptional durability, demands minimal maintenance, and is impervious to rot, pests, and fading. While it typically has a higher upfront cost, its long-term value and near-zero maintenance often justify the investment.
- Essential Hardware: Always use screws and other fasteners made from rust-resistant materials, such as stainless steel or exterior-grade galvanized options. This prevents unsightly rust streaks from bleeding onto your window box and home exterior, and critically ensures the structural integrity of your box endures through all weather conditions.
3. Thoughtful Design Considerations for Aesthetics and Functionality
Beyond basic measurements, consider how your window box will visually integrate with your home’s existing architecture and color scheme.
- Finishing Touches: Will you paint the box to perfectly match your window trim, stain it to complement natural wood siding, or allow the chosen wood to age gracefully and develop a natural patina? Utilizing high-quality, outdoor-grade paints or stains is crucial for both aesthetic appeal and providing an essential protective barrier against moisture and UV radiation.
- Imperative Drainage: Adequate drainage is absolutely essential for the health of your plants and the longevity of your window box. Plan to incorporate multiple drainage holes in the bottom board to prevent waterlogging, which leads to root rot and accelerates wood decay.
- Liner Options: Consider adding an internal liner to your window box. Materials like burlap can help retain soil while allowing natural aeration and drainage. Heavy-duty plastic sheeting (with added drainage holes!) offers superior protection for the wood, particularly beneficial for untreated wood or if you aim for maximum moisture retention. Landscape fabric is another excellent choice for this purpose.
Comprehensive List of Supplies for Your DIY Window Box Project
Gathering all your required tools and materials before commencing construction is a crucial step that will significantly streamline your project, ensuring a smooth, efficient, and enjoyable building experience. Here’s a detailed list to guide you:
- Pencil and Measuring Tape: Indispensable for all precise marking, measuring, and verification steps throughout the project.
- Electric Drill: Essential for quickly and efficiently creating pilot holes (to prevent wood splitting) and driving screws. A cordless model offers greater mobility and convenience.
- Screwdriver Bits: Ensure you have the correct bit types and sizes to match the heads of your chosen wood screws.
- Electric or Manual Saw: A circular saw or miter saw will yield the cleanest, most precise, and perfectly square cuts for your wooden boards. While a reliable handsaw can also be used, it demands more physical effort and a steady hand for accuracy.
- 1-inch Thick Boards: Select your preferred weather-resistant wood (cedar, redwood, pressure-treated pine, or composite lumber). You will need pieces for the front, back, two sides, and the bottom of your box. The total quantity and precise dimensions will be dictated by your specific window measurements.
- Medium-Grit Sandpaper: For thoroughly smoothing all rough edges, removing splinters, and preparing wood surfaces for optimal paint or stain adhesion. An orbital sander can significantly accelerate this task.
- 1.5-inch to 2-inch Exterior-Grade Wood Screws: It is absolutely critical that these screws are rust-resistant (e.g., stainless steel or galvanized) to ensure lasting structural integrity and prevent unsightly rust stains.
- High-Quality Potting Soil: Use a lightweight, premium potting mix specifically formulated for container gardening. Avoid heavy garden soil, which compacts easily and hinders root development and drainage in confined spaces.
- Your Preferred Plants: Choose flowers, herbs, or small vegetables that are well-suited to your local climate and the specific sunlight exposure of your window.
- *Optional but Highly Recommended Items:
- Exterior-Grade Paint or Wood Stain: To provide critical protection against the elements and enhance the aesthetic appeal of your window box.
- Weatherproof Sealant: An additional layer of sealant can further boost the durability and lifespan of your wooden box.
- Box Liner: Options include natural burlap, heavy-duty plastic sheeting (remember to punch additional drainage holes!), or durable landscape fabric. Liners help retain moisture and protect the wood.
- Heavy-Duty Mounting Brackets: Robust, weather-resistant brackets designed to securely support the substantial weight of a filled window box.
- Masonry Drill Bit: An absolute necessity if your home’s exterior is composed of brick, stone, or stucco, for drilling into these tough materials.
- Level Tool: To ensure your window box is perfectly horizontal during installation, for both aesthetic appeal and even watering.
Step-by-Step Instructions: Constructing Your Custom Window Box
1. Precise Measurement and Marking of Boards
Based on the meticulous window measurements you’ve taken, accurately determine the exact dimensions for each of the five components of your window box: the front piece, the back piece, two side pieces, and the bottom piece. It is essential to account for the actual thickness of the boards themselves when calculating the final length of the front and back pieces, especially if they are designed to overlap the side pieces for a cleaner finish.
- Front and Back Pieces: These will typically be the longest components of your box.
- Side Pieces: Their length will correspond to the desired overall depth of your finished window box.
- Bottom Piece: The length of the bottom piece should match the front/back pieces, and its width should correspond to the side pieces, ensuring a snug and secure fit within the assembled frame.
Utilize your pencil and measuring tape to clearly and precisely mark these exact lengths onto your chosen lumber.
2. Accurate Cutting and Wood Preparation
With your marks clearly visible, carefully use your electric or manual saw to cut along the marked lines. Prioritize straight, square cuts, as these are fundamental for a professional-looking and structurally sound window box. Once all pieces are cut, take the time to gently sand all edges and surfaces of the boards using medium-grit sandpaper. This vital step removes any splinters or rough spots, ensuring a smooth finish and, if you plan to paint or stain, creates an ideal surface for optimal adhesion.
3. Assembling the Main Box Frame
This is where your individual wood pieces begin to transform into a functional window box.
- Drill Pilot Holes: Before driving any screws, it is absolutely crucial to pre-drill pilot holes at every joint where screws will be inserted. Pilot holes prevent the wood from splitting, especially when working with denser woods or placing screws close to an edge. Select a drill bit that is slightly smaller in diameter than your chosen wood screws.
- Connect Sides to Front/Back: Begin by attaching the two side pieces to either the front or the back board, effectively forming a U-shaped structure. Ensure all edges are perfectly flush and square before securing them with your exterior-grade wood screws. Use a minimum of two screws per joint for robust strength.
- Complete the Rectangular Frame: Next, attach the remaining front or back board to close the loop and complete the sturdy rectangular frame of your window box. Double-check that all four corners are square using a carpenter’s square for precision.
4. Securing the Bottom and Integrating Essential Drainage
Once the four sides of your window box are securely assembled, it’s time to install the base and prepare for plant health.
- Attach the Bottom Board: Carefully position the bottom board, ensuring it fits snugly and is flush with the assembled sides. Screw the bottom board firmly into place, using multiple screws along all four edges to create a strong and stable base for your plants.
- Crucial Drainage Holes: This is a non-negotiable step for the vitality of your plants. Using your electric drill, create several drainage holes—ideally at least 5-7, each approximately 1/2 inch in diameter—evenly spaced across the entire bottom board. Adequate drainage prevents water from accumulating, which can lead to detrimental root rot and accelerate the decay of the wood itself.
5. Finishing Touches: Sanding, Painting, and Lining (Highly Recommended)
With the primary assembly complete, now is the perfect opportunity to enhance your window box’s durability, protect it from the elements, and elevate its aesthetic appeal.
- Final Smoothing: If any rough spots or minor imperfections resulted from the assembly process, give the entire box another light sanding to achieve a perfectly smooth finish.
- Apply Paint or Stain: If you’ve chosen to finish your box, apply a high-quality exterior-grade paint or wood stain. This step not only adds significant aesthetic appeal, allowing you to match or complement your home’s exterior, but critically provides an additional layer of protection against moisture, UV rays, and general wear and tear, substantially extending the lifespan of your window box. Always follow the manufacturer’s specific instructions for optimal application and drying times.
- Install a Liner: Before introducing any soil, consider lining your window box. Burlap is a breathable option that retains some soil while allowing natural aeration and drainage. Heavy-duty plastic sheeting, with carefully punched drainage holes, offers superior protection for the wood, particularly beneficial if using untreated lumber or aiming for maximum moisture retention. Durable landscape fabric is another excellent alternative.
6. Secure Installation: Expert Mounting of Your Window Box
Proper and secure installation is paramount for both safety and the long-term integrity of your window box, especially given the considerable weight it will hold once filled with soil and watered plants.
- Selecting Robust Brackets: Invest in heavy-duty, weather-resistant mounting brackets specifically designed for window boxes or heavy-duty shelving. Critically, ensure these brackets are rated to safely support the anticipated maximum weight of your fully planted and watered window box.
- Installation on Wood Siding: If your home features wood siding, the most stable and secure method is to mount the brackets directly into the wall studs. Utilize a reliable stud finder to accurately locate these structural elements behind your siding.
- Installation on Masonry (Brick, Stone, Stucco): For homes with brick, natural stone, or stucco exteriors, specialized tools and hardware are required. You will need a masonry drill bit and appropriate masonry anchors (e.g., expansion anchors or sleeve anchors) to securely affix the brackets. Always pre-drill pilot holes into the masonry before inserting the anchors.
- Ensuring Level Placement: Always use a level tool to ensure your window box is perfectly horizontal before making any permanent attachments. This not only contributes significantly to a polished, professional appearance but also ensures that water distributes evenly among your plants.
Filling Your Window Box: The Art and Science of Planting
With your beautifully crafted and securely installed window box now ready, it’s time for the most exciting phase: bringing it to vibrant life with carefully selected plants!
1. Choosing the Optimal Potting Mix
A common mistake is using heavy garden soil, which is entirely unsuitable for containers; it compacts easily, hindering root growth and proper drainage. Instead, opt for a high-quality, lightweight potting mix specifically formulated for container gardening. Look for mixes that boast excellent drainage, aeration, and sufficient moisture retention. At this stage, you might also consider incorporating a slow-release granular fertilizer to provide sustained nourishment for your plants.
2. The “Thriller, Filler, Spiller” Concept for Dynamic Designs
Designing a visually captivating window box often benefits from adhering to the popular “Thriller, Filler, Spiller” principle, which creates a balanced and dynamic arrangement:
- Thriller: This is a tall, dramatic plant positioned in the center or at the back of the box. Its purpose is to create a striking focal point and add essential vertical interest to your composition (e.g., ornamental grasses, cannas, upright fuchsias, coleus).
- Filler: Medium-height plants are used to fill in the space around the ‘thriller,’ providing lushness, volume, and continuity to the display (e.g., impatiens, petunias, dusty miller, smaller coleus varieties, begonias).
- Spiller: Trailing or vining plants are positioned at the edges of the box, cascading gracefully over the sides. These ‘spillers’ soften the harsh lines of the container and add an elegant, flowing dimension (e.g., ivy, sweet potato vine, calibrachoa, lobelia, creeping Jenny).
3. Aligning Plants with Sunlight Exposure and Watering Needs
The long-term success of your window box hinges critically on selecting plants that are compatible with the specific environmental conditions of your window’s location.
- Sunlight Analysis: Carefully observe how much direct sunlight your window receives throughout the day.
- Full Sun (6+ hours of direct sun): Ideal for sun-loving varieties such as geraniums, petunias, calibrachoa, portulaca, and many herbs like basil and rosemary.
- Partial Shade (3-6 hours of direct sun, often morning sun): Suitable for impatiens, fuchsias, coleus, begonias, and pansies.
- Full Shade (less than 3 hours of direct sun): Best for shade-tolerant plants like ferns, hostas, specific impatiens varieties (New Guinea impatiens), and ivy.
- Watering Compatibility: Always group plants that share similar watering requirements. Some plants prefer consistently moist soil, while others thrive when the soil is allowed to dry out slightly between waterings. Mismatching watering needs can lead to plant stress or death.
4. Popular Plant Choices for Stunning Window Boxes:
Consider these proven performers for your next window box creation:
- Vibrant Flowering Favorites: Geraniums, Petunias, Impatiens, Begonias, Marigolds, Pansies, Violas, Fuchsias, Lobelia, Calibrachoa, Vinca.
- Fragrant Edibles & Aromatics: Basil, Thyme, Rosemary, Mint, Chives, Parsley, various Lettuce varieties, Spinach, compact Cherry Tomatoes, and delicious Strawberries.
- Textural Foliage & Visual Interest: Coleus (in countless patterns), Dusty Miller, Sweet Potato Vine, Ivy, various Ferns, and ornamental Grasses.
5. Planting Procedure and Initial Aftercare
Fill your window box with the chosen potting mix, leaving approximately one to two inches of space from the top rim. Gently remove each plant from its nursery container, carefully loosen any circling roots, and artfully arrange them according to your “Thriller, Filler, Spiller” design or preferred aesthetic. Once you are satisfied with the arrangement, backfill around the plants with more potting mix, gently firming it down to eliminate air pockets. Immediately after planting, water thoroughly until you observe water draining from the bottom holes, ensuring the roots are well-hydrated.
Ongoing Maintenance for Thriving Window Boxes Throughout the Seasons
To ensure your window boxes remain a vibrant and spectacular display throughout the entire growing season, consistent and attentive care is absolutely essential.
- Diligent Watering: Due to their elevated position and limited soil volume, window boxes tend to dry out much more rapidly than traditional garden beds. Check the soil moisture daily, particularly during periods of hot, sunny, or windy weather. Always water deeply until excess water drains from the bottom. For added convenience, consider integrating self-watering inserts or a simple drip irrigation system.
- Regular Fertilizing: Most potting mixes provide nutrients for only a few weeks after planting. To sustain continuous growth and prolific blooming, begin fertilizing with a balanced liquid fertilizer every 2-4 weeks. Alternatively, use a slow-release granular fertilizer mixed into the soil at planting time, strictly adhering to the product’s instructions.
- Consistent Deadheading: Regularly remove spent or faded flowers (a process known as deadheading). This simple practice redirects the plant’s energy from seed production back into producing more blooms, encouraging continuous flowering and maintaining a tidy appearance.
- Strategic Pruning: Pinch back any leggy or overly long stems to promote bushier growth and encourage a greater profusion of flowers. This also helps maintain the desired shape and fullness of your window box display.
- Vigilant Pest and Disease Management: Routinely inspect your plants for any early signs of pests or diseases. Addressing any issues promptly with appropriate organic or chemical treatments can prevent widespread damage and keep your plants healthy.
- Thoughtful Winter Care: In colder climates, consider your winter strategy. Options include bringing tender plants indoors, protecting the window box with insulating materials, or emptying and storing the box in a sheltered location until spring. Some hardy perennial plants might successfully overwinter in the box with adequate protection.
Your Masterpiece Awaits!
Building a DIY window box is an incredibly satisfying and empowering project that allows you to imbue your home’s exterior with personalized beauty and a continuous burst of vibrant life. From the meticulous selection of durable materials to the artistic arrangement of diverse plants, each step offers a unique opportunity for creative expression and hands-on engagement. The beautiful result is more than just a planter; it’s a charming, custom-crafted addition that significantly enhances your home’s curb appeal, expresses your personal style, and provides endless gardening pleasure and pride.
If you embark on this rewarding project, we would absolutely love to see your incredible results! Please share photos of your handcrafted window boxes with our community by sending them directly to [email protected]. Happy building, and may your gardening be filled with joy and beauty!
Photo Credit: Flickr.com/photos/ms4denmark/514957000/