
Transforming Your Kitchen: The Ultimate Guide to DIY Stainless Steel Countertops
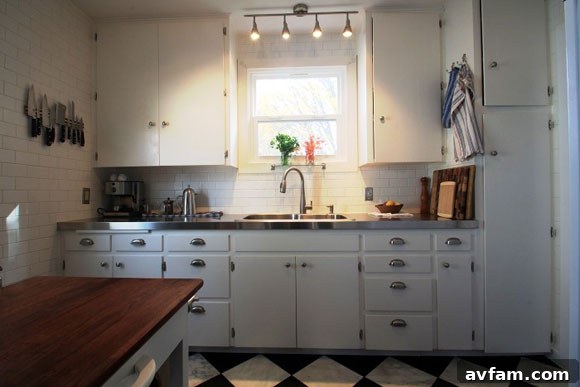
Embarking on a kitchen renovation can be one of the most rewarding home improvement projects, significantly enhancing both the aesthetics and functionality of your space. Among the myriad choices for countertops, stainless steel stands out as a material celebrated for its sleek, modern appeal, exceptional durability, and unparalleled hygiene. While often associated with professional kitchens and high-end design, the idea of installing stainless steel countertops might seem daunting, perhaps even beyond the realm of a typical do-it-yourself endeavor. However, as one inspiring homeowner story beautifully illustrates, creating stunning, professional-grade stainless steel countertops is not only achievable but also surprisingly cost-effective for the dedicated DIY enthusiast.
This comprehensive guide delves into the world of DIY stainless steel countertops, inspired by real homeowners who transformed their kitchen from ordinary to extraordinary. We’ll explore the myriad benefits of this versatile material, demystify the installation process, and provide invaluable insights to help you embark on your own kitchen upgrade journey.
Why Stainless Steel Countertops Are a Game Changer
Before diving into the DIY specifics, let’s understand why stainless steel is an increasingly popular choice for modern kitchens, both residential and commercial. Its advantages extend far beyond mere aesthetics:
- Unmatched Durability: Stainless steel is renowned for its strength and resilience. It resists dents, scratches (though it can show minor ones over time, contributing to a desirable patina), and general wear and tear, making it ideal for busy kitchens. It won’t chip, crack, or peel like some other materials.
- Exceptional Hygiene: One of the primary reasons professional chefs and healthcare facilities favor stainless steel is its non-porous surface. This means it doesn’t harbor bacteria, mold, or mildew, making it incredibly easy to clean and sanitize. A quick wipe-down with appropriate cleaners keeps your kitchen truly hygienic.
- Heat Resistance: Unlike laminate or certain solid surface countertops, stainless steel can withstand extremely high temperatures. You can place hot pots and pans directly on the surface without fear of scorching or damage, offering unparalleled convenience in a busy cooking environment.
- Stain Resistance: As its name suggests, stainless steel is highly resistant to stains from food, liquids, and common household chemicals. Spills can be wiped away easily without leaving lasting marks, maintaining the pristine look of your countertops for years.
- Modern Aesthetic Appeal: The sleek, reflective surface of stainless steel brings a contemporary, industrial-chic vibe to any kitchen. It complements a wide range of design styles, from minimalist modern to rustic farmhouse, adding a sophisticated touch that never goes out of style.
- Eco-Friendly Choice: Stainless steel is 100% recyclable, making it an environmentally responsible choice for your kitchen remodel. Its long lifespan also reduces the need for frequent replacements, further contributing to sustainability.
The Allure of DIY: Achieving Professional Results on a Budget
For many homeowners, the thought of upgrading countertops often comes with a hefty price tag. Custom-fabricated stainless steel countertops from a specialist can indeed be an expensive investment. However, the DIY route offers a compelling alternative, allowing you to achieve a luxurious look and superior functionality without breaking the bank. The story of the featured homeowners perfectly encapsulates this spirit of resourceful renovation.
These homeowners embarked on an ambitious do-it-yourself project, choosing stainless steel as their material of choice. Their journey wasn’t just about saving money; it was about the satisfaction of creating something beautiful and enduring with their own hands. They recognized the value of the material and wisely sought ways to integrate it into their home without the prohibitive costs typically associated with professional installation. This approach not only slashed expenses but also provided them with invaluable hands-on experience and a deeper connection to their newly transformed kitchen.
From Formica to Fabulous: Our Inspiring DIY Journey
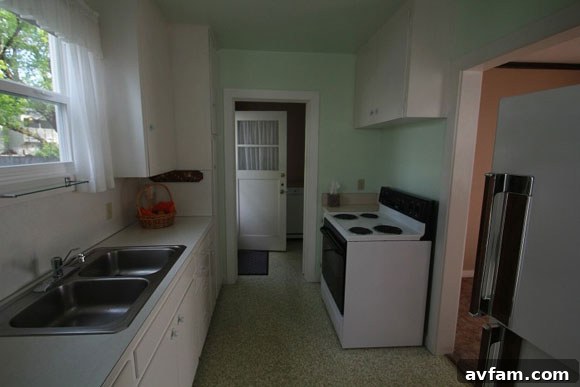
The transformation began with a common scenario: outdated Formica countertops that no longer suited the homeowners’ aesthetic or functional needs. While Formica served its purpose, it lacked the durability, heat resistance, and modern appeal they desired for their kitchen. The decision to upgrade to stainless steel was a bold one, promising a dramatic improvement in both form and function.
Their ingenious approach centered on a clever strategy: utilizing plywood as a robust and cost-effective base. This foundational layer would provide the necessary structural integrity and a smooth surface for the stainless steel. The most significant cost-saving measure came from purchasing the raw stainless steel sheets directly from a local sheet metal dealer. This direct-from-supplier approach bypassed retail markups, allowing them to acquire high-quality material at a fraction of the cost typically charged by custom fabricators. Incredibly, the total material cost for their entire countertop project came in at an astonishing $400, averaging out to approximately $20 per square foot – a price point virtually unheard of for stainless steel countertops.
While committed to the DIY spirit, they made a strategic decision to enlist professional help for one critical aspect: bending the metal. Stainless steel, especially in larger sheets, requires specialized equipment and expertise to achieve precise, crisp bends for edges and integrated backsplashes. This smart move ensured a professional finish on the visible edges, elevating the overall quality of their DIY project. Aside from this professional bending, every other aspect of the installation, from preparing the plywood base to securing the stainless steel, was meticulously handled by the homeowners themselves. The result? A stunning, professional-looking countertop system that not only looks fantastic but also delivers on the promise of stain-free, rust-proof, and incredibly durable surfaces, capable of withstanding hot pans and all types of spills with ease.
Planning Your DIY Stainless Steel Countertop Project
Success in any DIY project hinges on meticulous planning. For stainless steel countertops, this phase is particularly crucial.
Accurate Measurements and Design
Begin by precisely measuring your existing countertops or the dimensions of your new cabinet layout. Create a detailed drawing, noting all dimensions, sink cutouts, appliance clearances, and desired overhangs. Consider the gauge of stainless steel; typically, 16-gauge (thicker and more robust) or 18-gauge (more common and slightly lighter) are suitable for countertops. Decide on the finish – brushed (most common, hides scratches well), polished, or textured. Think about edge profiles: a simple bend is common, but you can explore integrated backsplashes or custom edge details if your professional bender can accommodate them.
Sourcing Materials: Smart Choices for Savings
As our inspiring homeowners demonstrated, where you buy your materials significantly impacts your budget.
- Plywood Base: Opt for high-quality, moisture-resistant plywood, such as marine-grade or exterior-grade, to ensure a stable and durable base. The thickness should be sufficient to support the stainless steel and provide a sturdy working surface, typically 3/4 inch.
- Stainless Steel Sheets: Contact local sheet metal fabricators, metal suppliers, or industrial steel distributors. Inquire about prices for 304-grade stainless steel sheets, which is the industry standard for kitchen applications due to its excellent corrosion resistance. Be clear about the dimensions and gauge you need.
- Adhesives and Fasteners: You’ll need a strong construction adhesive specifically designed for bonding metal to wood. Consider using stainless steel screws or rivets in discreet locations to further secure the metal, especially around edges or cutouts.
- Other Supplies: Don’t forget caulk (silicone-based, food-safe), sanding blocks, cleaning solutions, and polishing compounds.
Step-by-Step: Constructing Your Stainless Steel Countertops
With careful planning and materials in hand, you’re ready to start the build phase.
Building the Plywood Base
Your plywood base is the foundation of your new countertops. It must be perfectly level, rigid, and securely fastened to your cabinetry. Cut the plywood panels to match your counter dimensions, including any necessary cutouts for sinks or cooktops. Ensure all edges are smooth and clean. Secure the plywood to the top of your base cabinets using wood screws, ensuring they are flush or countersunk. Use shims if necessary to achieve a perfectly level surface. Fill any seams or screw holes with wood filler and sand smooth to prevent any imperfections from showing through the stainless steel.
Fabricating the Stainless Steel Sheets
This is where the professional bending aspect comes in. Provide your sheet metal dealer or fabricator with precise measurements and diagrams for each piece, clearly marking where bends, cutouts, and edge details are required. Emphasize the importance of accuracy. Once the metal is bent and cut to your specifications, carefully inspect each piece for any damage or imperfections before transport. Handle the sheets with care to avoid scratching the surface.
Attaching the Stainless Steel to the Base
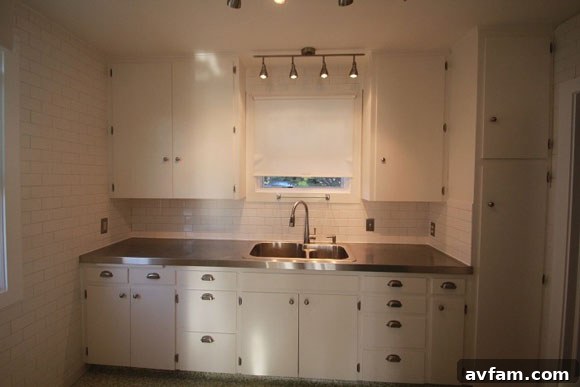
This is the moment of transformation. Apply a generous, even layer of construction adhesive to the top surface of your plywood base. Carefully position the stainless steel sheet onto the adhesive, ensuring it aligns perfectly with your base. Work slowly and methodically, as the adhesive sets quickly. Once in place, apply even pressure across the entire surface to ensure good adhesion. You can use clamps, weights, or even carefully walk across the surface (wearing clean shoes!) to help bond the metal to the plywood. Allow the adhesive to cure completely according to the manufacturer’s instructions.
Seaming and Finishing
If your design requires multiple sheets of stainless steel, pay close attention to the seams. While professional fabricators often weld seams for a truly seamless look, a DIY approach typically relies on precise fitting and a high-quality silicone caulk. Apply a thin bead of food-safe silicone caulk to the seam, smoothing it with a wet finger or a specialized tool for a clean, watertight finish. Finally, clean the entire surface of your new countertops with a stainless steel cleaner and polish to remove any fingerprints, smudges, or adhesive residue, revealing their full luster.
Essential Tools and Materials for Your Project
To ensure a smooth installation, gather these tools and materials:
- Measuring Tape and Straightedge: For accurate dimensions.
- Pencil/Marker: For marking cuts and layouts.
- Circular Saw or Jigsaw: For cutting plywood.
- Drill/Driver: For securing plywood to cabinets.
- Screws: Wood screws for plywood, potentially small stainless steel screws for securing metal edges if desired.
- Construction Adhesive: High-strength, metal-to-wood bonding adhesive.
- Caulking Gun and Silicone Caulk: Food-safe, mildew-resistant silicone for sealing seams and edges.
- Clamps and Weights: To ensure good adhesion during curing.
- Level: To ensure a perfectly flat base.
- Sanding Blocks/Paper: For smoothing plywood.
- Safety Gear: Gloves, safety glasses, ear protection.
- Cleaning Supplies: Stainless steel cleaner, microfiber cloths.
Overcoming Challenges and Expert Tips
While a DIY stainless steel countertop project is rewarding, it comes with its own set of challenges. Being aware of them can help you prepare:
- Accuracy is Key: Any measurement error in the plywood base or the metal fabrication will be highly visible. “Measure twice, cut once” is paramount here.
- Scratching: Stainless steel can scratch. While a brushed finish helps camouflage minor scratches over time, be extremely careful during installation. Keep protective film on the metal as long as possible.
- Weight: Large sheets of stainless steel can be heavy and unwieldy. Enlist help for handling and positioning.
- Bubbles/Imperfections: Ensure an even application of adhesive to prevent air bubbles or irregularities that could show through the metal.
- Cleanliness: Keep your workspace spotless. Dust or debris trapped between the plywood and stainless steel can create bumps.
Maintaining Your Stainless Steel Countertops
Once installed, caring for your new stainless steel countertops is straightforward. Regular cleaning with a mild soap and water solution or a specialized stainless steel cleaner will keep them gleaming. Always wipe in the direction of the grain to prevent streaking. Avoid abrasive scrubbers or harsh chemical cleaners that could damage the finish. For deeper cleaning or to remove minor scratches, specific stainless steel polishing compounds can be used periodically.
A Sustainable and Stylish Investment
Embarking on a DIY stainless steel countertop project is more than just a renovation; it’s an investment in the long-term beauty, functionality, and value of your home. The resilience and timeless appeal of stainless steel ensure that your kitchen will remain stylish and perform flawlessly for decades. By taking the DIY route, you not only save a substantial amount of money but also gain immense satisfaction from crafting a significant part of your home with your own hands. The journey from old Formica to gleaming stainless steel is a testament to what dedicated homeowners can achieve.
Inspired to take on this incredible home improvement project? For a detailed step-by-step tutorial and more insights from these pioneering homeowners, check out their full guide:
DIY Stainless Steel Countertop Installation Tutorial