
Ultimate Guide to Weatherizing Windows with Silicone Caulk: Seal Drafts & Save Energy
As the seasons make their inevitable shift, bringing colder temperatures in winter and scorching heat in summer, many homeowners begin to notice a familiar and unwelcome phenomenon: drafts. These subtle but persistent intruders can sneak through tiny cracks and gaps around your windows, making your home less comfortable and sending your energy bills soaring. Fortunately, there’s a highly effective, relatively simple, and budget-friendly solution to combat this issue: weatherizing your windows with 100% silicone caulk. This comprehensive guide will walk you through everything you need to know to effectively seal out drafts, enhance your home’s energy efficiency, and enjoy a more comfortable living environment year-round.
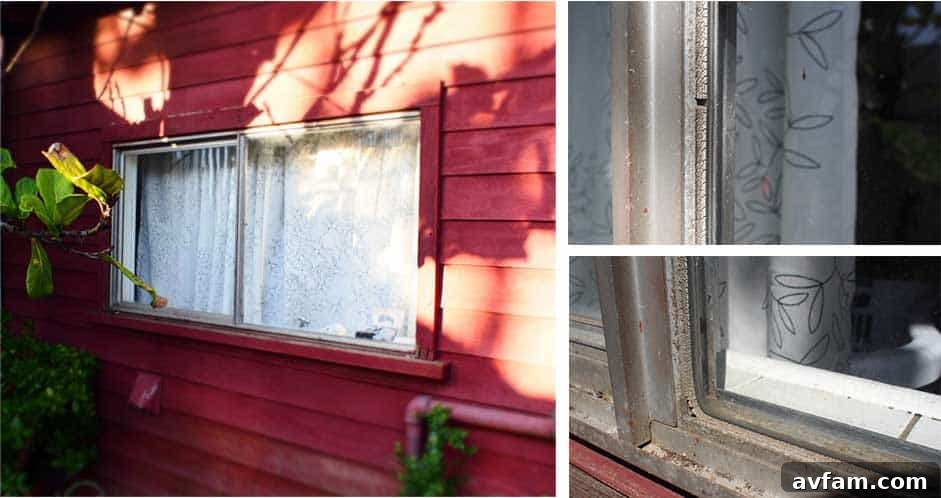
We’ve all experienced that chilling breeze near a window on a cold day, or felt the air conditioner working overtime trying to cool a room with warm air seeping in. Upon closer inspection, you might find that the existing weatherstripping or old caulk has become cracked, brittle, or pulled away from the window frame, creating perfect pathways for air leakage. The good news is that addressing these vulnerabilities with a high-quality silicone caulk is a straightforward DIY project that can yield significant results. You don’t need to be a seasoned contractor to achieve a professional-grade seal. Let’s delve into why window weatherization is so crucial for every home and how silicone caulk stands out as the ideal material for the job.
Why Window Weatherization is Essential for Every Home
Beyond just the immediate discomfort, drafty windows can have a profound impact on your home’s overall performance, your family’s comfort, and, significantly, your wallet. Understanding these multifaceted benefits can motivate you to tackle this important home improvement task, transforming a simple chore into a smart investment:
- Significant Energy Savings: Windows are notorious for being one of the primary sources of heat loss in winter and heat gain in summer. Studies show that a substantial portion—up to 25-30%—of a home’s heating and cooling energy can be lost through inefficient windows and their surrounding gaps. By effectively sealing these leaks with caulk, you drastically reduce the workload on your heating, ventilation, and air conditioning (HVAC) system. This directly translates to lower energy bills and a smaller carbon footprint, making your home both more economical and environmentally friendly.
- Enhanced Home Comfort: Eliminating drafts creates a more consistent and comfortable indoor temperature throughout your home. No more encountering unwelcome cold spots near windows during the chilly winter months, nor struggling to keep certain areas cool in the blistering summer heat. This uniformity makes your living spaces more enjoyable, functional, and inviting for everyone.
- Improved Indoor Air Quality: Sealing gaps doesn’t just block air; it also prevents dust, pollen, and other outdoor allergens from infiltrating your home. This can significantly improve the air quality inside, which is especially beneficial for individuals with allergies, asthma, or other respiratory sensitivities. A tighter home envelope means fewer airborne irritants circulating indoors.
- Noise Reduction: Caulk acts as an effective barrier not only against air but also against sound. Sealing your windows can help dampen exterior noise from traffic, loud neighbors, construction, or other environmental disturbances. The result is a quieter, more peaceful, and serene home environment, contributing positively to your relaxation and productivity.
- Pest Control: Small, unsealed gaps around windows are inviting entry points for various pests, including insects, spiders, and even small rodents. A properly sealed window denies these unwelcome guests easy access to your home, helping to maintain a cleaner and more hygienic living space without the need for harsh chemicals.
- Moisture Protection: Unsealed gaps can allow moisture, such as rain or melting snow, to penetrate the structure, leading to potential issues like mold growth, mildew, and wood rot in window frames or wall cavities. Silicone caulk provides a robust, waterproof seal, protecting your home’s valuable structure from water damage, which can be costly and challenging to remediate.
- Increased Window Longevity: By diligently protecting the window frames and surrounding structures from direct exposure to harsh weather elements, moisture, and UV degradation, you can significantly extend the lifespan of your windows. This preventative maintenance helps to prevent premature deterioration, saving you money on costly repairs or replacements down the line.
Understanding the Culprits: Where Do Window Drafts Originate?
Before you grab your caulk gun and start sealing, it’s incredibly helpful to understand precisely where drafts commonly originate. While a modern window unit itself might be highly energy-efficient, the installation quality or the aging components around it can still create significant air leaks that undermine its performance:
- Between the Window Frame and the Wall: This is arguably one of the most prevalent areas for air leakage. Over time, houses naturally settle, and building materials expand and contract with fluctuations in temperature and humidity. This dynamic movement can lead to the formation of gaps between the stationary window frame and the exterior siding or interior drywall, creating direct pathways for drafts.
- Around Operating Parts of the Window: For operable windows (those that open, such as double-hung, casement, or sliding windows), drafts can often occur where the sashes meet the frame when the window is closed. While factory-installed weatherstripping is specifically designed to prevent this, it can degrade, compress, or become dislodged over time.
- Cracked or Deteriorated Weatherstripping: As highlighted in our initial observation, the weatherstripping—the flexible material designed to create a tight seal between the movable parts of a window when closed—is highly susceptible to wear and tear. Constant compression, exposure to harsh UV rays, and extreme temperature fluctuations can cause it to become brittle, cracked, or pull away from its intended position, directly compromising its sealing capability.
- Faulty Window Panes or Glazing: Less common, but sometimes the seal around the glass pane itself can fail, leading to drafts or, in the case of double-paned windows, moisture accumulation between the glass layers. It’s important to note that caulk is not an effective solution for these types of failures; professional window repair or full replacement is usually necessary.
- Through Old Putty or Glazing Compound: Older windows often utilize glazing putty or compound to seal the glass panes directly to the window frame. Over decades, this putty can dry out, crack, crumble, and fall out, creating direct air leaks around the glass and compromising the window’s integrity.
Why 100% Silicone Caulk is Your Best Bet for Window Weatherization
When it comes to sealing exterior gaps around windows, not all caulks are created equal. While a variety of caulk types exist on the market, 100% silicone caulk stands out as the unequivocally superior choice, particularly for outdoor applications and areas directly exposed to the relentless elements. Our recommendation, similar to the original content, strongly leans towards reputable brands like GE 100% Silicone, known for its consistent quality and proven, long-term performance.
Here’s a detailed breakdown of why silicone caulk is the optimal material for effectively weatherizing your windows and ensuring a lasting seal:
- Exceptional Durability and Flexibility: Unlike cheaper alternatives such as acrylic latex caulks that tend to dry out, shrink, and crack over a relatively short period, silicone caulk maintains an incredible degree of flexibility for years. This inherent elasticity is crucial as it allows the caulk bead to expand and contract harmoniously with the natural movement of your house and window frames. Buildings are constantly shifting due to settling, and materials react to temperature fluctuations. Silicone’s flexibility ensures it can accommodate these movements without losing its protective seal, resisting cracking, crumbling, and peeling for many years.
- Superior Weather Resistance: One of silicone caulk’s most significant advantages is its inherent resistance to virtually all forms of harsh weather. It is completely waterproof, making it impenetrable to rain, snow, and ice. Furthermore, it can withstand extreme heat and freezing temperatures without degrading, and it is highly resistant to direct sunlight (UV rays), which often causes other caulks to break down and lose effectiveness prematurely. This makes it an ideal choice for any exterior window application.
- Excellent Adhesion Properties: Silicone caulk is engineered to adhere strongly and reliably to a wide variety of common building materials typically found around windows. These include glass, wood (painted or unpainted), vinyl, aluminum, fiberglass, and various masonry surfaces like brick and stone. Once properly cured, it forms a robust, long-lasting bond that won’t easily detach.
- Mold and Mildew Resistant: Many high-quality silicone caulks are specifically formulated with powerful additives that inhibit the growth of unsightly and unhealthy mold and mildew. This is particularly beneficial in damp or humid environments, ensuring the caulk maintains a clean, aesthetically pleasing, and healthy appearance over its lifespan.
- Unmatched Longevity: While other types of caulk might require reapplication every few years to maintain their integrity, a properly applied 100% silicone caulk can impressively last for 10-20 years, or even longer, depending on environmental factors and application quality. This superior long-term performance translates into excellent value and less frequent maintenance for homeowners.
- Creates a Truly Waterproof Seal: The primary function of exterior caulk is to prevent water infiltration. Silicone caulk excels at this, forming an impenetrable, watertight barrier that effectively keeps moisture out. This protection is vital for safeguarding your window frames, sills, and the underlying wall structure from potential water damage, which can lead to costly repairs and structural issues.
Step-by-Step Guide: Weatherizing Your Windows with Silicone Caulk
Now that you fully understand the critical “why” behind window weatherization and the benefits of choosing silicone caulk, let’s move on to the practical “how.” Follow these detailed steps meticulously to effectively seal your windows and transform your home into a more energy-efficient and comfortable sanctuary.
1. Gather Your Tools and Materials
Having all the necessary equipment ready and within reach before you commence will make the entire process much smoother, safer, and more efficient. Here’s a comprehensive list of what you’ll need:
- 100% Silicone Caulk: Crucially, select a high-quality, reputable brand explicitly labeled for exterior use. Common choices include clear (which blends with any surface) or colors matched to your window trim or siding.
- Caulk Gun: A standard caulk gun will suffice, but consider investing in a drip-free model for easier and cleaner application, especially if you’re new to caulking.
- Utility Knife or Razor Blade: Essential for precisely cutting open the caulk tube nozzle and for the delicate but necessary task of scoring and removing old caulk.
- Caulk Removal Tools: A specialized caulk removal tool, a sturdy putty knife, or a flathead screwdriver can be invaluable for scraping away stubborn, old caulk.
- Wire Brush or Stiff Bristle Brush: Useful for cleaning rough surfaces, removing loose paint flakes, and dislodging stubborn debris.
- Cleaning Supplies: A supply of clean rags, a bucket of warm water mixed with mild detergent, rubbing alcohol or mineral spirits (for dissolving stubborn caulk residue or grease), and plenty of dry cloths.
- Painter’s Tape (Optional but Highly Recommended): For creating impeccably crisp, clean caulk lines, especially beneficial for those seeking a professional finish or beginners wanting a guide.
- Drop Cloths or Tarps: To protect the ground, landscaping, or nearby interior surfaces from accidental caulk drips, falling debris, or cleaning solutions.
- Gloves: Silicone caulk can be quite sticky and messy; wearing gloves will protect your hands and simplify cleanup.
- Safety Glasses: Always recommended when using sharp tools, especially when prying or scraping, or when working overhead.
2. Prepare the Window Area: Clean, Inspect, and Remove Old Caulk
This phase is arguably the most critical step in the entire weatherization process. The longevity, adhesion, and effectiveness of your new caulk depend entirely on a clean, dry, and properly prepared surface. Skipping or rushing this step will almost certainly lead to premature caulk failure.
- Thoroughly Clean the Window and Surrounding Frame: Begin by washing the window glass, the entire frame, and the adjacent siding or wall area with a solution of soap and water. This removes surface dirt, dust, spiderwebs, and grime. Allow the area to dry completely before proceeding.
- Remove All Existing Old Caulk: This step is non-negotiable. If you apply new caulk over old, failing caulk, the new caulk will only be as strong as the weak adhesion of the old material underneath.
- For Dry, Brittle, or Loose Caulk: Use a utility knife or razor blade to carefully slice along both edges of the old caulk bead. Once scored, use a putty knife or a flathead screwdriver to gently pry it away from the surface. Work slowly and methodically to avoid inadvertently damaging the window frame, siding, or paint.
- For Stubborn or Firmly Adhered Caulk: A specialized caulk removal tool can be highly effective. These tools are designed to scrape and pull away old caulk efficiently. For truly stubborn, aged silicone, you might consider using a chemical caulk remover. Always test such products in an inconspicuous area first to ensure they don’t damage the underlying surface, and rigorously follow the manufacturer’s instructions for safe use.
- Scrape and Brush Away Any Residue: After removing the bulk of the old caulk, use a wire brush or a stiff-bristled brush to vigorously scrape away any remaining small pieces, loose paint flakes, or embedded debris. The surface where the new caulk will be applied must be as smooth and free of any irregularities as possible.
- Final Surface Cleaning and Drying: Wipe down the entire area where caulk will be applied with a clean rag dampened with rubbing alcohol or mineral spirits. This crucial step removes any lingering grease, oil, or invisible caulk residue that could compromise adhesion. It’s imperative that the surface is completely dry before you apply new caulk. Silicone caulk, like most adhesives, will not adhere properly to a wet, dusty, or greasy surface.
- Inspect for Underlying Gaps and Damage: As you clean and prepare, take the opportunity to carefully inspect all areas around the window. Look for any structural damage to the window frame itself, loose panes, or excessively large gaps (wider than approximately 1/4 inch) that might require the insertion of a backer rod before caulking. Address any significant damage or structural issues before applying caulk, as caulk is a sealant, not a structural repair material.
3. Mask the Area (Optional but Recommended for a Professional Finish)
For those aiming for crisp, perfectly straight caulk lines, especially if you’re not an experienced caulker, painter’s tape can be an invaluable ally:
- Apply painter’s tape parallel to the gap where you intend to apply the caulk. Place one strip of tape precisely on the window frame and another strip on the adjacent wall or siding, ensuring you leave the desired width of the caulk bead exposed between the two strips.
- Ensure the tape is pressed down very firmly along its edges to prevent any caulk from seeping underneath, which would defeat the purpose of masking.
4. Apply the Silicone Caulk
With the area meticulously prepared and any masking applied, it’s time for the main event: applying the silicone caulk.
- Prepare the Caulk Tube: Using your utility knife, carefully cut the tip of the caulk tube’s nozzle at a 45-degree angle. The size of the opening should ideally match the width of the gap you intend to fill. For most standard window gaps, a small-to-medium opening (approximately 1/8 to 1/4 inch) is usually appropriate. After cutting, use the long metal rod typically found on most caulk guns to puncture the inner foil seal of the tube.
- Load the Caulk Gun: Insert the prepared caulk tube into the caulk gun, ensuring it’s seated firmly. Push the plunger rod firmly against the back of the tube until it engages.
- Apply a Consistent Bead: Position the very tip of the nozzle at the beginning of the gap you wish to seal. Apply steady, even pressure to the caulk gun’s trigger while smoothly and continuously drawing the gun along the entire length of the gap.
- Optimal Technique: It is generally more effective and ensures better penetration to “push” the caulk into the joint rather than “pull” the gun, as this forces the caulk deeper into the gap, promoting superior adhesion. Strive to maintain a consistent speed and angle to create an even, uniform bead.
- Target Areas: Concentrate your efforts on sealing the perimeter of the stationary window frame where it meets the exterior wall or siding. Additionally, address any areas where weatherstripping was visibly compromised and could benefit from an supplementary seal (though remember, caulk is a sealant, not a primary replacement for damaged integral weatherstripping).
- Avoid Breaks: Wherever possible, try to apply the caulk in one continuous motion for each section of the window. This minimizes unsightly breaks, overlaps, or start-and-stop points that can compromise the seal’s appearance and effectiveness.
- Don’t Overfill the Gap: Apply enough caulk to fully fill the gap and create a solid seal, but avoid excessive overfilling. Too much caulk can lead to a messy, unprofessional appearance and can be harder to tool smoothly.
5. Tool the Caulk for a Smooth Finish
Tooling the caulk immediately after application is a crucial step that helps create a professional, smooth, and watertight seal, as well as pushing the caulk firmly into the joint for maximum adhesion.
- Use a Caulk Tool or Gloved Finger: Lightly drag a specialized caulk tooling tool or a gloved finger (which can be slightly dampened with a bit of water or mineral spirits for silicone to prevent sticking) along the freshly applied caulk bead. This action effectively pushes the caulk fully into the joint, removes any excess material, and creates a neat, aesthetically pleasing concave surface.
- Wipe Away Excess: Keep a clean, damp rag handy to promptly wipe away any excess caulk from your tooling tool or finger as you work. Change rags frequently to prevent spreading excess caulk.
- Remove Painter’s Tape (If Used): If you opted to use painter’s tape for cleaner lines, carefully peel it away immediately after tooling the caulk, while the caulk is still wet and pliable. Pull the tape at a 45-degree angle away from the freshly applied caulk bead. Waiting until the caulk fully cures can result in a jagged edge or, worse, pull up the fresh caulk, ruining your effort.
6. Allow for Proper Curing
Silicone caulk, like all sealants, requires a specific amount of time to cure completely and achieve its full strength and durability. Always refer to the manufacturer’s instructions printed on the caulk tube for specific drying and curing times, as these can vary by product and environmental conditions. Generally:
- Touch Dry: Silicone caulk typically becomes touch-dry (meaning it won’t smudge if lightly touched) within 30 minutes to a few hours after application.
- Full Cure: However, full curing, where the caulk reaches its maximum hardness, flexibility, and waterproofing properties, can take anywhere from 24 hours to several days. This duration depends heavily on ambient temperature, humidity levels, and the thickness of the caulk bead.
- Protection from Moisture: During the initial curing period, it is advisable to protect the newly caulked areas from direct exposure to rain or heavy moisture if at all possible, to ensure optimal bonding and curing.
Common Mistakes to Avoid When Caulking Windows
To ensure your window weatherization project is successful, long-lasting, and truly enhances your home, it’s crucial to be aware of and actively avoid these common pitfalls that often lead to premature failure:
- Skipping Surface Preparation: Applying caulk over dirt, dust, old caulk residue, peeling paint, or a wet surface is the single most common and detrimental mistake. This invariably leads to poor adhesion and premature caulk failure. Cleanliness and dryness of the substrate are absolutely paramount for a durable seal.
- Using the Wrong Type of Caulk: Utilizing an interior-grade acrylic latex caulk for exterior windows will result in rapid degradation, cracking, and failure due to its inability to withstand harsh UV exposure, extreme temperature fluctuations, and moisture. Always, without exception, opt for 100% silicone specifically formulated for exterior applications.
- Cutting the Nozzle Incorrectly: A nozzle hole that’s cut too small will make it difficult to adequately fill the gap, requiring excessive effort. Conversely, a hole that’s too large leads to excessive waste, a messy application, and an unprofessional finish. Aim for a size that closely matches the width of the gap you are sealing.
- Applying Too Much or Too Little Caulk: Applying an excessive amount of caulk not only creates a bulky, unprofessional appearance but also wastes valuable material. Conversely, applying too little caulk will not provide a sufficient or effective seal against drafts and moisture. Strive for a consistent, full bead that fills the joint without overflowing.
- Not Tooling the Caulk: Tooling isn’t merely for aesthetics; it plays a critical role in the caulk’s performance. Tooling helps to fully embed the caulk into the joint, ensuring maximum adhesion to both surfaces, pushing out any trapped air, and creating a smooth, sloped surface that sheds water effectively.
- Ignoring Safety Precautions: Always prioritize safety. Wear protective gloves to keep caulk off your skin and safety glasses to protect your eyes, especially when using sharp tools like utility knives or when scraping old, brittle materials.
- Working in Extreme Temperatures: Most caulk products have an optimal application temperature range (always check the product label). Applying caulk in very cold or excessively hot weather can significantly affect its initial adhesion, workability, and proper curing, potentially compromising the long-term seal.
When to Call a Professional
While sealing drafts with silicone caulk is an excellent and accessible DIY project for most homeowners, there are specific instances where consulting or hiring a professional might be necessary or highly advisable. Knowing your limits can save you time, money, and potential headaches:
- Extensive Window Damage: If, upon inspection, you discover significant rot in the window frame, broken glass panes (especially if they are sealed double-paned units), or major structural issues with the window unit itself, caulk alone will not be sufficient. These problems require professional repair, glass replacement, or even a full window replacement to address the underlying structural integrity.
- Lead Paint Concerns: If your home was constructed before 1978, there is a significant risk that lead-based paint was used. Disturbing old caulk or paint during the removal process can release hazardous lead dust. In such cases, it is imperative and safest to consult with a lead-safe certified professional who has the specialized training and equipment to handle such materials safely and legally.
- Complex or Historical Architectural Windows: Homes with intricate or historical window designs, or those with unique architectural features, might require specialized techniques, materials, and a nuanced understanding of preservation. These types of projects are best entrusted to experienced professionals who specialize in historical restoration or complex window installations.
- If You’re Uncomfortable or Lack Confidence: If you are genuinely uncomfortable with performing the task yourself, lack confidence in your DIY skills, or need to work on windows that are difficult to access (e.g., very high up on a multi-story home, requiring specialized ladders or scaffolding), do not hesitate to call a professional. Safety should always be your paramount concern, and professionals have the tools, expertise, and insurance to handle challenging situations safely.
Conclusion: Enjoy a More Comfortable and Energy-Efficient Home
Weatherizing your windows with high-quality 100% silicone caulk is a powerful, highly cost-effective, and remarkably impactful way to significantly improve your home’s energy efficiency, enhance indoor comfort, and contribute to the overall longevity of your property. By meticulously following these detailed steps—from thorough preparation and selecting the right, durable materials, to proper application techniques and diligent finishing—you can effectively seal out those pesky drafts, dramatically reduce your energy consumption, and enjoy a quieter, more consistently comfortable living space throughout every season of the year.
Don’t let cracked weatherstripping and invisible gaps continue to drain your hard-earned energy budget and compromise your family’s comfort. Take proactive control of your home’s thermal envelope today. For more in-depth instructions and visual guides on transforming your drafty windows into energy-efficient assets, be sure to check out this comprehensive guide on weatherizing your windows and start saving on your utility bills immediately.