
Ultimate Guide to Unclogging Drains: DIY Solutions, Prevention & Expert Tips
A clogged drain is more than just an inconvenience; it’s a frustrating, often unsightly, and potentially costly plumbing issue. The gurgling sounds, slow drainage, or complete standstill of water can disrupt your daily routine and, if left unaddressed, can lead to unpleasant odors, bacterial buildup, and even significant damage to your plumbing system. While the thought of tackling a clog might seem daunting, many common blockages can be resolved with simple, effective DIY methods before you need to call a professional plumber. This comprehensive guide will walk you through various techniques, from powerful chemical solutions to eco-friendly alternatives, along with crucial safety advice and preventative strategies to keep your drains flowing freely.
Before diving into specific solutions, it’s incredibly helpful to try and identify the likely culprit behind your clog. Understanding the composition of the blockage will guide you toward the most effective and safest method for resolution. For instance, a bathroom sink or shower drain is typically plagued by a combination of hair and soap scum, often intertwined with dental floss or small debris. Kitchen sinks, on the other hand, are common victims of grease buildup, food particles, and coffee grounds. Knowing your enemy is the first step to conquering it.
Understanding Your Clog: The Key to Effective Unclogging
Successfully clearing a drain often begins with a detective’s approach. By understanding what typically causes clogs in different areas of your home, you can better select the appropriate tools and methods:
- Bathroom Drains (Sinks, Showers, Tubs): The primary culprits here are almost always hair, soap scum, and often a mix of both. Hair traps shampoo and conditioner residue, forming sticky masses that adhere to pipe walls. Dental floss and small items like contact lenses or bits of toothpaste caps can also contribute significantly to these blockages.
- Kitchen Drains (Sinks): Kitchen clogs are notoriously greasy. Cooking fats, oils, and grease solidify as they cool in your pipes, creating sticky obstructions that trap food particles, coffee grounds, and other debris. Starchy foods like pasta or rice, when washed down the drain, can also swell and contribute to blockages.
- Utility Sinks and Other Drains: These can be a mixed bag, often accumulating dirt, sediment, pet hair, or other specific items depending on their use.
Attempting to clear a grease clog with a hair-dissolving chemical might be less effective, just as a plunger might struggle with a hardened mineral deposit. A quick assessment can save you time, effort, and prevent potential damage to your pipes.
Effective DIY Drain Unclogging Methods
Here are several proven methods you can try at home, ranging from simple tools to more potent solutions.
1. The Potent Power of Insta-Flo Drain Cleaner
For those seeking a powerful solution, chemical drain cleaners can be highly effective, but they must be used with extreme caution. Among these, products like Insta-Flo stand out due to their unique crystalline composition and efficacy. If you’re looking for something that tackles tough clogs, including grease, this type of product might be your answer.
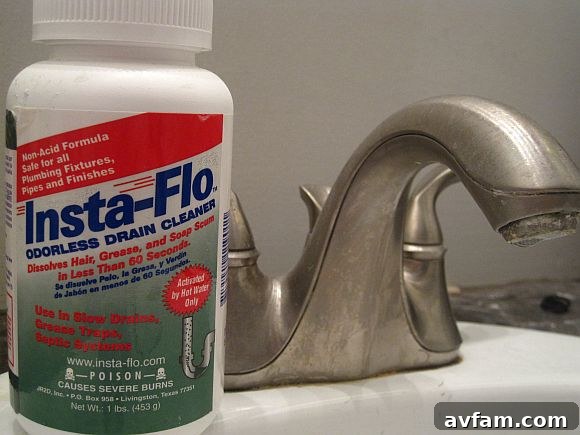
Insta-Flo is composed of non-acidic crystals that are activated by hot water, generating a significant amount of heat to dissolve organic matter. It’s often recommended by hardware store owners for its ability to clear a wide variety of clogs, from hair and soap scum in bathrooms to stubborn grease in kitchen sinks.
How to Use Insta-Flo for Optimal Results:
- Prepare the Drain: First, ensure the drain is clear of standing water. If there is standing water, try to remove as much as possible. Then, flush the drain with hot water for about a minute. This warms the pipes and helps activate the crystals more effectively.
- Add the Crystals: Carefully measure approximately one cup of Insta-Flo crystals and slowly pour them directly into the drain opening. Avoid splashing.
- Allow to Sit: Let the crystals sit in the drain for about 30 seconds. This brief pause allows them to settle and begin their initial reaction.
- Activate with Hot Water: After 30 seconds, slowly add more hot water to the drain. You’ll hear popping and fizzing sounds as the crystals dissolve and react, indicating the solution is working its way down to the clog. Continue adding hot water until the fizzing subsides and the water starts to drain freely.
- Flush Thoroughly: Once the clog is cleared, flush the drain with plenty of hot water for several minutes to ensure all remaining crystals and dissolved debris are completely rinsed away from your pipes.
Beyond Clogs: Insta-Flo for Maintenance
One notable benefit of Insta-Flo is its versatility; it’s not just for active clogs. Its grease-dissolving properties make it excellent for kitchen sinks, preventing the accumulation of fats and oils that often lead to blockages. Moreover, you can incorporate Insta-Flo into a monthly drain maintenance routine. Using a smaller amount (e.g., half a cup) once a month can help keep your pipes clean and significantly reduce the likelihood of future clogs, saving you from recurring headaches.
Crucial Safety Precautions for Chemical Drain Cleaners:
While highly effective, products like Insta-Flo are potent and can be dangerous if not handled properly. Always prioritize safety:
- Read Instructions Carefully: Always follow the manufacturer’s instructions on the product label.
- Wear Protective Gear: Absolutely essential. Wear sturdy rubber gloves to protect your hands and safety glasses or goggles to shield your eyes from splashes. Consider a mask to avoid inhaling dust from the crystals.
- Ensure Ventilation: Work in a well-ventilated area. Open windows and turn on exhaust fans to prevent the buildup of fumes.
- Never Mix Chemicals: Do NOT mix Insta-Flo or any other chemical drain cleaner with other cleaning products, especially bleach or ammonia. Mixing can create toxic fumes or dangerous chemical reactions.
- Avoid Use in Standing Water: While some chemical cleaners are designed for standing water, it’s generally safer to remove as much standing water as possible before adding the chemical, as this reduces the risk of splash-back.
- Keep Out of Reach: Store chemical drain cleaners securely, out of reach of children and pets.
- Know Your Pipes: Avoid using harsh chemical cleaners on old, corroded, or fragile pipes, or if you have a septic system, as they can cause damage or disrupt the septic tank’s bacterial balance.
- Do Not Use After Other Cleaners: If you’ve already tried another chemical drain cleaner without success, do not immediately follow up with Insta-Flo. Wait several hours, or even a day, and flush with plenty of water before trying a different product or method, to prevent dangerous chemical reactions.
Handle with care, and you’ll find Insta-Flo to be a powerful ally in maintaining clear drains.
2. The Trusty Plunger Technique
The humble plunger is a classic, non-chemical solution for many clogs, especially those closer to the drain opening. It works by creating a vacuum and using hydraulic pressure to dislodge blockages.
How to Effectively Use a Plunger:
- Choose the Right Plunger: There are two main types: cup plungers (flat-bottomed, ideal for sinks) and flange plungers (with an extended flange, best for toilets). For most sink and tub drains, a good quality cup plunger will suffice.
- Prepare the Plunger: For an optimal seal, consider coating the rubber lip of the plunger with a thin layer of petroleum jelly. This helps create a tighter suction against the drain opening.
- Fill with Water: Fill the sink or tub with enough water to completely cover the rubber head of the plunger. The water itself helps create a more effective seal and transmits the plunging force to the clog. If your sink has an overflow drain, plug it with a wet rag to maximize suction.
- Position and Plunge: Place the plunger squarely over the drain opening, ensuring a tight seal. Push down firmly to expel air, then pull up sharply to create suction. Repeat this push-and-pull motion rapidly for about 10-20 seconds.
- Check and Repeat: Remove the plunger quickly to check if the water begins to drain. If it’s still clogged, reposition the plunger and repeat the process several times. Persistence is key with a plunger.
A plunger is often most effective on blockages like hair and soap scum in bathrooms or food particles in kitchens. It might not be enough for hardened grease or deeper, more severe clogs.
3. Eco-Friendly Power: Vinegar and Baking Soda
If you prefer a natural, chemical-free, and environmentally friendly approach, the classic combination of baking soda and vinegar can often tackle minor to moderate clogs and freshen up your drains.
How to Use Vinegar and Baking Soda:
- Clear Standing Water: Remove any standing water from the sink or tub.
- Pre-Treat with Hot Water: Pour a kettle of hot (but not boiling) water down the drain. This helps to loosen some of the initial gunk.
- Add Baking Soda: Pour one cup of baking soda directly into the drain. If the drain is partially clogged, you might need to use a spoon or spatula to push it past the opening.
- Follow with Vinegar: Immediately follow the baking soda with one cup of white vinegar. The mixture will begin to fizz and foam vigorously as the baking soda (a base) reacts with the vinegar (an acid), producing carbon dioxide gas. This foaming action can help dislodge and break down clogs.
- Let it Sit: Allow the solution to sit and work its magic for at least 20-30 minutes, or even longer (up to an hour) for tougher clogs. You can cover the drain with a stopper during this time to enhance the pressure.
- Flush with Hot Water: After the waiting period, flush the drain thoroughly with plenty of hot water to rinse away the dissolved clog and the remaining solution.
This method is excellent for light clogs, general drain freshening, and as a preventative measure. It’s safe for all types of pipes and septic systems, but it may not be powerful enough for very severe or stubborn blockages.
4. The Drain Snake (Auger)
For clogs that are deeper in the pipe or resistant to plungers and chemical solutions, a drain snake (also known as a drain auger or plumbing snake) can be an invaluable tool. This mechanical device is a long, flexible metal cable with a small auger or hook at the end, designed to be threaded into the drain to either pull out the obstruction or break it apart.
How to Use a Drain Snake Safely:
- Prepare the Area: Lay down old towels or newspapers to catch any water or debris that might come out of the drain. Wear gloves.
- Access the Drain: For sinks, you might need to remove the stopper. For tubs, sometimes the overflow plate needs to be unscrewed to feed the snake directly into the main drainpipe.
- Feed the Snake: Slowly feed the end of the snake into the drain opening. When you feel resistance, you’ve likely hit the clog.
- Clear the Clog: Once you hit the clog, gently rotate the snake handle. This action helps the auger tip to either latch onto the clog (especially good for hairballs) or break it into smaller, manageable pieces. Avoid forcing it too aggressively, as this could potentially damage your pipes.
- Extract or Flush: Once you feel the clog give way, carefully pull the snake back out, hopefully bringing the obstruction with it. If you believe you’ve broken it apart, flush the drain with hot water to ensure everything clears.
- Clean Up: Clean the snake thoroughly after use and disinfect any tools and the affected area.
Drain snakes come in various lengths and types, from inexpensive handheld models for minor clogs to more robust drum augers for deeper issues. They are particularly effective against hair and fibrous clogs.
5. Manual Removal (P-Trap Cleaning)
Sometimes, the clog is located right within the P-trap – the U-shaped pipe directly beneath your sink. This section of piping is designed to hold water and prevent sewer gases from entering your home, but it’s also a common collection point for debris.
Cleaning the P-Trap:
- Prepare: Place a bucket or old container directly underneath the P-trap to catch any water or debris that will fall out.
- Loosen Connections: Use a wrench or pliers to carefully loosen the slip nuts on both sides of the P-trap. If they are plastic, they might be hand-tight.
- Remove the Trap: Gently remove the U-shaped section of pipe. Be prepared for water to spill out.
- Clear the Clog: Manually remove any visible hair, grease, or debris from inside the P-trap. You might need a wire brush or a small tool to scrape the inside clean.
- Reassemble: Reattach the P-trap, making sure the slip nuts are tightened securely but not over-tightened (especially with plastic pipes).
- Test: Turn on the water slowly to check for leaks and ensure the drain is flowing freely.
This method is highly effective for localized clogs and avoids chemicals altogether, making it a safe choice for most plumbing systems.
Preventative Maintenance: Keep Your Drains Flowing Smoothly
The best way to deal with a clogged drain is to prevent it from happening in the first place. Incorporating a few simple habits into your routine can save you a lot of hassle and expense.
- Use Drain Strainers: Place drain screens or strainers over all your kitchen and bathroom drains. These inexpensive devices catch hair, soap scum, food particles, and other debris before they enter your pipes.
- Dispose of Grease Properly: Never pour cooking oils, fats, or grease down your kitchen sink. Allow them to cool and solidify, then scrape them into the trash. Even hot water won’t prevent grease from eventually solidifying and accumulating in your pipes.
- Flush with Hot Water Regularly: After doing dishes, run hot water down the kitchen drain for a minute or two. This helps flush away any remaining food particles and grease that might cling to pipe walls. Similarly, run hot water in bathroom sinks after use.
- Avoid Coffee Grounds: While they might seem harmless, coffee grounds are a common culprit for clogs. They don’t dissolve and can clump together, forming stubborn blockages. Dispose of them in the trash or compost.
- Hair Traps for Showers/Tubs: For showers and tubs, consider special hair traps designed to catch hair before it goes down the drain, often more effective than standard strainers.
- Regular Vinegar and Baking Soda Flush: Perform a preventative flush with baking soda and vinegar (as described above) once a month. This can help break down minor buildup and keep odors at bay.
- Consider Enzyme Drain Cleaners: Unlike chemical cleaners that use harsh corrosives, enzyme cleaners use beneficial bacteria to digest organic material like grease and hair. They are slow-acting but excellent for preventative maintenance and safe for septic systems.
- Educate Household Members: Ensure everyone in your home understands the importance of proper drain usage and disposal habits.
When to Call a Professional Plumber
While DIY solutions are effective for many common clogs, there are times when it’s best to call in the experts. Recognizing these situations can prevent further damage and ensure a lasting solution.
- Persistent or Recurring Clogs: If you’ve tried multiple DIY methods and the clog keeps coming back, it might indicate a deeper, more complex issue within your plumbing system that requires professional assessment.
- Multiple Clogged Drains: If several drains in your home (e.g., a sink, toilet, and shower) are clogged simultaneously, it often points to a blockage in your main sewer line. This is a serious issue that needs immediate professional attention.
- Slow Drains Everywhere: A general slowing of drainage across various fixtures can also signal a main line problem.
- Foul Odors or Sewage Backup: These are clear signs of a severe blockage or sewer line issue. If you notice sewage backing up into your sinks, tubs, or toilets, stop using water immediately and call a plumber.
- Unidentified Cause: If you can’t determine the cause of the clog or if you suspect something large or unusual has gone down the drain, a professional can use specialized cameras to diagnose the problem accurately.
- Lack of Proper Tools or Expertise: If you don’t have the right tools (like a long drain snake for deeper clogs) or feel uncomfortable attempting a repair, a professional has the equipment and experience to handle it safely.
- Concern for Pipe Damage: If your home has older pipes, or if you’re worried about causing damage with aggressive DIY methods, it’s safer to defer to a professional.
A professional plumber can use advanced tools like hydro-jetting (high-pressure water) or video inspection to effectively clear severe blockages and identify underlying problems without risking damage to your home’s plumbing infrastructure.
Conclusion: Keep Your Plumbing Happy
Dealing with a clogged drain doesn’t have to be a nightmare. By understanding the common causes of blockages and having a repertoire of effective DIY solutions at your disposal, you can often resolve these issues quickly and efficiently. Whether you opt for the powerful action of a chemical cleaner like Insta-Flo, the mechanical force of a plunger, or the eco-friendly fizz of baking soda and vinegar, remember that safety and proper technique are paramount.
Moreover, adopting a routine of preventative maintenance is your best defense against future clogs, ensuring your drains remain free-flowing and your home’s plumbing system stays healthy. And while these DIY methods are incredibly helpful, always remember your limits. Don’t hesitate to call a professional plumber when faced with persistent, severe, or multiple clogs, as their expertise can save you from bigger headaches down the line.
We hope these solutions prove helpful in keeping your drains clear. Do you have any other tried-and-true drain unclogging tricks or preventative hacks that we might have missed?