
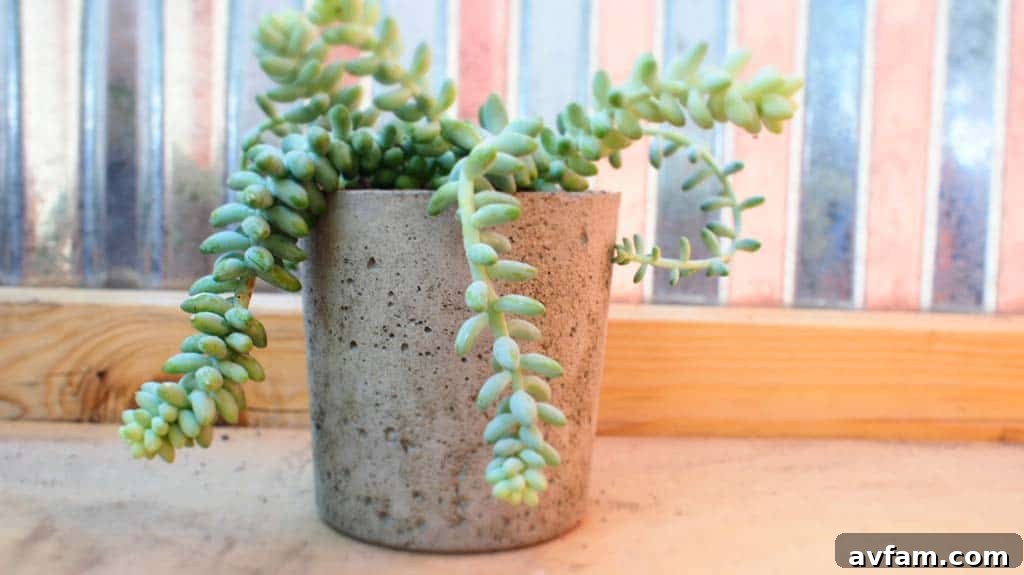
Craft Your Own Modern Oasis: A DIY Guide to Cement Succulent Planters
Succulents have captured the hearts of plant enthusiasts worldwide, thanks to their stunning variety, resilience, and minimal care requirements. Thriving effortlessly in diverse climates, from the sun-drenched landscapes of Southern California to cozy indoor settings across the country, these captivating plants need little more than proper drainage and occasional watering to flourish. For those of us who appreciate greenery but aren’t blessed with the greenest thumbs, succulents offer the perfect, low-maintenance solution.
While traditional terra cotta pots and even planters crafted from brick offer rustic charm, there’s a growing demand for contemporary aesthetics in home decor. This is where DIY cement planters step in, providing a sleek, minimalist look that complements any modern interior or exterior space. We’ve long admired the large-scale concrete planters gracing chic restaurants and contemporary office spaces, but their size and weight often make them impractical for home use. The good news? You can easily create your own stylish, custom-sized cement planters, perfectly suited for succulents that require minimal soil depth.
Our journey into making these homemade concrete planters began with simple, recycled materials: a 1/2 gallon milk carton and a trusty take-out container from our favorite local Thai restaurant. This project is not only incredibly satisfying but also surprisingly simple, making it an ideal activity for all ages – even our four-year-old enthusiastically participated!
Why Choose DIY Cement Planters for Your Succulents?
Beyond their aesthetic appeal, crafting your own concrete planters offers a multitude of benefits:
- Modern Aesthetics: Cement planters provide a clean, industrial, and sophisticated look that perfectly complements contemporary decor styles. Their neutral tone allows the vibrant colors and unique shapes of succulents to truly stand out.
- Durability: Concrete is an incredibly robust material, making these planters highly durable and long-lasting. They can withstand various weather conditions outdoors and are resistant to chips and cracks indoors, unlike more fragile materials.
- Cost-Effective: Compared to purchasing large, designer concrete planters, making your own is significantly more budget-friendly. You can utilize readily available and often recycled materials for molds, further reducing costs.
- Customization Potential: The beauty of DIY lies in complete control. You can experiment with different mold shapes and sizes, add pigments to the concrete for colored planters, or paint them once cured for a personalized touch.
- The Joy of Creation: There’s immense satisfaction in creating something beautiful and functional with your own hands. This project is a rewarding experience that yields tangible results you can proudly display.
- Optimal for Succulents: Concrete’s porous nature can offer some breathability for plant roots, and when combined with proper drainage, creates an ideal environment for succulents to thrive without excess moisture.
Gathering Your Essential Tools and Materials
This beginner-friendly DIY project requires only a few basic items. Before you begin, gather everything to ensure a smooth and efficient process. You’ll be amazed at how easily accessible these materials are!
Required Materials:
- Molds: You’ll need two containers for each planter: one for the outer mold and one for the inner mold.
- Outer Mold: Think beyond just milk cartons! Consider plastic containers like yogurt tubs, empty detergent bottles (cut appropriately), or sturdy cardboard boxes. The size will dictate your planter’s external dimensions.
- Inner Mold: This will create the hollow space for your succulent. Smaller plastic take-out containers, plastic cups, or even smaller milk cartons work perfectly. Ensure there’s at least a 1/2 inch to 1 inch gap between the inner and outer mold for the concrete walls.
- Quikrete Ready-To-Use Concrete Mix: A small bag (e.g., 40 lbs) is more than enough for several small planters. This mix simplifies the process as it contains all necessary aggregates.
- Bucket: A sturdy mixing bucket, preferably one you don’t mind getting dirty. A 5-gallon bucket is ideal.
- Mixing Stick/Trowel: A robust stick, garden trowel, or even a small shovel for thoroughly mixing the concrete.
- Cooking Spray (or Vaseline/Form Release Agent): Crucial for preventing the concrete from sticking to your molds, ensuring easy demolding.
- Heavy Objects/Rocks: Small rocks, sand, or any heavy object to weigh down the inner mold and prevent it from floating when the concrete is poured.
Recommended Safety Gear:
- Gloves: Concrete can be irritating to skin.
- Dust Mask: Especially when mixing dry concrete, to avoid inhaling fine particles.
- Safety Glasses: To protect your eyes from splashes.
Step-by-Step Guide: Crafting Your Own Modern Concrete Planters
Let’s dive into the hands-on process of creating your stylish succulent homes. Remember, patience is key for successful curing!
1. Preparing Your Molds for a Flawless Finish
The foundation of a great planter begins with meticulously prepared molds. Thorough cleaning is paramount, as any residue can transfer to your finished product. Wash your chosen containers with soap and water, then allow them to air dry completely. Moisture can interfere with the concrete’s setting process.
For molds like milk cartons, you might want to adjust their height. We chose to cut the top off our milk carton, utilizing only the more rigid bottom half to create a shallower, wider planter that suits succulents’ root systems. Consider the desired height and shape of your final planter before cutting.
2. Mixing the Concrete to the Perfect Consistency
Now it’s time to prepare your concrete mix. Open your 40 lb. bag of Quikrete Ready-To-Use Concrete Mix. For several small planters, you won’t need the entire bag. We recommend starting with approximately half the bag (about 20 lbs.) in your mixing bucket. This allows for easier, more manageable mixing.
Carefully add water. Begin with about 1.5 to 2 pints of water for 20 lbs of mix. The key is to add water gradually and mix thoroughly. You’re aiming for a consistency similar to thick oatmeal or peanut butter – not too watery, and not too dry. It should be workable and hold its shape without crumbling. If the mixture is too dry, add an additional 1/2 pint of water, stirring well after each addition. Avoid adding too much water, as this can weaken the final concrete product. It doesn’t take excessive stirring; just ensure all dry clumps are fully incorporated and the mix is uniform.
3. Pouring and Shaping Your Planters
Before pouring, generously spray the inside of your outer mold with cooking spray (or apply a thin layer of Vaseline/form release agent). This step is critical for easy demolding later. Then, carefully pour the mixed concrete into the outer mold. Do not fill it completely to the brim; leave ample room for the displacement that will occur when you insert the inner mold. The goal is to create a solid base and walls of sufficient thickness.
Gently tap the outer mold on a hard surface several times. This helps to release any trapped air bubbles, which can weaken the concrete and create undesirable pockmarks on the surface. Once you’ve poured the concrete, spray the exterior of your inner mold with cooking spray as well. Carefully center the inner mold into the wet concrete, pressing down firmly until you achieve the desired depth for your succulent. The concrete will rise around the inner mold. Ensure there’s at least 1/2 inch to 1 inch of concrete at the bottom for stability and a good wall thickness.
To prevent the inner mold from floating upwards as the concrete settles, fill it with heavy objects like rocks, sand, or even small weights. This will keep it securely in place while the concrete begins to set.
4. The Waiting Game: Initial Drying and Demolding
Once your molds are filled and shaped, the crucial drying process begins. Allow your cement planters to dry undisturbed for at least 24 hours. During this initial curing period, the concrete hardens sufficiently to hold its shape. Keep them in a cool, shaded area if possible, to prevent them from drying too quickly, which can lead to cracks.
After 24 hours, it’s time for the exciting moment of demolding! If you used plastic containers, the concrete planters should typically slide out quite easily due to the cooking spray. If they’re a bit stubborn, a firm tap on the bottom or sides of the outer mold usually helps release them. For cardboard cartons (like the milk carton), you can simply tear or cut the carton away from the hardened concrete, making removal very straightforward.
5. Proper Curing for Enhanced Strength and Longevity
Once your planters are demolded, the process isn’t quite finished. Proper curing is absolutely essential for the concrete to reach its maximum strength and durability. While the planters are solid after 24 hours, they are not yet fully cured. Concrete gains strength over time through a chemical reaction that requires moisture.
There are a couple of methods to cure your concrete planters effectively:
- Moist Curing: Wrap your planters in wet burlap, old towels, or plastic sheeting to prevent moisture loss. Keep the burlap or towels consistently damp for at least 3-5 days. You can lightly mist them with water periodically. This method ensures the concrete hydrates properly, leading to a much stronger and less brittle planter.
- Applying a Sealer: Alternatively, you can apply an acrylic sealer designed for concrete. This not only helps with curing by locking in moisture but also provides an extra layer of protection against weathering and staining. Make sure to choose a sealer that is safe for plants if you opt for this method before planting.
Your planters will typically achieve their full strength within 5 to 7 days, though concrete continues to cure and harden for up to 28 days. Once the primary curing period is complete, they are ready for planting!
6. Adding Drainage Holes (Crucial for Succulents!)
While not mentioned in the original text, a drainage hole is absolutely vital for succulents. Without proper drainage, water can accumulate at the bottom of the planter, leading to root rot, which is fatal for most succulents. Before planting, ensure your cement planters have at least one drainage hole. You can create this in a couple of ways:
- During Pouring: Place a small, greased dowel or a piece of PVC pipe (about 1/2 inch to 1 inch in diameter) vertically in the bottom center of your outer mold before pouring the concrete. Ensure it reaches the bottom of the outer mold and extends slightly above the concrete level. Remove it carefully after initial drying.
- After Curing (Drilling): Once the concrete is fully cured, you can drill a drainage hole using a masonry drill bit. Start with a small pilot hole, then gradually increase the bit size until you have a sufficient drainage opening. Always wear safety glasses and a dust mask when drilling concrete.
Planting Your Succulents and Ongoing Care
With your beautifully crafted and cured planters ready, it’s time to bring them to life with succulents! Choose a well-draining succulent potting mix, often labeled as “cactus and succulent mix.” This soil blend typically contains perlite or sand to prevent waterlogging.
Carefully plant your succulents, ensuring their roots are covered but the base of the plant isn’t buried too deeply. For watering, succulents prefer infrequent but thorough watering. The “spray bottle” method suggested earlier is excellent for keeping the soil lightly moist and the plant hydrated without the risk of overwatering or creating standing water, especially indoors. However, for outdoor planters or larger succulents, a more substantial watering might be needed every 1-2 weeks, allowing the soil to dry out completely between waterings. Always check the soil moisture before watering.
Succulents also need plenty of light. Place your new planters in a location that receives ample sunlight, ideally 6 hours or more of direct sunlight for most varieties. If kept indoors, a south-facing window is usually best.
Creative Placement and Personalization Ideas
Your new modern cement planters are incredibly versatile and can enhance almost any space. Outdoors, they make fantastic centerpieces for patio tables, adding a touch of contemporary elegance to your al fresco dining area. Indoors, they look striking on window sills, bookshelves, side tables, or as minimalist accents around your home or office.
Want to truly make them your own? The natural gray of concrete is beautiful, but don’t shy away from customization!
- Painting: Use acrylic or exterior-grade paints to add pops of color, create geometric patterns, or achieve a sophisticated monochrome look. Seal with a clear coat to protect the paint.
- Staining: Concrete stains can give your planters a deeper, more varied hue while allowing the natural texture to show through.
- Texturizing: Before the concrete fully cures, you can gently scratch or etch designs into the surface for added interest.
- Metallic Accents: Consider painting a metallic band around the rim or base for a chic, industrial-glam finish.
These customizable DIY cement planters offer endless possibilities for expressing your personal style while providing a perfect home for your beloved succulents. Enjoy the process of creating and styling your unique pieces!