
Living in a bustling city often means trading expansive backyards for compact, convenient urban dwellings. For many residents of lofts, apartments, and condos, the lack of traditional outdoor space can feel like a significant compromise, especially when the allure of fresh herbs, vibrant flowers, or home-grown vegetables calls during prime gardening season. The yearning for a personal slice of green heaven – a balcony or a cozy patio – becomes a daily desire for those who dream of cultivating their own plants.
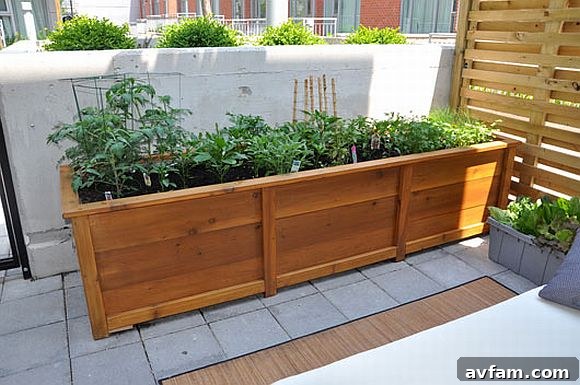
But what if we told you that limited space doesn’t mean limited possibilities for your green thumb? The good news is that even the smallest porch, balcony, or patio can be transformed into a thriving garden sanctuary through the ingenious practice of container gardening. This versatile and rewarding method allows urban dwellers to cultivate a variety of plants, bringing nature’s beauty and bounty right to their doorstep. Whether you’re a seasoned gardener or a complete novice, creating your own container garden is an accessible and incredibly satisfying project.
Why Embrace Container Gardening? The Benefits of Growing in Small Spaces
Container gardening offers a wealth of advantages, making it an ideal solution for urban environments and anyone with restricted outdoor areas:
- Space Efficiency: Naturally, the primary benefit is the ability to garden without a traditional plot of land. Containers allow you to utilize every square inch of your balcony, patio, or even windowsill.
- Portability and Flexibility: Unlike in-ground gardens, containers can be moved. This means you can chase the sun, protect plants from harsh weather, or rearrange your layout on a whim. Heavy containers can be fitted with casters for easier movement.
- Pest and Disease Control: Elevated and isolated from ground soil, container gardens often experience fewer issues with common garden pests and soil-borne diseases. It’s also easier to spot and treat problems in a smaller, more contained environment.
- Weed Management: With fresh potting mix and isolated planting, weeding becomes a minimal chore, freeing up more time to enjoy your plants.
- Customization and Aesthetics: Containers come in endless shapes, sizes, and materials, allowing you to design a garden that perfectly complements your personal style and outdoor decor. You can create striking visual displays with different plant heights and textures.
- Accessibility: Raised containers and garden boxes can make gardening more accessible for individuals with mobility challenges, reducing the need for bending and kneeling.
- Soil Control: You have complete control over the soil composition, ensuring your plants receive the optimal nutrients and drainage they need, which can be particularly advantageous in areas with poor native soil.
Planning Your Perfect Container Garden: Key Considerations Before You Dig In
Before you embark on your DIY container garden project, a little foresight and planning will go a long way in ensuring its success. Understanding your specific environment and the needs of your desired plants is crucial.
1. Location, Location, Location: Assessing Your Outdoor Area
- Sunlight Analysis: This is arguably the most critical factor. Observe your chosen spot throughout the day. Does it receive full sun (6+ hours of direct sun), partial sun (3-6 hours), or partial/full shade (less than 3 hours)? This will dictate which plants will thrive. Some plants love intense afternoon sun, while others prefer the gentler morning rays or filtered light.
- Wind Exposure: For higher-floor balconies or exposed patios, wind can be a significant factor. Strong gusts can damage delicate plants, knock over containers, and accelerate soil drying. Consider selecting hardy, compact plants or using heavier containers in windy areas. Windbreaks can also be a creative solution.
- Weight Considerations: If you’re planning a large or heavy container (like the impressive 800+ pound planter described by condo resident Jennifer Myers in her DIY container garden post for HGTV Canada), it’s vital to assess the structural capacity of your balcony or deck. Always consult with your building management or a structural engineer if you have concerns about weight. For less space or higher elevations, opting for lighter materials and smaller designs is a sensible approach.
- Water Access: How easily can you water your plants? Having a spigot or easily accessible water source nearby will make daily maintenance much simpler. Consider investing in a watering can, a small hose, or even a drip irrigation system for larger setups.
2. Choosing the Right Container: Size, Material, and Drainage
The container itself is the foundation of your garden. Select wisely!
- Size Matters: The size of your container should be appropriate for the plants you intend to grow. Larger plants like tomatoes or small shrubs require more root space than herbs or lettuce. A common mistake is using containers that are too small, which restricts root growth and requires more frequent watering.
- Material Options:
- Wood: Cedar is an excellent choice due to its natural resistance to rot and insects, as Jennifer Myers wisely used. Other options include treated pine (ensure it’s safe for edibles) or composite wood. Wood offers a classic, natural aesthetic.
- Plastic: Lightweight, inexpensive, and available in various colors and styles. However, plastic can retain heat, potentially stressing roots in direct sun, and may degrade over time.
- Terracotta/Ceramic: Visually appealing and breathable, but heavy and can dry out soil quickly. Prone to cracking in freezing temperatures.
- Metal: Modern and durable, but can get very hot in the sun, potentially cooking roots. Requires careful placement.
- Fabric Pots (Grow Bags): Excellent for air pruning roots, preventing circling. Lightweight, affordable, and good for drainage.
- Drainage is Non-Negotiable: Regardless of the material, proper drainage is absolutely essential. Stagnant water will lead to root rot and kill your plants. Ensure your chosen container has ample drainage holes at the bottom. If not, you’ll need to drill them yourself. A layer of gravel at the bottom is often recommended, though its effectiveness is debated; simply ensuring good drainage holes is paramount.
3. Selecting Your Plants: Match Plants to Your Environment
Once you understand your microclimate, you can choose plants that will thrive:
- Herbs: Basil, mint, rosemary, thyme, oregano, chives, parsley, cilantro. Most herbs love sun and are perfect for containers.
- Vegetables:
- Leafy Greens: Lettuce, spinach, kale, Swiss chard – many varieties tolerate partial shade.
- Root Vegetables: Radishes, carrots (short varieties), baby beets.
- Bush Varieties: Bush beans, peas.
- Fruiting Vegetables: Cherry tomatoes, bell peppers, chili peppers, small eggplants (look for “dwarf” or “patio” varieties).
- Fruits: Strawberries, dwarf blueberries (require acidic soil), compact citrus varieties.
- Flowers: Petunias, marigolds, nasturtiums (edible!), pansies, impatiens, snapdragons. Add color, attract pollinators, and can be companion plants.
- Consider Plant Grouping: Group plants with similar light and water requirements together in larger containers for a harmonious and healthy arrangement.
Ready to Build Your Own Container Garden? Step-by-Step Construction Guide
Creating your custom container garden is a rewarding DIY project. Here’s a detailed guide based on practical experience, expanding on Jennifer Myers’ excellent foundation.
Materials You’ll Need:
- Wood: High-quality cedar is recommended for its durability and natural resistance to rot. Other options include redwood, cypress, or pressure-treated lumber (ensure it’s safe for food crops if applicable).
- Fasteners:
- Waterproof decking screws (stainless steel or ceramic coated for longevity).
- Nail gun and appropriate nails (optional, but speeds up assembly).
- Staple gun and heavy-duty staples (for attaching liners).
- Adhesive: Heavy-duty, waterproof construction adhesive.
- Lining Materials:
- Heavy-duty plastic sheeting or pond liner (at least 6-mil thick) – crucial for moisture retention and protecting the wood.
- Weed barrier fabric (breathable landscape fabric) – placed over the plastic liner.
- Soil: High-quality potting mix (specifically formulated for containers, not garden soil). Consider adding some organic compost for nutrient boost.
- Wood Treatment (Optional): Exterior-grade deck stain or sealant to protect the wood and enhance its appearance.
- Tools: Measuring tape, pencil, saw (circular saw or miter saw recommended), drill with various bits, safety glasses, work gloves.
- Optional Enhancements: Casters/wheels for mobility, decorative trim, landscape fabric over drainage holes (inside the liner) to prevent soil loss.
Construction Steps:
- Design and Cut Your Wood:
First, sketch out your desired container dimensions. Decide on the height, length, and width. Remember, larger containers mean more soil and more weight. Carefully measure and cut all your wood pieces: the four sides (front, back, and two ends) and the bottom panels. For Jennifer’s very large container, she built it in pieces and assembled it on-site; for most home projects, you can likely assemble the entire box before moving it.
- Assemble the Sides:
Begin by attaching the side panels together to form the rectangular or square frame. Use your waterproof decking screws and construction adhesive for a strong, durable bond. Pre-drilling pilot holes will prevent the wood from splitting. Ensure all corners are square and the frame is sturdy.
- Attach the Bottom:
Once the sides are assembled, secure the bottom pieces to the frame. Again, use screws and adhesive. Ensure there are small gaps between the bottom planks (if using multiple) or drill several large drainage holes (1/2 to 1 inch diameter) into the bottom if using a single solid piece. These are separate from the liner’s drainage holes.
- Line the Container:
This is a critical step for the longevity of your container and the health of your plants. Line the entire interior of the wooden box with the heavy-duty plastic sheeting or pond liner. Overlap the edges and fold the corners neatly. The goal is to create a waterproof barrier between the soil and the wood. Critically, after the plastic liner is in place, you MUST cut drainage holes into the plastic liner at the bottom, directly over the wooden drainage holes or gaps you created. Failure to do so will negate all your drainage efforts and lead to waterlogging.
Next, place the weed barrier fabric over the plastic liner. This porous layer will prevent soil from washing out through the drainage holes while still allowing water to escape. Staple both liners securely to the top edge of the wooden container.
- Finishing Touches (Optional):
At this stage, you can choose to apply an exterior-grade deck stain or sealant to the outside of your wooden container. This will protect the wood from the elements and enhance its aesthetic appeal. Alternatively, you might prefer to let the wood weather naturally over time, developing a charming, rustic patina. If you plan to move the container frequently and it’s heavy, consider attaching heavy-duty casters to the bottom before filling it.
Planting and Maintaining Your Thriving Container Garden
1. Filling with Soil and Planting:
- Use Quality Potting Mix: Never use garden soil, which is too dense for containers and can compact, leading to poor drainage and aeration. Fill your lined container with a high-quality, lightweight potting mix designed for containers. Leave about 1-2 inches of space from the rim.
- Arrange Your Plants: Consider the “Thriller, Filler, Spiller” method for visually appealing arrangements. “Thriller” plants are tall and upright, “Filler” plants are bushy and full, and “Spiller” plants cascade over the edge of the container. Plant according to each plant’s specific needs for spacing and depth.
- Water Thoroughly: After planting, water your container garden deeply until water drains from the bottom. This helps settle the soil and reduce transplant shock.
2. Watering and Fertilizing:
- Consistent Watering: Container plants typically dry out faster than in-ground plants. Check soil moisture daily, especially during hot, dry, or windy weather. Water when the top inch of soil feels dry to the touch. Water deeply until you see water draining from the bottom.
- Fertilization: Most potting mixes contain a limited supply of nutrients. Begin fertilizing a few weeks after planting with a balanced liquid fertilizer or a slow-release granular fertilizer, following product instructions. Container plants generally require more frequent feeding than garden beds.
3. Ongoing Care:
- Pruning and Deadheading: Regularly pinch back leggy growth and remove spent flowers (deadhead) to encourage bushier growth and more blooms/produce.
- Pest and Disease Watch: Inspect your plants regularly for any signs of pests or diseases. Address issues promptly with organic solutions like insecticidal soap or neem oil.
- Seasonal Care: As seasons change, you might need to adjust plant placement, provide protection from frost, or bring certain plants indoors.
Beyond the Box: Other Small-Space Gardening Solutions
While DIY container boxes are fantastic, there are other creative ways to maximize your green space:
- Vertical Gardens: Utilize wall space with hanging planters, pocket gardens, or trellises for climbing plants like cucumbers or pole beans.
- Window Boxes: Perfect for herbs, small flowers, or leafy greens right outside your window.
- Hanging Baskets: Ideal for cascading flowers, strawberries, or cherry tomatoes, freeing up floor space.
- Hydroponics/Aeroponics: For the tech-savvy urban gardener, these soilless systems offer rapid growth and high yields in a compact footprint, often indoors.
Cultivate Your Urban Oasis
The dream of a lush garden doesn’t have to be limited by the confines of urban living. With a thoughtful approach to DIY container gardening, you can transform even the most modest balcony or patio into a vibrant, productive, and deeply satisfying green space. From the initial planning stages to the joy of harvesting your first fresh herbs, every step of the process is an opportunity to connect with nature and enhance your home environment.
So, gather your materials, envision your urban oasis, and get ready to cultivate your very own piece of paradise. What are your thoughts on building a container garden? Or perhaps you’ve already devised another clever small-space gardening solution? Share your ideas and inspire fellow city dwellers to embrace their inner gardener!
Photo courtesy of HGTV Canada