
Now that the weather has finally graced us with its cooperation, we are thrilled to be back on track with our long-term February project: the comprehensive refinishing of our cherished cast-iron and porcelain clawfoot tub. This isn’t just a simple facelift; it’s a deep dive into restoring a piece of history, and every step, no matter how small, brings us closer to revitalizing this bathroom centerpiece.
Restoring the Elegance: A DIY Guide to Refinishing Clawfoot Tub Feet
Our journey to reclaim the former glory of our vintage clawfoot tub has been a testament to the unpredictable nature of DIY home improvement. Where we last left off, we found ourselves navigating a labyrinth of complications. We faced everything from unexpected material shortages and the untimely demise of power tools to a series of unforeseen hiccups that momentarily stalled our progress. It required a strategic pause, a moment to regroup, and a thorough re-evaluation of our game plan. But with renewed determination and a clearer vision, we’ve finally managed to push forward, tackling one of the most visible and surprisingly intricate components: the actual claw feet. These elegant supports, often overlooked, are crucial for both the aesthetics and stability of the tub, and their restoration presents a unique set of challenges and rewards.
The Foundation of Grandeur: Understanding Clawfoot Tub Feet
Clawfoot tubs are iconic for their distinctive design, and much of their charm lies in the intricate feet that elevate them. These feet aren’t merely functional; they are artistic expressions, often sculpted into animal paws or ornate designs, that contribute significantly to the tub’s vintage appeal. Our specific tub features classic chrome claw feet, which, while once gleaming, had succumbed to decades of moisture and neglect. The condition of these feet can make or break the overall appearance of a restored tub, transforming it from merely functional to a true showpiece. Restoring them properly means addressing deep-seated issues like rust and tarnishing while ensuring a durable, aesthetically pleasing finish that will last for years to come. This initial phase of our restoration project, focusing solely on the feet, serves as a crucial foundation for the larger task ahead, setting the tone for the meticulous work required on the tub itself.
The Chrome Challenge: Rust and Initial Restoration Attempts
When we first envisioned the restoration of our chrome claw feet, our plan seemed straightforward enough: a bit of sanding to banish the rust, followed by a meticulous polishing to restore their original luster. We approached the task with optimism, armed with various sanding grits and polishing compounds, confident that elbow grease and patience would prevail. However, it quickly became apparent that the rust situation was far more complex and pervasive than what initially met the eye. What appeared to be surface rust was, in fact, deep-seated corrosion that had pitted the chrome, leaving a textured, uneven surface that no amount of sanding or polishing could realistically salvage to its former reflective glory. The chrome plating itself was compromised in several areas, making a simple polish insufficient. This unexpected reality check forced us to reconsider our approach entirely, prompting the need for a new course of action. It was a clear reminder that in DIY, flexibility and adaptability are just as important as skill and planning.
After trying and failing with several different methods of rust removal and traditional polishing techniques, it became undeniably clear that the claw feet needed a more radical intervention if they were ever to look decent again. We experimented with various rust converters and stronger abrasive compounds, but the underlying damage remained stubbornly visible. The prospect of achieving a mirror-like chrome finish through conventional means seemed increasingly distant and prohibitively time-consuming. It was a moment of truth, where we had to set aside our initial purist intentions and embrace a more practical, yet still highly effective, solution. So, with a deep breath and a dash of creative pragmatism, we closed our eyes to the traditional restoration methods and turned to our trusty DIY fix-all sidekick: spray paint. This decision, initially a reluctant one, quickly revealed itself to be a smart and efficient path forward, promising a beautiful transformation without the endless hours of sanding and buffing.
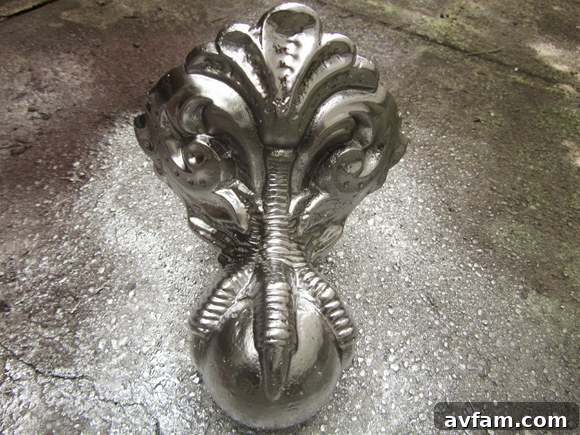
Selecting the Right Arsenal: Materials for a Flawless Finish
Our journey to find the perfect solution led us to our local big-box home improvement store, where we found ourselves staring at a vast wall of aerosol cans. This wasn’t just about picking any spray paint; it was about devising the best possible strategy to preserve our claw feet, prevent future rust from ever rearing its ugly head again, and ultimately impart that super shiny, reflective sheen we so desperately wanted to achieve. We carefully considered various brands and formulas, weighing factors like rust-inhibiting properties, adhesion to metal, and the quality of the final finish. After much deliberation and research, we settled on a two-part system from Rust-Oleum, a brand renowned for its durability and effectiveness in metal treatments: their Rusted Metal Primer and their specialized Chrome spray paint. This combination promised not only aesthetic excellence but also long-lasting protection against the elements, ensuring our renewed feet would stand the test of time.
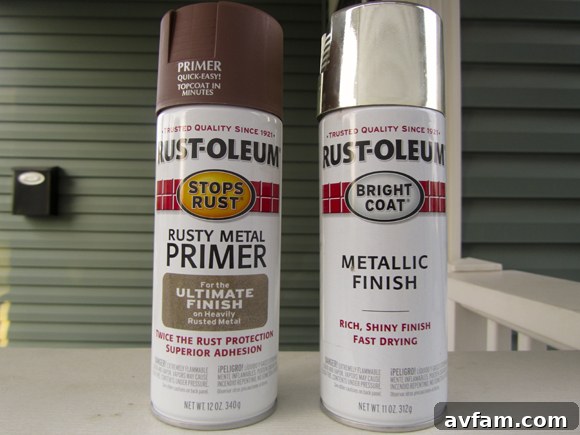
Essential Materials Checklist:
- Wire Brush: For removing loose rust and flaking paint.
- Dish Soap and Water: For thorough cleaning and degreasing.
- Clean Rags/Towels: For drying the feet completely.
- Drop Cloths or Cardboard: To protect your work area from overspray.
- Respirator Mask: Essential for protecting against paint fumes.
- Protective Gloves: To keep hands clean and protected.
- Rust-Oleum Rusted Metal Primer: The crucial first layer for adhesion and rust inhibition.
- Rust-Oleum Chrome Spray Paint: The topcoat for that desired reflective finish.
The Transformation Process: A Step-by-Step Guide
1. Meticulous Preparation: The Key to Lasting Results
As with any painting project, meticulous preparation is the undisputed key to achieving a lasting and professional-looking finish. We began by thoroughly following the directions for the primer. Our first step involved using a sturdy wire brush to aggressively remove all traces of loose rust, flaky paint, and any other debris that could compromise adhesion. This roughing-up process not only cleans the surface but also creates a slightly textured profile that helps the primer bond more effectively. Once the loose rust was gone, we meticulously washed the feet with a simple solution of dish soap and water. This step is critical for degreasing the surface and removing any lingering dust or grime that might prevent proper paint adhesion. After a thorough scrub, we rinsed them completely and dried them with clean rags, ensuring there was absolutely no moisture left, as even a speck of water can lead to adhesion issues or flash rust once painting begins. We then carefully transported them outside to our designated spray painting spot, an area well-ventilated and protected from the elements, ready for their first transformative coat.
2. Priming for Protection: Building a Solid Foundation
With the feet perfectly prepped, it was time for the Rusted Metal Primer. We applied a good, even coat, ensuring full coverage of all surfaces. The primer plays several vital roles: it seals the metal, provides an excellent base for the chrome paint to adhere to, and, most importantly, offers a robust layer of rust prevention. Applying the primer in thin, even coats, rather than one thick layer, helps to avoid drips and ensures a smoother finish. We maintained a consistent distance from the feet and used a steady, back-and-forth motion to achieve uniform coverage. Given the notoriously high humidity in Ohio, we paid extra attention to allowing ample drying time between coats, and before moving on to the next step, to ensure the primer fully cured. Patience at this stage prevents issues down the line and guarantees the best possible adhesion for the chrome finish.
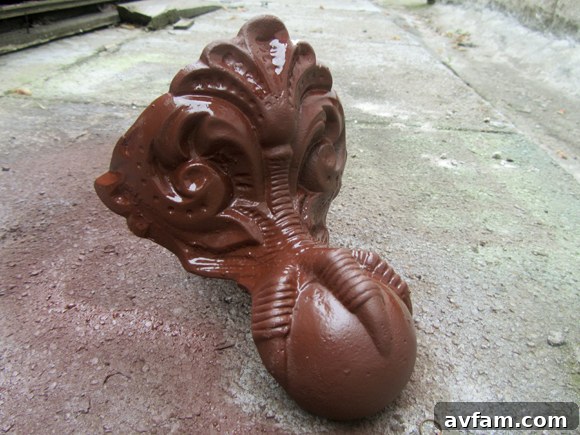
3. Achieving the Gleam: Applying the Chrome Finish
Next, after allowing the primer sufficient time to dry and cure, we moved on to the exhilarating task of applying the chrome paint. This was the moment we had been eagerly anticipating, hoping for a bright, clean, and ultimately dazzling shiny finish that would bring these vintage feet back to life. We used the same careful spray technique – light, even passes from a consistent distance – to build up the chrome layer gradually. The transformation was almost immediate and utterly satisfying. We were pleasantly relieved, and frankly, thrilled, to find that the Rust-Oleum Chrome spray paint delivered exactly the finish we were hoping for. The once dull, corroded feet were replaced with a remarkably reflective, almost mirror-like chrome, shining brilliantly under the sunlight. It was a stark and beautiful contrast to their previous state, exceeding our expectations for a spray-painted finish. The high-quality paint truly made a difference, proving that with the right products and technique, a professional-looking result is achievable even for DIY enthusiasts.
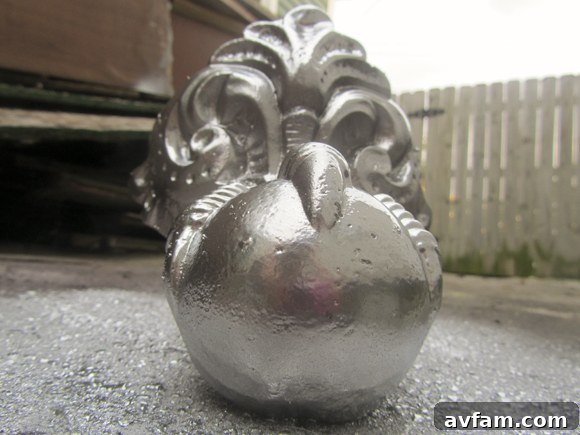
Progress and Anticipation: Reaching the Finish Line
Currently, we’ve managed to get two of the four feet to this beautiful, chromed stage. The difference is truly remarkable, and seeing the progress invigorates our determination to complete the remaining two. We’re optimistic about tackling and finishing the next set of feet this week, bringing us ever closer to the completion of this particular segment of the tub restoration. A fantastic bonus, according to the specifications of the chrome spray paint, which also boasts a built-in rust blocking formula, is that there’s no need for an additional topcoat. This means these newly restored “bad boys” are suddenly very close to being reunited with Clementine, our beloved red tub. The anticipation of seeing Clementine fully assembled with her gleaming, restored feet is immense, marking a significant milestone in our ambitious home improvement journey. Each completed foot feels like a small victory, fueling our excitement for the grand reveal of the entire renovated tub.
Tips for Your Own Clawfoot Tub Foot Restoration Project
Embarking on a restoration project, especially one involving a vintage piece like a clawfoot tub, can be incredibly rewarding. Here are some essential tips we’ve gathered from our experience that might help you on your own DIY journey:
- Realistic Assessment is Key: Before starting, thoroughly assess the condition of your tub feet. Understand if surface cleaning, polishing, or a more intensive approach like painting is truly necessary.
- Be Flexible with Your Plans: DIY projects rarely go exactly as planned. Be prepared to adapt, research alternative solutions, and not be afraid to change your original strategy when faced with unexpected challenges.
- Invest in Quality Materials: Skimping on primer or paint quality can severely impact the longevity and appearance of your finish. Good quality products, like those with integrated rust prevention, are worth the investment.
- Prioritize Safety: Always work in a well-ventilated area when using spray paints and wear appropriate personal protective equipment, including a respirator mask and gloves, to protect yourself from fumes and chemicals.
- Patience is a Virtue: Rushing the process, especially drying times, can lead to imperfections and adhesion issues. Allow each coat to dry thoroughly according to the manufacturer’s instructions.
- Preparation is Paramount: The success of any paint job lies in the preparation. Don’t cut corners on cleaning, sanding, and priming. A well-prepared surface ensures a smooth, durable, and beautiful final finish.
- Embrace Trial and Error: If you’re new to spray painting, consider practicing on a scrap piece of metal first to get a feel for the distance, speed, and coverage needed to avoid drips and achieve an even coat.
Conclusion: A Step Closer to a Bathtub Masterpiece
The journey to restore our clawfoot tub’s feet from rusted relics to gleaming chrome masterpieces has been an enlightening and rewarding experience. What began as a complex problem demanding an unexpected solution ultimately led us to discover the incredible transformative power of modern spray paint technology. Each step, from the initial assessment of severe rust to the careful application of primer and the final, brilliant chrome finish, has brought us closer to our goal. We’ve learned the importance of adaptability, the value of quality materials, and the immense satisfaction that comes from bringing a forgotten piece of history back to life with our own hands. As we near the completion of all four feet, the excitement builds for the moment Clementine, our beloved red tub, will stand proudly on her revitalized supports, ready to be the stunning focal point of our restored bathroom. This project is more than just refinishing; it’s about preserving character, embracing the DIY spirit, and creating a space that truly reflects our vision.