
Transform Your Garage Floor: A Comprehensive Guide to Durable Epoxy Coatings
The modern garage has evolved far beyond its traditional role as a simple parking spot or a dusty storage area for tools. Today, homeowners are increasingly repurposing their garages into vibrant utility rooms, inspiring workshops, functional home gyms, or even inviting extensions of their living space. This transformation demands an environment that is not only highly functional but also aesthetically pleasing and undeniably clean. The cornerstone of such a transformation often begins with the floor – the most abused surface in any garage.
Reimagining your garage into a more usable and appealing space invariably starts with addressing the floor. Traditional concrete garage floors are prone to stains, cracks, and chips, making them look uninviting and difficult to maintain. Fortunately, modern coating solutions offer a remarkable antidote to these common issues. Our friend Matt, a resident of Mesa, Arizona, recently embarked on a journey to revitalize his stained and chipped garage floor using a high-quality epoxy coating system. His results have been nothing short of impressive, providing a testament to the power of a well-executed floor upgrade.
Why Epoxy Garage Floors are a Game Changer
Epoxy coatings have rapidly become the gold standard for garage floor transformations, and for good reason. They offer an unparalleled combination of durability, aesthetic versatility, and practical benefits that traditional concrete simply cannot match. For homeowners in challenging climates like Mesa, Arizona, where summer temperatures frequently soar above 115 degrees Fahrenheit, the choice of a floor coating is even more critical. Garage floors in such environments must bravely withstand the intense heat of scorching tires, resisting sticking, melting, or degradation under extreme conditions.
Unmatched Durability and Resilience
An epoxy floor isn’t just a coat of paint; it’s a robust resin system that creates a hard, durable surface capable of enduring significant wear and tear. This includes heavy vehicle traffic, dropped tools, oil spills, and chemical exposure. Unlike bare concrete, epoxy floors resist chipping, cracking, and abrasion, ensuring a long-lasting, pristine appearance.
Enhanced Aesthetic Appeal
Beyond its toughness, epoxy offers incredible aesthetic flexibility. Available in a vast array of colors, patterns, and finishes, epoxy can mimic the sophisticated look of granite, terrazzo, or even custom designs. This allows homeowners to create a truly personalized space that complements their home’s style. Matt, for instance, chose a medium brown base accentuated with decorative paint chips in dark brown, cream, and black, achieving a luxurious, granite-like finish that elevated the entire garage’s ambiance.
Chemical and Stain Resistance
Garages are often home to various chemicals, from automotive fluids to cleaning agents. Epoxy coatings create a seamless, non-porous surface that prevents liquids from penetrating, making spills incredibly easy to clean. Oil, grease, antifreeze, and other harsh chemicals can be wiped away without leaving unsightly stains or damaging the floor, ensuring a clean and hygienic environment.
Easy Maintenance and Cleaning
The smooth, non-porous nature of an epoxy floor makes cleaning a breeze. Dust, dirt, and debris can be swept or vacuumed effortlessly, and spills can be quickly mopped up. This significantly reduces the time and effort required to maintain a spotless garage, freeing up more time for hobbies or relaxation.
Increased Property Value
A beautifully finished and highly functional garage floor is a significant upgrade that adds tangible value to your home. It enhances curb appeal, makes the garage more usable, and signals a well-maintained property to potential buyers, offering an excellent return on investment.
Matt’s Transformation: A Local Success Story with Veron Coating’s Granite-Cote System
Given the demanding climate of Mesa, Arizona, Matt’s choice of flooring product was paramount. He opted for a locally sourced solution: Veron Coating’s Granite-Cote System. This specific system is renowned for its ability to simulate the sophisticated, multi-dimensional look of granite or terrazzo flooring, bringing a touch of elegance to a typically utilitarian space. Matt’s color palette – a rich medium brown base adorned with paint chips in dark brown, cream, and black – created a warm, inviting, and incredibly durable surface.
The Granite-Cote System from Veron Coatings is specifically engineered to be a durable, chemical, and abrasion-resistant seamless solution. Its robust composition makes it ideally suited for high-traffic areas like garage floors, which must endure heavy loads, impacts, and constant exposure to elements. The seamless finish not only contributes to its aesthetic appeal but also simplifies cleaning and maintenance, as there are no grout lines or crevices for dirt and grime to accumulate. This innovative system ensures that even under the intense Arizona sun and the rigors of daily use, Matt’s garage floor will remain pristine and highly functional for years to come.
The Step-by-Step Installation Process: A DIY Guide to Epoxy Floor Perfection
While the prospect of installing an epoxy floor might seem daunting, Matt’s successful DIY project demonstrates that with careful preparation and attention to detail, it’s an achievable and highly rewarding endeavor. Here’s a detailed breakdown of the steps he meticulously followed to achieve his stunning garage floor transformation:
1. Thorough Surface Preparation: Acid Wash and Power Wash
The success of any epoxy coating hinges entirely on proper surface preparation. Matt began by thoroughly cleaning his garage floor. This crucial first step involved an acid wash to etch the concrete, which creates a rougher surface profile that allows the epoxy to bond more effectively. Following the acid wash, he used a powerful pressure washer to meticulously remove all existing stains, dirt, grease, and loose debris. This extensive cleaning ensures that the concrete is perfectly clean and porous, ready to accept the new coating without contaminants hindering adhesion.
2. Repairing Imperfections: Filling Grout and Sanding
After the floor was immaculately clean and dry, Matt addressed any existing imperfections. This involved carefully filling in any grout lines, small cracks, or minor divots in the concrete. Using a suitable concrete filler or patch compound, he ensured a smooth, level surface. Once the filler had dried and cured according to the manufacturer’s instructions, he sanded down the patched areas. This step is vital for creating a uniform substrate, eliminating any bumps or ridges that could show through the final epoxy layers and compromise the finish’s integrity.
3. Applying the Primer Coat: Enhancing Adhesion and Sealing
With the floor perfectly prepared and repaired, Matt moved on to the first layer of the Granite-Cote System: the primer coat. The primer serves several critical functions. It penetrates deep into the concrete, sealing any remaining pores and preventing moisture from rising and causing delamination. More importantly, it creates a strong adhesive bond between the concrete substrate and the subsequent epoxy layers, ensuring the entire system remains firmly attached and durable over time. Matt applied the primer evenly, following the manufacturer’s coverage rates, and allowed it to cure properly.
4. Laying the Base Coat: The Foundation of Color and Strength
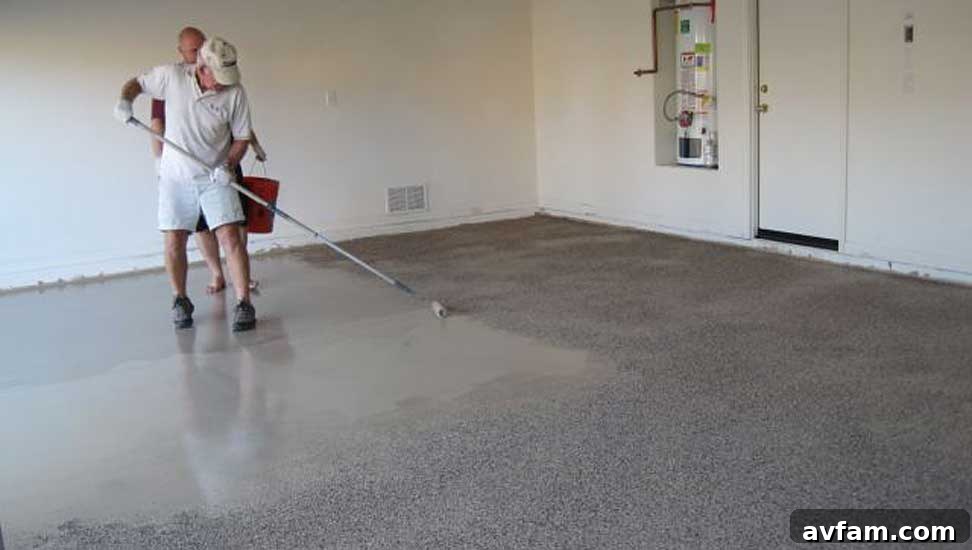
Once the primer was sufficiently cured, the base coat was applied. This is the primary colored layer of the epoxy system and where the chosen medium brown hue came to life. Matt meticulously mixed the two-part epoxy base coat according to Veron Coating’s specifications, ensuring a consistent blend. He then applied it evenly across the entire floor using high-quality rollers, paying close attention to achieve uniform thickness and coverage. The base coat provides the bulk of the system’s structural integrity and forms the canvas for the decorative chips.
5. Broadcasting the Decorative Chips: Adding Visual Depth and Texture
Immediately after applying the base coat, while the epoxy was still wet and tacky, Matt began the process of “throwing chips.” This involved broadcasting the decorative paint chips – a mix of dark brown, cream, and black – evenly over the wet base coat. The chips are vital for achieving the granite or terrazzo aesthetic. Matt ensured a consistent distribution, aiming for full coverage without clumping. The chips adhere to the wet epoxy, becoming permanently embedded in the surface, adding visual depth, a slight texture, and an extra layer of slip resistance.
6. Applying the Top Coat: The Ultimate Shield
After the base coat and chips had fully cured (typically 12-24 hours depending on environmental conditions), Matt proceeded to apply the final, protective layer: the clear top coat. This is where the true resilience of the Granite-Cote System shines through. Matt, understanding the importance of maximum protection, opted for three generous layers of the clear coat. Each layer was applied evenly and allowed to cure before the next. The clear top coat encapsulates the base coat and chips, providing a seamless, high-gloss, and incredibly durable barrier. This protective shield is what makes the floor resistant to chemicals, abrasions, UV damage, and the intense heat from hot tires. As Matt rightly concluded, “the more the better” when it comes to these crucial clear layers, enhancing both longevity and the floor’s brilliant finish.
Finishing Touches and Future Plans
With the epoxy coating fully cured, Matt’s garage floor now gleams with a sophisticated, resilient finish. As a final step to complete the aesthetic, he plans to paint the baseboards, which will truly frame the newly transformed floor and give the garage a polished, professional look. Once that’s done, his garage will be ready for anything, from housing vehicles to hosting projects, all without the worry of damage or difficult cleaning.
Matt’s experience serves as an inspiring example of how a strategic DIY project can significantly upgrade a home’s functionality and aesthetic appeal. His meticulously executed epoxy floor not only addresses the practical challenges posed by Arizona’s extreme climate but also elevates the entire garage into a clean, inviting, and highly durable space.
We extend our sincere thanks to Matt for generously sharing his valuable insights and detailed process with us. His success with the Veron Coating’s Granite-Cote System is a powerful endorsement for anyone considering a similar garage floor renovation.
If you’ve recently completed a do-it-yourself project that you’re particularly proud of, we’d love to hear about it! Please don’t hesitate to let us know and share your story with our community. Your experiences can inspire and guide others on their own home improvement journeys.