
Showcasing Your Vintage Snowboard Collection: An Easy & Stylish DIY Wall Display
For many, a snowboard is far more than just a piece of sporting equipment; it’s a canvas of self-expression, a vessel of exhilarating memories, and often, a cherished collector’s item. The unparalleled thrill of carving down a pristine mountain face is often matched only by the pride of owning a piece of snowboarding history, especially those iconic decks that defined an era. Whether you’re a seasoned collector with a discerning eye or a passionate enthusiast looking to honor your favorite decks, finding the right way to display these treasures is paramount.
We recently had the pleasure of connecting with an avid snowboard collector and dedicated DIY enthusiast who reached out about a truly iconic board from our own archives: the 1993 Burton Jeff Brushie Pro model. This particular board had a starring role in a previous how-to guide we shared with Apartment Therapy on creatively hanging snowboards, and its enduring appeal continues to spark conversation and admiration among the global snowboarding community.
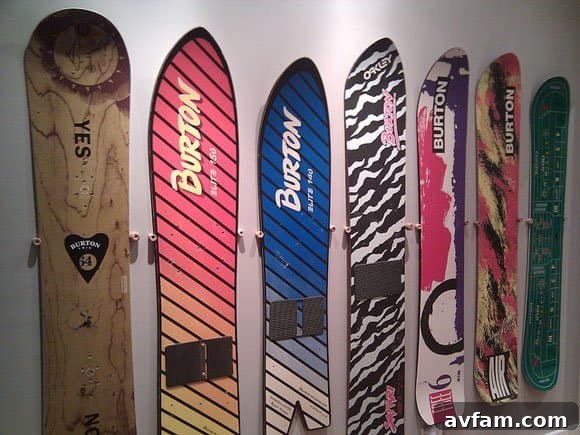
While we’re keen on preserving our cherished Jeff Brushie Pro within our own collection, we were absolutely delighted when this collector graciously shared a glimpse into their truly impressive vintage snowboard display. Held securely in place using our very own cork-based wall mount method, their collection is a vibrant testament to a profound appreciation for the sport’s rich heritage, particularly focusing on vintage Burton snowboards. It’s unequivocally clear they harbor a deep passion for the brand, having curated a remarkable and diverse assembly of iconic decks that tell a vivid story of innovation, style, and cultural impact from a truly golden era of snowboarding.
A Glimpse into a Passionate Collector’s Dream: Iconic Burton Boards
The shared photographs of this collector’s meticulously arranged display left us in awe. Each board speaks volumes, capturing the very essence of a pivotal and transformative time in snowboarding culture. Among their prized possessions were some truly legendary pieces that resonate deeply with anyone familiar with the sport’s golden age:
- The Jeff Brushie Craps Table Board: This graphic is much more than just a design; it’s a bona fide cultural artifact. Representing the playful, rebellious, and unapologetically bold spirit of the early to mid-90s, the “Craps Table” graphic on a Jeff Brushie pro model is extraordinarily sought after by collectors worldwide. Brushie himself was a style icon, pushing freestyle riding into daring new frontiers, and his boards perfectly reflect that unique swagger, innate creativity, and influential trendsetting. It encapsulates an era where individuality, vibrant colors, and audacious aesthetics reigned supreme, both on the slopes and in the broader youth culture.
- The Craig Kelly Air: Craig Kelly, often revered and rightfully hailed as the “Godfather of Freeriding,” single-handedly redefined what was truly possible on a snowboard. The “Air” model, with its clean lines, minimalist aesthetic, and performance-driven design, perfectly captures the sophisticated yet powerful aesthetic of that generation—a harmonious blend of raw power and elegant simplicity. Owning a Craig Kelly board is akin to holding a tangible piece of fundamental snowboarding history, representing a transformative time when the sport truly found its advanced footing and pioneered many modern freeride techniques that are still relevant today.
- The Elite 150 Swallowtail: A true, undeniable classic, the Elite 150 swallowtail board harks back to snowboarding’s earliest roots in powder surfing and exploration. Swallowtail designs are ingeniously engineered for unparalleled float and nimble maneuverability in the deepest of snow, offering a distinctive ride feel that traditional boards simply cannot replicate. This board isn’t merely a display piece; it’s a powerful symbol of deep powder dreams, the relentless pursuit of ultimate float, and the intricate evolution of specialized board design within the industry. Its prominent presence in the collection highlights the collector’s profound appreciation for both freestyle dynamism and freeride heritage, showcasing a comprehensive understanding of snowboarding’s multifaceted history.
Looking at these meticulously preserved and beautifully displayed boards, one cannot help but feel a profound sense of nostalgia and deep admiration. They don’t just sit passively on the wall; they practically exude the vibrant energy of their glory days, looking as though they could still effortlessly rip down any mountain face, carving fresh tracks with an inimitable blend of style, precision, and unadulterated joy. Such collections serve as fantastic conversation starters, inspiring anecdotes, and a beautiful, living homage to the sport’s rich, dynamic, and ever-evolving past.
Why Display Your Snowboards? More Than Just Practical Storage
Beyond simply clearing valuable floor space, thoughtfully wall-mounting your snowboards fundamentally transforms them from bulky, utilitarian gear into captivating, gallery-worthy pieces of art. Here’s a comprehensive breakdown of why displaying your cherished quiver is an absolutely fantastic and rewarding idea:
- Showcase Your Passion: Your snowboards are tangible narratives of your adventures, your unique style, and your unwavering dedication to the sport. Displaying them proudly and prominently allows you to eloquently share this profound passion with anyone who steps into your personal space.
- Artistic Expression and Decor: Snowboard graphics have evolved into sophisticated and diverse forms of art, ranging from vibrant abstract designs and intricate illustrations to iconic brand collaborations and powerful statements. Each deck, in essence, is a dynamic canvas. Wall mounting your collection ingeniously transforms your living environment into a dynamic, ever-changing, and deeply personal gallery.
- Preservation and Protection: Vintage snowboards, especially those with significant sentimental or monetary value, benefit immensely from proper display techniques. Keeping them securely off the floor prevents accidental damage, unsightly scratches, and detrimental exposure to moisture or extreme temperatures. Our DIY method is particularly gentle and non-invasive, specifically designed to avoid any permanent modification or damage to the board itself, thus preserving its original, pristine condition.
- Optimizing Space and Organization: Utilizing vertical wall space is an incredibly intelligent and efficient way to organize and declutter any room. Instead of awkwardly piling boards in a dusty corner, elegantly hanging them frees up valuable floor real estate, making your space feel larger, tidier, and more purposeful.
- Nostalgia and Constant Inspiration: Each board can evoke a cascade of cherished memories—epic powder days, challenging runs conquered, or unforgettable times spent with friends on the mountain. A visible and well-arranged collection serves as a constant source of inspiration for your next thrilling mountain adventure, fueling your desire to hit the slopes.
Your Comprehensive Guide to an Affordable & Elegant DIY Snowboard Wall Mount
Inspired by the inherent beauty and elegant simplicity of the collector’s display we admired, we’re thrilled to re-share and further elaborate on our straightforward, incredibly budget-friendly method for magnificently showcasing your own quiver. This ingenious DIY solution is perfectly suited for anyone seeking an elegant, yet remarkably sturdy, way to hang their snowboards without breaking the bank or requiring a complex array of specialized tools. It’s particularly appealing for preserving vintage boards as it fundamentally doesn’t involve drilling into the board itself, thereby safeguarding its original, unblemished condition. Prepare to transform your living space, garage, or dedicated gear room into your very own personal snowboarding museum!
Essential Equipment & Tools You’ll Need
Before you enthusiastically embark on this project, ensure you meticulously gather all necessary items. Having everything conveniently on hand will make the entire process exceptionally smooth, efficient, and enjoyable. You’ll undoubtedly be surprised at how few materials are genuinely required for achieving such a professional-looking and robust result.
- Two Small Corks or Rubber Grommets: These unassuming items are truly the stars of our innovative display method. Corks (like standard wine corks, which can be carefully cut to size if they are too long) are absolutely ideal due to their gentle, non-abrasive surface. This crucial characteristic will effectively prevent any scratches, scuffs, or pressure marks on your valuable snowboard’s delicate edges. Rubber grommets offer similar protective qualities and excellent durability. Choose a size that provides sufficient surface area to securely support the board without being overly obtrusive or distracting.
- Two 2-inch Self-Tapping Screws: These screws are specifically selected for their robust strength, making them robust enough to securely fasten the corks/grommets to the wall and reliably support the entire weight of your snowboard. Self-tapping means they possess the ability to create their own thread as they are driven into the material, which is incredibly convenient, particularly when navigating through drywall anchors.
- Two Drywall Anchors: Unless you are fortunate enough to be drilling directly into a solid wall stud (which is always the preferred and strongest option for maximum security, if feasible), drywall anchors are absolutely crucial for ensuring a strong, dependable hold in plaster or standard drywall. They are designed to expand securely behind the wall, creating a solid and stable point for the screw to bite into. Select anchors that are appropriate for the anticipated weight of your snowboard; typically, standard medium-duty anchors are more than sufficient for this application.
- Ruler or Measuring Tape: Precision is an absolute paramount for achieving a perfectly balanced, aesthetically pleasing, and professional-looking display. A reliable ruler or measuring tape will empower you to accurately mark your mounting points with meticulous exactitude.
- Level: An absolute must-have tool! An uneven or visibly crooked snowboard display can instantly become an unfortunate eyesore and detract from the beauty of your board. A level ensures your mounting points are perfectly horizontal and perfectly aligned, leading to an impeccably professional and visually satisfying finish.
- Screwdriver (Phillips head or appropriate for your specific screws): This will be used to effectively drive the screws and, if necessary, to precisely install the drywall anchors. While an electric drill equipped with an appropriate screwdriver bit can significantly speed up the entire process, a manual screwdriver works perfectly fine and offers greater control for delicate tasks.
- Pencil: An essential simple tool for clearly and precisely marking your points on the wall before any drilling commences.
Step-by-Step Instructions for Your DIY Snowboard Display
Follow these detailed steps carefully and patiently to ensure a supremely secure, perfectly level, and aesthetically pleasing installation. This method has been meticulously designed to be both quick and easy, typically taking less than 15 minutes to complete once you have all your materials meticulously ready and organized.
-
Plan Your Display & Gather All Materials
First and foremost, diligently gather all the essential equipment and tools listed in the previous section. Once you have everything conveniently assembled, take a thoughtful moment to determine the ideal and most impactful location for your cherished board. Carefully consider factors such as optimal visibility, ambient lighting conditions, and its harmonious proximity to other existing decor elements. Will your snowboard serve as a bold focal point in your vibrant living room, or a more subtle, elegant nod to your passion in a bustling hallway? Think carefully about the appropriate hanging height – typically, the board looks most impressive and balanced when its center is roughly at eye level, but this can certainly vary depending on your specific ceiling height and unique personal preferences. Crucially, ensure the chosen wall section is entirely clear of any hidden electrical wiring or plumbing pipes before you proceed with any drilling.
-
Measure & Mark Your Mounting Points Precisely
Take your snowboard and carefully measure its widest width across the very top. This precise measurement is absolutely crucial as it directly determines the exact spread and spacing of your mounting points on the wall. For instance, if your board measures 11 inches wide at its broadest point, you will mark two points exactly 11 inches apart on your wall. Hold the measuring tape or ruler firmly against the wall where you intend to hang the board, and use your pencil to clearly mark these two specific points. Most importantly, utilize a level to ensure these marks are perfectly horizontal and situated precisely across from each other. Accuracy at this stage is paramount, as it directly prevents a visibly crooked or uneven display that can detract from your snowboard’s beauty.
-
Install Anchors and Prepare Cork Supports
Now, it’s time to diligently install your drywall anchors at the precisely marked points. If you are fortunate enough to encounter a solid wall stud behind your drywall (which inherently provides the absolute strongest and most secure hold), you may not require an anchor; in this case, simply pre-drill a pilot hole that is slightly smaller than your screw’s diameter, then proceed. Otherwise, carefully install the drywall anchors strictly according to their specific manufacturer’s instructions, which typically involves drilling a pilot hole, then gently tapping or screwing the anchor in until it sits perfectly flush with the wall surface. Once the anchors are firmly in place, take your self-tapping screws and carefully drive them through the exact center of your cork stoppers or rubber grommets. The cork/grommet should now be firmly and concentrically attached to the screw head. Next, place this screw-and-stopper assembly against the marked point on the wall and drive it through the previously installed anchor or directly into the drywall/stud. Stop turning when the cork/grommet is firmly seated against the wall, but exercise caution not to overtighten, as this could potentially damage the cork, the wall, or the anchor itself.
-
Verify Level and Solid Mounting Points
Before proceeding to the final step, take a deliberate step back and visually inspect your newly installed cork anchors. Reconfirm their perfect horizontal alignment using your level once more. Gently test their solidity and stability by applying a small amount of pressure; they should feel unequivocally secure and completely unmoving within the drywall. If they appear even slightly uneven, wobbly, or less than perfectly stable, it is highly advisable to carefully remove them and meticulously start over with the installation. A stable and perfectly level foundation is absolutely essential for securely and safely holding your valuable snowboard.
-
Mount Your Snowboard
This is the exciting moment of truth! Carefully take your snowboard and gently raise it with its bottom side facing the wall. Delicately lower the board, precisely aligning its widest points (which are typically located just above the bindings or at the broadest part of the nose/tail) with your securely installed cork or rubber anchors. The edges of the board will then rest snugly and securely on the corks, suspending it elegantly and stylishly against the wall. Take your time during this step to ensure it sits perfectly balanced, stable, and aesthetically pleasing.
-
Admire Your New Display!
Finally, take a well-deserved step back and proudly admire your brand new, perfectly executed snowboard storage and display solution! You have successfully transformed your cherished board into a captivating and highly personal wall feature. What makes this even more satisfying is the knowledge that this entire project typically required less than $5 in materials and a mere 15 minutes of your time to set up. It stands as a testament to the fact that effective, stylish, and impactful decor does not have to be expensive, complicated, or time-consuming to achieve.
Caring for Your Displayed Vintage Snowboard
Now that your vintage snowboard is proudly and beautifully displayed, a few simple yet crucial considerations can help preserve its pristine condition and vibrant graphics for many years to come:
- Avoid Direct Sunlight: Prolonged exposure to harsh UV rays from direct sunlight can significantly fade vibrant graphics and gradually degrade the materials of your snowboard over time. Position your display thoughtfully in an area that effectively avoids extensive direct sunlight.
- Dust Regularly: A soft, clean microfiber cloth can be used periodically to gently keep dust and grime from accumulating on the board’s surface and its intricate graphics, maintaining its fresh appearance.
- Maintain a Stable Environment: Extreme or rapid fluctuations in temperature or humidity levels can potentially impact the structural integrity and aesthetic condition of the board’s materials. A stable, climate-controlled indoor environment is always considered ideal for long-term preservation.
Conclusion: Transform Your Gear into Gallery-Worthy Art
Displaying your snowboard collection, especially those rare and sentimentally valuable vintage gems, is an absolutely fantastic and deeply personal way to honor the sport’s rich, evolving history and to uniquely personalize your living space. Our simple, cost-effective, and incredibly gentle cork method offers a secure, aesthetically pleasing, and non-damaging solution that proudly protects your boards while magnificently showcasing their unique beauty and historical significance.
Whether it’s a legendary Burton Jeff Brushie Pro, a revolutionary Craig Kelly Air that redefined riding, or a classic Elite 150 swallowtail designed for deep powder, each and every board holds a compelling story worth telling and celebrating. We wholeheartedly encourage you to embark on this quick and rewarding DIY project and transform your treasured snowboards from mere stored gear into inspiring, gallery-worthy pieces of art that reflect your passion and personal style. Share your incredible displays with us and inspire fellow collectors and enthusiasts alike! Happy hanging!
Photo credit: Chelsa Skees