
Embarking on a new chapter in a new home often comes with unexpected projects. For us, it meant addressing a pair of silent sentinels in our backyard: a visibly ailing peach tree and another unidentified tree that had long since given up its fight for life. After observing these dormant giants for a year, this winter presented the perfect opportunity to transform them. Our goal was clear: safely fell the dead trees, process the wood into usable firewood, and construct an efficient, accessible firewood rack for our cozy den fireplace and future camping adventures. This comprehensive guide will walk you through our journey, detailing everything from essential tools and safety precautions to the simple construction of a practical firewood storage solution.
Why Build a Firewood Rack? The Benefits of Organized Wood Storage
Before diving into the practicalities of tree removal and wood processing, it’s crucial to understand the significance of proper firewood storage. Simply piling wood on the ground can lead to a host of problems, including moisture absorption, pest infestation, and difficulty accessing seasoned logs. A well-designed firewood rack elevates the wood off the ground, promoting crucial air circulation that aids in the drying process (seasoning) and deters insects and rodents. Organized storage not only keeps your yard tidy but also ensures your firewood is readily available, burns more efficiently, and lasts longer. Building your own DIY firewood rack is a rewarding project that pays dividends in convenience and fuel quality.
Essential Tools and Uncompromised Safety: Preparing for the Task
Any project involving chainsaws and heavy wood requires meticulous preparation, especially concerning tools and personal safety. Before making the first cut, gathering the right equipment and committing to stringent safety protocols is paramount. This foundational step is non-negotiable for a safe and successful firewood project.
The Powerhouse: STIHL MSA 200 C-BQ Cordless Chainsaw
For this project, our trusted companion was the STIHL MSA 200 C-BQ cordless chainsaw. This versatile tool has been an invaluable asset for several years, proving its worth during our initial property clearing. Its battery-powered efficiency offers impressive cutting power without the noise, fumes, or maintenance associated with gas models, making it ideal for residential use. Complementing the chainsaw, a reliable STIHL hatchet was on hand for finer work and splitting smaller pieces.
Even for experienced users, reviewing the owner’s manual for any new or unfamiliar chainsaw, including the STIHL MSA 200 C-BQ, is absolutely critical. Different models can have unique controls, safety features, and operational procedures. Taking a few moments to familiarize yourself with the specific nuances of your tool can prevent accidents and ensure optimal performance. Our property, for instance, previously housed extensive yard debris from uncollected felled trees, underscoring the importance of thorough preparation before tackling any new wood-cutting task.
Before each use, we diligently perform a series of essential checks on our chainsaw:
- **Bar Oil Levels:** Always ensure the bar oil reservoir is completely topped off. Proper lubrication is vital for chain longevity and efficient cutting.
- **Chain Tension:** A properly tensioned chain should snap back into place when pulled from the bottom of the guide bar. If it’s too loose, it can easily derail, posing a significant hazard. Adjusting chain tension is typically a straightforward process.
- **Battery Charge:** For cordless models, using a fully charged battery maximizes performance and ensures you won’t be left mid-cut.
- **Visual Inspection:** Conduct a thorough visual scan for any damage, loose parts, or debris. Confirm the chain brake functions correctly, and listen for any unusual sounds during a brief test run.
Uncompromising Safety: Essential Personal Protective Equipment (PPE)
Once your chainsaw is inspected and ready, your next priority must be your personal protective equipment. Using the correct safety gear isn’t merely a suggestion; it is a mandatory requirement when operating a chainsaw. Accidents can happen swiftly, and PPE is your last line of defense. Fortunately, high-quality safety gear is readily available and relatively inexpensive, found at local home centers or online retailers. Here’s a detailed list of what you need and why it’s crucial:
- **Chainsaw Chaps or Pants:** These are arguably the most important piece of PPE. Designed with layers of synthetic fibers that instantly clog the chainsaw chain upon contact, they can prevent severe leg injuries. Ensure they fit properly over your regular pants and cover the top portion of your work boots.
- **Safety Glasses/Goggles:** Protect your eyes from flying wood chips, sawdust, and debris. Always wear impact-resistant glasses, even if you have a face shield, for an extra layer of protection.
- **Head Protection and Face Screen:** A hard hat protects against falling branches or kickback, while a mesh or polycarbonate face screen shields your face from projectiles. This combination is essential for head and facial injury prevention.
- **Hearing Protection:** Chainsaws generate significant noise levels that can cause permanent hearing damage over time. Earplugs or earmuffs are critical to protect your hearing.
- **Mid to High Work Boots:** Sturdy, steel-toed work boots provide protection from falling logs, dropped tools, and chainsaw kickback. The mid to high cut also helps prevent ankle injuries.
- **Work Gloves:** Heavy-duty work gloves improve grip on the chainsaw and wood, reduce vibration, and protect your hands from splinters, cuts, and scrapes.
Strategic Tree Removal: Safely Felling Dead Trees
Once you’re fully equipped and ready, the process of felling a tree requires careful planning and a thorough assessment of the environment. Never rush this stage.
Before making any cuts, meticulously survey the surrounding area. Identify the desired felling direction and ensure a clear, unobstructed path for the tree to fall. Crucially, also check every other direction. Miscalculations can occur, and understanding potential alternative fall zones is vital for safety. Look for any nearby structures, fences, power lines, or anything that could be damaged. For particularly large or precarious trees, especially those near buildings or utility lines, consider consulting or hiring a professional arborist. The smaller dead tree in our yard was in an ideal open space, simplifying the felling process. However, the larger tree was positioned right next to a chain-link fence. Fortunately, an ample open space existed for its fall, with no overhead wires or nearby structures to complicate matters.
After successfully felling the trees, the next step involves “limbing” – removing all the branches from the main trunk. Our STIHL chainsaw made quick work of the larger limbs, while the hatchet proved effective for severing smaller branches, ensuring efficiency and minimizing waste.
Efficient Firewood Processing: From Trunk to Kindling
Once the trees are down and limbed, the real work of transforming raw wood into usable firewood begins. This stage focuses on cutting the logs to appropriate lengths and processing smaller pieces for kindling.
Our STIHL chainsaw was essential for bucking the main trunk and larger branches into manageable firewood lengths, typically 16-18 inches, suitable for most fireplaces and wood stoves. These pieces are then often split to promote faster drying and easier burning. For the smaller branches and debris, our hatchet was perfect for creating kindling – small, easily ignitable pieces that are vital for starting fires. This meticulous approach ensured that every usable part of the fallen trees was repurposed, leading to distinct piles of ready-to-burn firewood and easily accessible kindling, maximizing the value of our efforts and ensuring nothing went to waste.
During this stage, exercise extreme caution, especially when cutting limbs or logs close to the ground. Always strive to keep your chainsaw chain from making contact with the earth, as this can dull the chain rapidly and even damage the saw. Additionally, maintain a stable and safe foot position, keeping your feet clear of the cutting path and away from potential log rolls.
DIY Firewood Rack Construction: Simplicity Meets Functionality
With a growing pile of freshly cut firewood, the need for effective storage becomes immediate. While numerous elaborate firewood rack designs exist, we opted for a method that excels in its simplicity, cost-effectiveness, and practicality – a design that is both robust and easily adaptable.
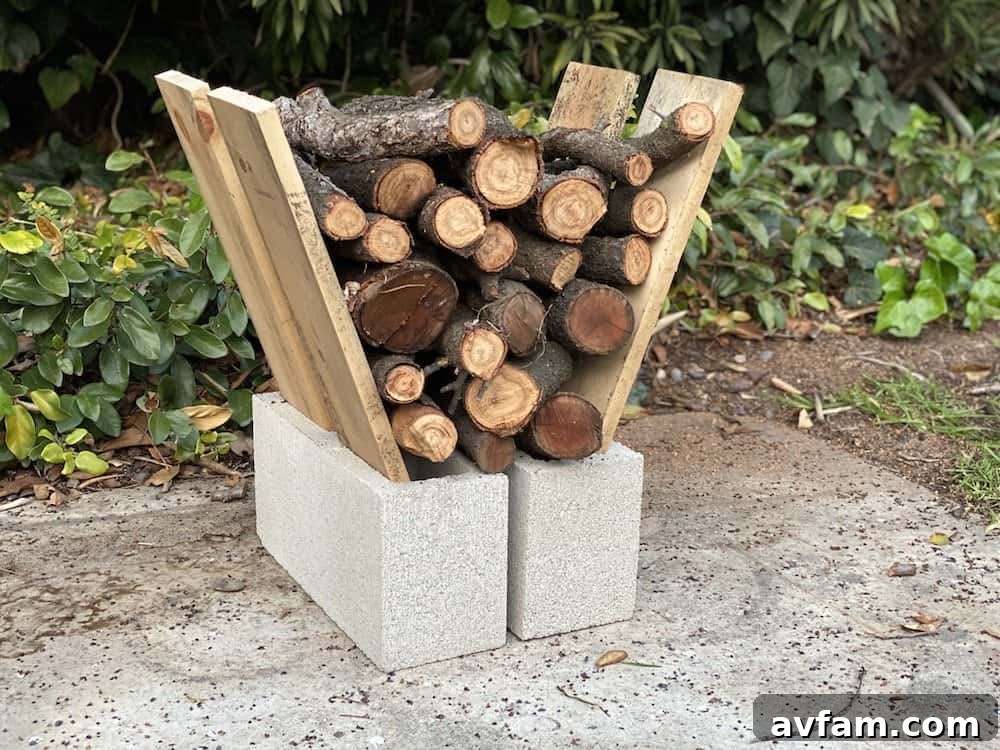
To construct this incredibly simple yet highly functional firewood rack, you’ll only need two primary materials: four 5-foot lengths of 2×4 lumber and two standard cinder blocks. This minimal material list keeps the project budget-friendly and accessible for any DIY enthusiast.
Here’s how to assemble your firewood rack:
- **Position the Cinder Blocks:** Place your two cinder blocks on a flat, stable surface where you intend to store your firewood. Ensure they are spaced appropriately to accommodate the length of your 2x4s and the volume of wood you plan to store.
- **Insert the 2x4s:** Take two of your 5-foot 2x4s and insert one end of each into the open cells of one cinder block. Angle them outwards, creating a “V” shape.
- **Repeat for the Second Block:** Do the same with the remaining two 2x4s and the second cinder block, mirroring the first setup.
- **Form the Support Structure:** The angled 2x4s, securely held by the weight of the cinder blocks and the firewood itself, will naturally form two robust “V” patterns. These V-supports are incredibly effective at cradling and stabilizing your stacked firewood.
It truly is that straightforward! The genius of this design lies in its inherent stability and ease of assembly.
One of the most appealing aspects of this cinder block firewood rack is its remarkable flexibility. When summer arrives, or if you need to relocate your firewood pile, the entire structure can be effortlessly disassembled. The 2x4s and cinder blocks can be stored away compactly, taking up minimal space. Furthermore, for those who appreciate aesthetic customization, the raw materials offer a blank canvas. You can easily paint the cinder blocks or the 2x4s to match your outdoor décor or add a splash of color, transforming a utilitarian object into a more visually integrated part of your landscape. This simple, robust, and versatile design makes it an ideal solution for any homeowner seeking an efficient way to store firewood.
Embracing Sustainable Practices and Maximizing Resources
Transforming dead trees into valuable resources like firewood is not only practical but also an excellent example of sustainable living. Instead of letting these trees go to waste or paying for their removal, we’ve harnessed their potential to provide warmth and utility for our family. The process of felling, processing, and stacking firewood, culminating in the creation of a simple DIY firewood rack, is a deeply satisfying endeavor. It connects you to nature, provides physical activity, and yields tangible benefits.
The next time you find yourself with a dead or dying tree in your yard, consider the opportunity it presents. With the right tools, proper safety measures, and a commitment to DIY, you can easily take it down and repurpose the wood. Whether it’s to fuel memorable camping trips, efficiently heat your home, or simply create a beautiful, organized wood pile, embracing this hands-on approach offers immense rewards.
This detailed guide reflects the authentic experiences and insights of Timothy Dahl of Charles & Hudson, made possible through the support of STIHL. We hope it inspires you to tackle your own firewood projects with confidence and enthusiasm.