
The weather outside might be dictating your weekend plans, but here in Kansas City, a chilly and rainy forecast sets the perfect stage for some rewarding DIY projects. And if you’re like me, constantly seeking innovative ways to enhance your living space, then I’ve got a fantastic new addition to my project list – one that I’m eager to share with you: magnificent invisible floating shelves.
Imagine your favorite books suspended as if by magic, seemingly defying gravity, adding a touch of modern elegance and intrigue to any room. These aren’t just ordinary shelves; they are a clever illusion, transforming functional storage into an artistic display. Whether nestled beside your bed, offering a practical yet stylish spot for your nightly reads, or gracing the walls of your living room or office area, these shelves are designed to captivate and streamline. I’m particularly excited about the prospect of creating a grouping of these invisible wonders, allowing me to curate a dynamic, multi-level arrangement that truly elevates my collection of books into genuine works of art.
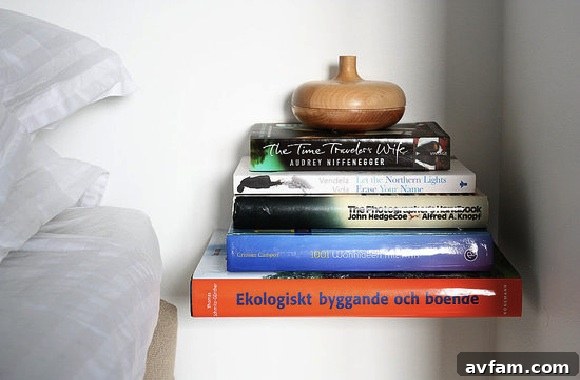
Unlock the Magic of Invisible Floating Shelves: A DIY Guide
The allure of invisible floating shelves lies in their ability to create an incredibly clean and minimalist aesthetic. They offer all the functionality of traditional shelving without the visual clutter of bulky brackets or supports. This makes them an ideal choice for contemporary interiors, small apartments where space is at a premium, or anyone looking to add a unique, personalized touch to their home decor. The illusion of books hovering mid-air instantly sparks conversation and adds a sophisticated focal point to any wall.
For those ready to embark on this ingenious home improvement project, a comprehensive tutorial is invaluable. Our friends at CasaSugar have provided an excellent guide to walk you through each step. Before you gather your tools and dive into the transformation, however, let’s explore some crucial pointers and expanded insights to ensure your DIY journey is smooth, successful, and results in stunning, sturdy invisible floating shelves.
Essential Materials for Your Invisible Shelf Project
To begin your invisible floating shelf adventure, you’ll need more than just enthusiasm. Gather these key materials and tools to ensure a seamless execution:
- Invisible Shelf Brackets: These specialized metal brackets are the secret behind the “floating” effect. They typically feature a base that mounts to the wall and a thin, sturdy arm that slides into the pages of a book. Look for high-quality, durable brackets that can support the weight of multiple books.
- A Sacrificial Hardback Book: This is arguably the most critical component. Choose a sturdy hardback book, preferably one you don’t mind altering slightly, as it will form the base of your shelf. The book’s spine should be thick enough to conceal the bracket arm, and its overall condition should be good enough to provide a stable foundation for the books stacked above it. Avoid paperback books or those with fragile bindings, as they won’t offer adequate support.
- Stud Finder: Crucial for ensuring the structural integrity of your shelf. Mounting your brackets directly into wall studs is paramount for safety and stability, preventing your beautiful new shelves from collapsing.
- Drill and Drill Bits: You’ll need a power drill to securely fasten the brackets to your wall. Ensure you have appropriate drill bits for your wall type (e.g., wood bits for studs, masonry bits for brick, or pilot bits for drywall anchors).
- Level: A spirit level or laser level is indispensable for ensuring your shelves are perfectly straight. Nothing detracts from a clean aesthetic more than a crooked shelf.
- Pencil: For marking drilling points and shelf placement.
- Measuring Tape: To plan your layout and ensure even spacing if you’re installing multiple shelves.
- Screws and Wall Anchors (if necessary): While anchoring into a stud is ideal, sometimes placement doesn’t allow for it. In such cases, heavy-duty wall anchors designed for the weight of your books might be an alternative, though studs are always preferred.
Preparation and Installation: Crafting Your Floating Display
The magic begins with meticulous preparation and careful installation. Don’t rush this stage; precision here ensures both beauty and durability.
- Planning Your Layout: Before drilling a single hole, visualize where you want your shelves. Consider the height, spacing, and the overall arrangement, especially if you’re creating a grouping. Use a pencil to lightly mark your desired locations on the wall. Think about the types of books or decorative items you plan to display.
- Locating Wall Studs: This step cannot be overstated. A stud finder is your best friend here. Run it across the wall in the area you’ve marked. Once a stud is detected, mark its center with your pencil. If you don’t have a stud finder, a “tried-and-true” technique involves knocking on the wall. A hollow sound indicates empty space, while a solid thud usually means you’ve found a stud. However, a stud finder offers far greater accuracy and is highly recommended for load-bearing installations.
- Mounting the Bracket: With your stud location confirmed, hold the invisible shelf bracket against the wall, aligning its mounting holes with the center of the stud. Use your level to ensure the bracket is perfectly horizontal. Mark the drill points through the bracket’s holes. Then, carefully drill pilot holes into the wall. Once the pilot holes are ready, securely fasten the bracket to the wall using appropriate screws. Tighten them firmly but avoid over-tightening, which can strip the screws or damage the wall.
- Attaching the Sacrificial Book: This is where the “invisible” illusion truly begins to take shape. The arm of the metal bracket is designed to slide into the pages of your chosen hardback book. Carefully slide the bracket arm into the book, ensuring it’s snug and secure. The book should fit tightly around the bracket arm, acting as a stable base. This book should be positioned so that its spine faces outwards, seamlessly blending with the other books.
The Secret to Invisibility: Perfecting the Stack
Once the bracket is securely mounted and your sacrificial book is in place, the final, crucial step to maintaining the illusion of invisibility is how you stack your books. The key is simple yet effective: stack your books high enough so that the metal bracket is completely covered.
Arrange your collection directly on top of the sacrificial book, ensuring that the height of the stacked books is sufficient to conceal every part of the bracket’s arm and base that would otherwise be visible. This creates a continuous, unbroken facade of books, making it appear as if they are effortlessly floating without any visible support. Experiment with different book sizes and orientations to achieve the most convincing and aesthetically pleasing result. You can vary the heights of your stacks, or even layer smaller decorative items on top of the tallest books, to add further depth and interest to your display.
Elevate Your Decor: Tips for Styling Invisible Floating Shelves
Beyond their practical utility, invisible floating shelves are a fantastic medium for creative expression. Here are some ideas to help you style them:
- Curated Collections: Instead of simply stacking books, curate small collections based on color, theme, or author. A monochromatic stack of books can be strikingly elegant, while a rainbow gradient adds a playful touch.
- Mix and Match: While books are the star, don’t hesitate to incorporate small decorative elements. A tiny succulent, a cherished figurine, a vintage camera, or a small framed photo can add personality and break up the uniformity of the books. Place these items on top of the uppermost books in a stack.
- Varying Heights: If you’re installing multiple shelves, vary their vertical placement to create a dynamic wall display. This adds visual interest and prevents the arrangement from looking too static.
- Beyond Books: While designed for books, the concept can be adapted. For instance, you could use a slightly larger “sacrificial” item (like a decorative box) to hold smaller, lighter objects, though always ensure stability and proper weight distribution.
- Lighting: Consider adding subtle accent lighting, such as LED strip lights installed discreetly behind the shelves, to highlight your display and enhance the “floating” effect, especially in the evening.
Safety and Maintenance: Ensuring Longevity and Stability
While invisible floating shelves are a testament to clever design, it’s essential to consider safety and proper maintenance:
- Weight Limits: Always respect the weight capacity of your chosen brackets and, more importantly, the wall itself. Overloading shelves can lead to damage, instability, and even collapse. Hardback books are heavier than paperbacks, so plan accordingly.
- Regular Checks: Periodically check the stability of your shelves. Ensure the screws are still tight and that the sacrificial book remains firmly attached to the bracket.
- Dusting: Like any other surface, your books and shelves will accumulate dust. Gently dust them regularly to keep your display looking fresh and vibrant.
- Environmental Factors: Avoid placing shelves in areas with extreme temperature fluctuations or high humidity, as these can affect both your books and the integrity of the wall mounting over time.
Embrace the DIY Spirit
The satisfaction of completing a DIY project that not only looks professional but also injects character into your home is immense. These invisible floating shelves are more than just storage solutions; they are a conversation starter, a personalized art installation, and a testament to clever design. They invite you to rethink how you display your beloved books and cherished items, creating a modern, clutter-free environment.
What are your thoughts on these ingenious invisible shelves? Do they spark your inner decorator, inspiring you to add them to your upcoming DIY project list? I’m certainly looking forward to getting started on mine, and I’ll be sure to keep you updated on my progress and share the final look. In return, I’d love to hear about your own experiences and transformations!
Photo courtesy of CasaSugar