
Transforming a blank wall into a captivating display of your favorite memories and artistic expressions is one of the most rewarding home decor projects. A thoughtfully curated gallery wall offers a striking way to exhibit your prized mementos, personal photographs, and cherished artwork, turning any room into a personalized sanctuary. Far from being a daunting task, creating an in-home gallery wall is a relatively straightforward and often budget-friendly endeavor, depending on the frames and prints you choose.
The Ultimate Guide to Creating a Stunning Gallery Wall
Whether you’re looking to infuse personality into a living room, add a touch of sophistication to a hallway, or create a cozy atmosphere in a bedroom, a gallery wall serves as a dynamic focal point. This comprehensive guide will walk you through every step of the process, from envisioning your design to expertly hanging your collection, ensuring your gallery wall perfectly reflects your unique style and tells your personal story.
Why Create a Gallery Wall? More Than Just Displaying Art
Beyond simply filling a blank space, a gallery wall offers numerous benefits for your home and well-being:
- Personal Expression: It’s a canvas for your life, showcasing your journey, passions, and unique aesthetic. Every piece tells a story, making your home truly yours.
- Adds Character and Depth: A well-designed gallery wall introduces texture, color, and visual interest, preventing rooms from feeling sterile or uninspired.
- Versatile Design Element: It can adapt to any interior style, from bohemian chic to minimalist modern, simply by adjusting the types of frames and art used.
- Budget-Friendly Decor: You don’t need expensive art. Family photos, postcards, children’s drawings, or even pages from old books can be framed to create impact.
- Conversation Starter: Guests will be drawn to the stories behind your displayed items, making your home a more engaging and welcoming space.
- Maximizes Vertical Space: Especially useful in smaller homes, gallery walls draw the eye upwards, making rooms feel larger and more open.
Step 1: Discovering Your Gallery Wall Style
Before you even think about frames, the first and most crucial step is deciding which look resonates with you and your home’s existing decor. This initial vision will guide all subsequent decisions, from frame selection to layout.
Embracing Eclectic Charm
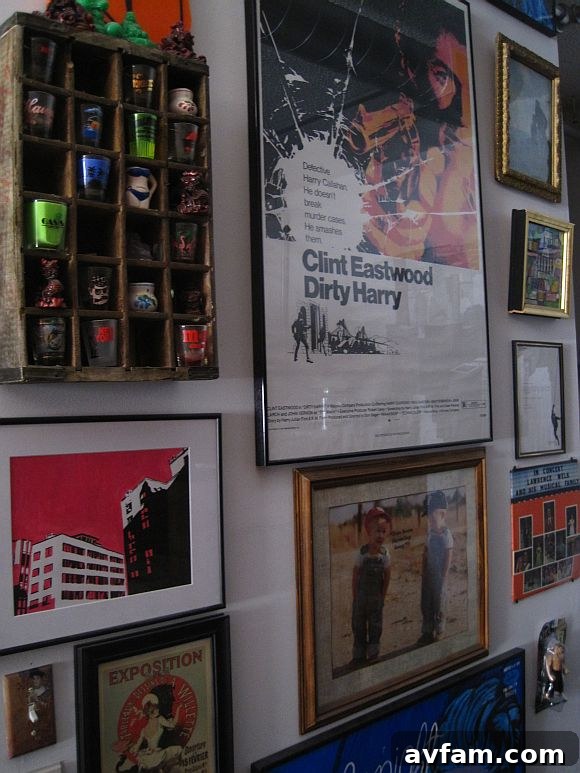
As seen in the image above, an eclectic, mismatched look can be incredibly captivating. This style celebrates individuality and allows for a vibrant mix of frames of all types, sizes, materials, and colors. It’s perfect for those who love a bohemian vibe, appreciate vintage finds, or want to display a diverse collection of art and photos without strict uniformity. The beauty of an eclectic wall lies in its organic, lived-in feel, often revealing new details upon closer inspection—yes, that might even be a John Cena action figure adding a touch of whimsy! Don’t judge; it’s all about personal expression.
Achieving Streamlined Sophistication
If your aesthetic leans towards modern, minimalist, or classic design, a more streamlined approach might be ideal. This could involve frames of varying sizes but all in the same color (e.g., all black, all white, or all natural wood) or made from the same material. Alternatively, you could opt for a uniform grid of identical frames, creating a sense of calm and order. This style often feels more formal and polished, providing a clean backdrop that lets the artwork itself shine.
Exploring Other Popular Aesthetics
- Bohemian Rhapsody: A mix of textures, often incorporating textile art, woven elements, and frames with intricate details or natural wood finishes.
- Mid-Century Modern: Clean lines, geometric patterns, and frames in natural wood tones or sleek metals, often featuring abstract art or architectural prints.
- Industrial Chic: Raw materials like metal frames, concrete-effect prints, and often incorporates non-traditional wall decor like vintage signs or gears.
- Coastal Calm: Light-colored frames, perhaps distressed wood or white, displaying seascapes, shell art, or beach-themed photography.
- Thematic Storytelling: Dedicate your wall to a specific theme, such as travel destinations, family history, or a particular artistic movement. This creates a cohesive narrative even with diverse pieces.
Step 2: Curating Your Collection – What to Display
Once you have a style in mind, it’s time to gather the items you wish to display. Think broadly—a gallery wall isn’t limited to just photos.
Photographs and Prints
Family photos, travel snapshots, scenic landscapes, or abstract prints can all find a place. Consider a mix of black and white alongside color photos for added visual interest, or stick to a monochrome palette for timeless elegance.
Original Art and Illustrations
Showcase paintings, drawings, sketches, or even children’s artwork. Don’t underestimate the power of a small, unique piece to add character.
Mirrors, Objects, and Memorabilia
Integrate small mirrors to reflect light and expand the perception of space. Incorporate decorative objects like small wall sculptures, vintage signs, botanical presses, or even a framed record album cover. Personal mementos, such as concert tickets or postcards from special trips, can also be framed and included.
Step 3: Selecting the Perfect Frames
We recommend picking your frames first, as this will often determine the size of the photo prints or art you’ll need. However, if you have specific pieces you absolutely want to display, you’ll naturally buy frames to fit those dimensions. Frame selection is crucial for achieving your desired aesthetic.
Materials and Finishes
Frames come in a vast array of materials, each contributing a different feel:
- Wood: Classic and versatile, ranging from rustic reclaimed wood to sleek polished oak or walnut.
- Metal: Modern and minimalist, often found in black, gold, silver, or bronze finishes.
- Acrylic/Plexiglass: Lightweight and shatter-resistant, ideal for a contemporary, frameless look.
- Composite: A cost-effective alternative that can mimic the look of wood or metal.
Color Coordination
For a streamlined look, choose frames all in one color (e.g., all black for drama, all white for brightness, or all natural wood for warmth). For an eclectic wall, feel free to mix colors, but consider having a dominant color family or a unifying element to prevent the wall from looking too chaotic.
Sizes and Dimensions
A dynamic gallery wall often benefits from a mix of frame sizes. Varying dimensions add visual interest and create a more organic feel. Measure your wall space to determine how many frames you can comfortably fit and in what general sizes.
Where to Find Frames
Frames are readily available from many sources:
- Big-Box Retailers: Stores like Target, IKEA, or Walmart offer affordable options in common sizes and styles.
- Craft Stores: Michaels, Hobby Lobby, and similar stores often have a wide selection, including custom framing services and sales.
- Online Retailers: Amazon, Wayfair, and specialty frame shops like Framebridge offer convenience and extensive choices, including custom sizes.
- Thrift Stores & Flea Markets: A treasure trove for unique, vintage, and often very affordable frames, perfect for an eclectic look. Don’t be afraid to give them a fresh coat of paint!
Step 4: Preparing Your Artwork and Photos
Once your frames are selected, it’s time to prepare their contents.
Printing Your Memories
If you need photo prints, you have several convenient options. Many stores like Target, CVS, or Walgreens offer in-store printing services, allowing you to get prints in minutes for just a few cents per print. For higher quality or custom sizes, online services like Shutterfly, Snapfish, or even professional local print shops provide excellent results. Always check reviews and sample prints if quality is a top priority.
Mounting and Matting
Consider using mats to enhance your artwork. Mats create a border around your photo or art, drawing the eye inward and making the piece appear more substantial and professional. They also help protect the art from sticking to the glass. Pre-cut mats are available in standard frame sizes, or you can opt for custom cutting.
Step 5: Planning Your Layout – The Art of Arrangement
This is where your vision truly comes to life. Don’t rush this step; a good layout is key to a cohesive and appealing gallery wall.
Mapping It Out on the Floor
The most effective way to plan your arrangement is to lay your framed pieces on the floor in front of the wall you intend to use. This allows you to play with the design and see how much space you want between each frame without the commitment of putting holes in your wall. Experiment with different configurations until you find a layout that feels balanced and aesthetically pleasing. You can surround a larger frame with a few smaller ones to create a sense of order without stifling creativity.
Using Paper Templates
For a more precise approach, especially with a grid or symmetrical layout, cut out paper templates the exact size of each frame. Tape these templates to the wall using painter’s tape. This allows you to visualize the exact spacing and alignment before you begin drilling or hammering. You can easily move them around until you achieve the perfect arrangement.
Popular Layouts to Consider
- The Grid: Identical frames arranged in a perfect grid, typically with uniform spacing. Ideal for a clean, modern aesthetic.
- Symmetrical Layout: Achieves balance by mirroring elements on either side of a central point or line. Frames might not be identical, but their distribution creates harmony.
- Asymmetrical/Organic Cluster: A more free-form arrangement, common in eclectic styles. Pieces are grouped together, often radiating from a central point, without strict rules but still maintaining visual balance.
- Edge-Aligned: One side (top, bottom, left, or right) of all frames aligns, creating an intentional, structured look even with varied sizes.
- Staircase Gallery: Follows the angle of a staircase, creating a dynamic display that guides the eye up or down.
Key Considerations for Spacing
Generally, frames should be spaced between 2 to 4 inches apart. Closer spacing creates a denser, more intimate feel, while wider spacing offers a more open, airy look. Maintain consistent spacing within your chosen layout for the most professional appearance.
Step 6: Mastering the Hanging Process
With your layout finalized, it’s time for the final, satisfying step: hanging your gallery wall. Don’t feel the need to get overly scientific with every measurement; sometimes, eyeballing it works just fine, especially for organic layouts. However, a few tools and tips can make the process smoother.
Essential Tools You’ll Need
- Level: Crucial for ensuring frames hang straight, especially in grid or symmetrical layouts.
- Measuring Tape: For precise spacing and positioning.
- Pencil: To mark hanging points on the wall.
- Hammer or Drill: Depending on your wall type and hanger choice.
- Picture Hangers: Choose appropriate hangers based on the weight of your frames (nails, D-rings, wire hangers, command strips).
- Painter’s Tape: Useful for holding paper templates or marking lines.
Tips for Level and Secure Hanging
- Mark Your Spot: Once your layout is finalized on the floor or with templates, mark the exact top center point where each hanger will go.
- Use a Level: After hanging each frame, use a small level to ensure it’s perfectly straight. Adhesive mini-levels can be placed directly on the frame for ease.
- Command Strips for Flexibility: For lighter frames or if you anticipate frequently changing your display, adhesive command strips are an excellent choice as they avoid wall damage and allow for easy repositioning.
- Two Hangers for Large Frames: For wider or heavier frames, using two hangers (one near each top corner) can prevent tilting and provide greater stability.
Avoiding Wall Damage
Arranging your frames on the floor or using paper templates before hanging is the best way to save your walls from several unnecessary holes! If you make a mistake, small nail holes can be easily filled with spackle and touched up with paint.
Maintaining and Evolving Your Gallery Wall
A gallery wall isn’t a static installation; it’s a living display. Over time, you might want to refresh elements, swap out photos, or add new pieces. This adaptability is part of its charm. Dust your frames regularly, and ensure they remain securely hung. Don’t be afraid to periodically rotate pieces or introduce new artwork to keep your display fresh and engaging.
Conclusion: Your Personalized Art Exhibit
Creating a gallery wall is an incredibly personal and rewarding home decor project. It allows you to transform a simple wall into a narrative, a mood board, and a collection of cherished moments and artistic inspirations. By carefully considering your style, curating your content, selecting appropriate frames, and thoughtfully planning your layout, you can craft a display that not only enhances your home’s aesthetic but also resonates deeply with your personal story.
Do you have a gallery wall in your home that you adore? Or are you now inspired to create one and embark on this creative journey? We’d love to hear about your ideas, experiences, and tips for making a gallery wall truly shine!