
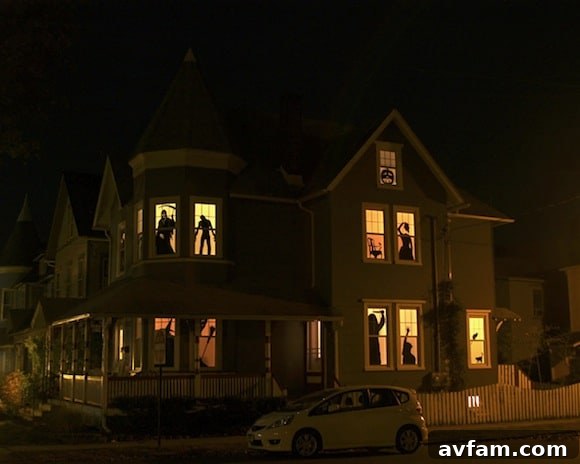
Transform your home into the neighborhood’s most haunted abode this Halloween with a classic, eye-catching, and surprisingly simple DIY project: spooky window silhouettes. Whether you’re past the trick-or-treating age or looking for a fun, family-friendly activity, decorating your house and lawn is a quintessential part of the spooky season. These homemade haunted house silhouettes promise an impressive and frightful display that will captivate passersby and set the perfect eerie mood for October 31st.
Before diving into the detailed steps, it’s worth noting the creative potential of this project. For those seeking inspiration or a slightly different take, our team at Built by Kids explored a similar concept. You can see our rendition of Witch and Grim Reaper Silhouettes, which might spark additional ideas for your own terrifying tableau.
The best part about crafting these chilling window decorations? The project is remarkably easy, budget-friendly, and perfect for all ages, making it a fantastic family activity. You’ll be amazed at the dramatic transformation your home undergoes with just a few simple materials and a touch of creativity. Before you begin your journey into the realm of DIY Halloween decor, make sure you have all your supplies at hand:
Unleash Your Inner Ghoul: Essential Materials for Spooky Silhouettes
Creating a truly haunting display starts with gathering the right tools. While the core materials are straightforward, a few optional additions can significantly enhance both the crafting experience and the final result.
Core Supplies:
- A Large Roll of Black Paper: This is your canvas for creating monstrous figures and eerie landscapes. Opt for heavy-duty craft paper, butcher paper, or even black poster board for durability. The size of the roll will depend on how many and how large you want your silhouettes to be.
- White Chalk: An indispensable tool for tracing your designs onto the black paper. White chalk provides excellent contrast and can be easily erased or wiped away if you make a mistake.
- Sharp Scissors: Precision is key! A good pair of craft scissors will make cutting out intricate details much smoother and less frustrating. Consider having a smaller pair for fine details and a larger pair for general cutting.
- PDFs of Silhouette Images: These templates are your starting point for a vast array of spooky characters. You can download a collection here, courtesy of Craft magazine. Look for designs featuring witches, ghosts, bats, spiders, haunted houses, grim reapers, monsters, and anything that screams “Halloween.”
Optional Supplies for an Enhanced Experience:
- A Soundtrack of Your Favorite Halloween Songs: Set the mood! A playlist featuring classics like “Ghostbusters,” Michael Jackson’s “Thriller,” and “Monster Mash” can make the crafting process even more enjoyable and inspire your spooky creations.
- Cold Cider: A refreshing treat to keep you hydrated and energized as you work on your masterpieces.
- An Assortment of Halloween Candy: Fuel your creativity (and satisfy your sweet tooth!) with a selection of your favorite seasonal confections.
Additional Recommended Tools for Professional Results:
- Craft Knife or X-Acto Knife with a Cutting Mat: For incredibly intricate details and sharp edges that scissors might struggle with, a craft knife is invaluable. Always use it on a self-healing cutting mat to protect your surfaces.
- Painter’s Tape or Double-Sided Tape: Essential for securing your finished silhouettes to your windows without leaving residue or damaging paint. Painter’s tape is great for temporary adhesion, while double-sided tape offers a more invisible hold.
- Clear Fishing Line or Monofilament: Perfect for hanging smaller, lighter silhouettes (like bats or ghosts) to create the illusion of floating.
- Pencil and Eraser: For light initial sketches or marking adjustments before committing with chalk.
- Measuring Tape: To accurately measure your windows and ensure your enlarged silhouettes will fit perfectly.
- Newspaper or Drop Cloth: To protect your work surface from chalk dust and paper scraps.
This project comes courtesy of the brilliant Jeffrey Rudell, whose hauntingly good haunted house silhouettes have garnered such popularity that they’ve been compiled and published in the highly acclaimed book: “Spooky Halloween Silhouettes.” Rudell’s expertise ensures that even beginners can achieve impressive results.
As Rudell eloquently writes for Craftzine, the magic lies in the simplicity and the dramatic effect achieved with minimal effort. Now, let’s delve into the step-by-step process of bringing these chilling visions to life in your own windows.
Crafting Your Creepy Canvas: Step-by-Step Directions
Follow these detailed instructions to create stunning Halloween silhouettes that will make your home the talk of the neighborhood.
- Step 1: Select Your Spooks and Print Them Out
Begin by browsing through the provided PDF templates or searching online for your favorite spooky silhouette designs. Consider the overall theme you want for your display – perhaps a haunted graveyard, a coven of witches, or a horde of monsters. Print your chosen silhouettes on standard printer paper. When selecting, think about the level of detail; simpler designs are easier for beginners, while more complex ones offer a greater challenge for experienced crafters. Print them in black and white to save ink, as you’ll only be using the outline.
- Step 2: Enlarge for Impact – Sizing Your Silhouettes
The key to dramatic window silhouettes is proper scaling. Take your printed templates to a local copy store or print shop and have them enlarged to fit your specific window dimensions. Communicate clearly with the staff about the desired final size. Alternatively, you can achieve enlargement at home:
- The Projector Method: If you have access to a projector, this is an excellent method. Project your silhouette image onto a wall covered with your black paper. Trace the projected image directly onto the paper with chalk.
- The Tiling Method: Many image editing programs allow you to print a large image across multiple standard-sized pages (tiling). Print your chosen silhouette this way, then carefully tape the individual pages together to form your enlarged template. This method requires a bit more patience but is very effective.
- Free Online Tools: Websites exist that can help you blow up images and then provide instructions for printing them across multiple pages. Search for “poster printer online” or “tile print images.”
Before enlarging, measure your windows. You don’t want the silhouette to cover the entire window; leave a small border around the edges for a cleaner look and easier mounting. Ensure the scale of your chosen figures looks appropriate for your window space – a giant witch might look out of place in a tiny pane, while small bats could get lost in a grand bay window.
- Step 3: Trace with Care – Transferring Your Designs
Once your silhouettes are enlarged, it’s time to transfer them onto your large roll of black paper. Lay your black paper flat on a clean, protected surface (like a table covered with newspaper). Place your enlarged paper template on top of the black paper. Secure it with painter’s tape to prevent slipping. Using white chalk, carefully trace the outline of your silhouette onto the black paper. Take your time to ensure all details are captured. If you’re using a craft knife for internal cuts later, you might also trace those details. The chalk provides a clear, temporary line that will guide your cutting.
- Step 4: Precision Cutting – Bringing Your Shapes to Life
With your designs traced, it’s time for the most meticulous step: cutting. Using your sharp scissors (and a craft knife for intricate areas if you have one), carefully cut out the traced silhouettes from the black paper. For smooth curves, try to cut in a continuous motion, rotating the paper rather than your scissors. For sharp angles and internal cutouts (like eyes or intricate patterns), a craft knife is ideal. Always cut away from your body and use a cutting mat. Discard the chalk lines you’ve just cut along, leaving only the crisp black silhouette.

Take pride in your cuts; clean edges make a significant difference in the final appearance of your display. If you’re creating a scene with multiple elements, consider cutting them out separately and then arranging them together.
- Step 5: Mounting and Display – Unleash the Spookiness!
Now for the exciting part: mounting your finished silhouettes in your windows! First, clean your windows thoroughly for optimal adhesion. The method of mounting will depend on the size and shape of your silhouettes:
- For Smaller, Lighter Shapes: Consider using clear fishing line or monofilament to hang items like flying bats, ghostly figures, or spiderwebs. Attach a small loop of fishing line to the back of the silhouette with tape, then secure the other end to the top of your window frame with a thumbtack or a small piece of tape. This creates a floating effect.
- For Larger Shapes or Direct Window Adhesion: Use painter’s tape or double-sided tape. Painter’s tape is excellent because it holds well but removes cleanly without damaging glass or window frames. Place small pieces of tape strategically on the back of your silhouettes (especially at corners and key points) and then press them firmly against the inside of your window glass. Ensure the tape is applied evenly to prevent sagging.
When positioning your silhouettes, think about creating a cohesive scene. You might have a witch flying across a moon silhouette, or a family of vampires peering out from a haunted castle. Experiment with placement until you achieve the desired eerie effect. For maximum impact, ensure your interior lights are on at night; this backlights the silhouettes, making them dramatically visible from outside.
Embrace Creative Freedom: Alternative Approaches and Enhancement Tips
While the step-by-step guide offers a solid foundation, don’t be afraid to experiment and personalize your Halloween display.
Freehanding for the Ambitious
If you’re an artist at heart and feeling ambitious, you can skip the templates entirely. Freehand your creepy silhouettes directly onto the black paper using white chalk. Start with simple shapes and gradually add details. This method allows for truly unique, one-of-a-kind creations that reflect your personal spooky style.
Beyond Black Paper: Exploring Other Materials
- Black Garbage Bags: For exceptionally large windows or if you need a very cost-effective solution, heavy-duty black garbage bags can be cut into silhouettes. They are lightweight and easy to tape up, though they might be less rigid than paper.
- Black Cardboard or Foam Board: For more durable, reusable, or three-dimensional silhouettes, consider using cardboard or foam board. These materials are sturdier and can be propped up independently or placed in frames.
- Colored Cellophane/Tissue Paper: Add a splash of color! If you cut out eyes or other features, you can back them with colored cellophane or tissue paper (e.g., red for glowing eyes, green for an eerie glow). When backlit, these will emit a spectral luminescence.
Maximizing the Spooky Factor with Lighting and Sound
The true magic of silhouettes comes alive after dark. Consider these enhancements:
- Strategic Interior Lighting: Position lamps or floodlights inside your home to shine directly onto your windows from behind the silhouettes. This creates sharp, dramatic shadows visible from the street.
- Colored Lights: Replace standard bulbs with red, green, or purple ones to cast an unsettling glow that complements your silhouettes.
- Strobe Lights or Flickering LEDs: For a truly terrifying effect, place a hidden strobe light or flickering LED candle near your window. The intermittent light will make your silhouettes appear to move or pulse.
- Spooky Sound Effects: Don’t forget the auditory element! Coordinate your visual display with a soundtrack of eerie screams, creaking doors, howling winds, or monstrous growls playing softly from an internal speaker.
Creating a Cohesive Scene
Instead of just placing individual figures, try to tell a story with your silhouettes. Arrange multiple elements to create a scene: a graveyard with zombies rising, witches brewing a potion, or a ghost haunting a decrepit manor. Vary the heights and depths of your figures to add dimension and realism.
Safety and Storage Tips
When placing silhouettes, ensure they don’t block emergency exits or significantly obscure your view for safety reasons. When Halloween is over, carefully peel off your silhouettes. If you used painter’s tape, they should come off cleanly. Store them flat in a large envelope or under a bed to keep them pristine for next year’s haunting.
What do you think of this versatile and impactful project? Will you be incorporating spooky silhouettes into your Halloween decor this year? Share your creative plans and let us know what ghostly figures you’ll be conjuring!
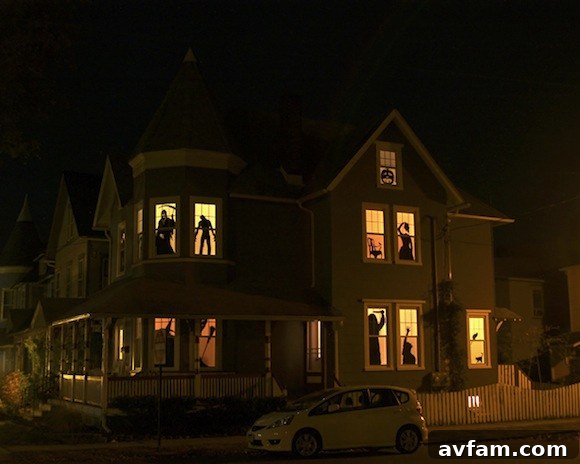
Photo courtesy of Craftzine.