
Revolutionize Your Open Space: Discover the Ingenious DIY Rope Wall Divider
Living or working in an expansive, open-concept environment, such as a trendy loft apartment or a spacious commercial studio, often presents a unique set of challenges. One of the most significant hurdles is effectively defining distinct areas without compromising the aesthetic appeal or the inherent openness of the space. As someone who has navigated these very waters, I can attest firsthand to the struggle of creating functional boundaries where none naturally exist. This challenge becomes even more pronounced for renters, where significant investment in permanent structural changes, like building traditional walls, is often out of the question and impractical.
While creative alternatives like strategically placed bookshelves can offer a superficial illusion of division, they frequently fall short in truly partitioning a large area into multiple, purposeful zones. For comprehensive space management, particularly when several separate sections are required, bookshelves quickly prove to be an insufficient and often cumbersome solution. What if there was an approach that was not only practical and cost-effective but also elegantly simple and visually stunning? Allow us to introduce an utterly ingenious concept that is redefining flexible space design: the DIY rope wall.
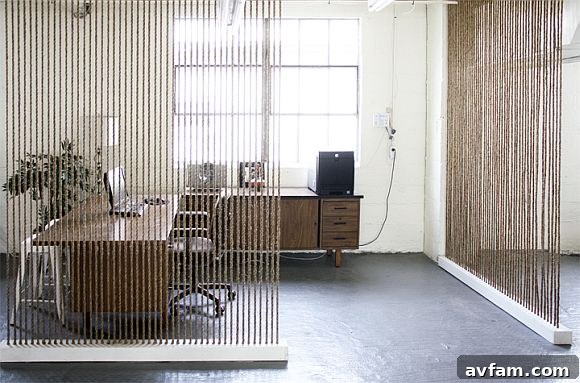
The Brilliant Solution: Rope Walls by The Brick House
The innovative idea of rope walls was pioneered by Morgan of The Brick House, transforming how we think about upholstery workshop. Morgan’s design came to life to assist Shelly Leer, the creative mind behind ModHomeEc (and a cherished friend!), in organizing her new upholstery workshop. While the sprawling open warehouse offered immense potential for projects and classes, Shelly desperately needed to carve out specific areas for her office, a dedicated tool room, and other functional zones.
Traditional walls would have been an expensive, permanent, and light-blocking solution, undermining the airy feel of the warehouse. Morgan’s suggestion of rope walls provided the perfect answer: a stylish, yet remarkably inexpensive, method to delineate spaces without sacrificing the workshop’s inherent openness. This clever approach offers a soft, semi-transparent division that maintains light flow and visual connectivity, which is ideal for a dynamic working environment.
Why Rope Walls Are a Game-Changer for Open-Concept Living
The appeal of rope walls extends far beyond their initial ingenious application in Shelly’s workshop. They represent a significant shift in how we can approach room dividers for lofts and other open-plan homes. Here’s why this DIY room partition is considered a stroke of genius:
1. Aesthetic Elegance and Openness
Unlike solid walls or even bulky furniture, rope walls offer a sense of separation without completely obscuring an area. The vertical lines of the ropes create a beautiful visual texture that adds character and depth to any space. They allow natural light to filter through, preserving the bright and airy feel that is often the hallmark of open-plan living. This semi-transparent quality ensures that the overall space still feels expansive and connected, rather than chopped up and confined. Whether your aesthetic leans towards minimalist, industrial, boho, or coastal, the choice of rope type and color can be tailored to complement any interior design.
2. Cost-Effectiveness and DIY Accessibility
One of the most attractive aspects of rope walls is their budget-friendly nature. Compared to the considerable expense of constructing traditional drywall partitions, or even investing in high-end modular room divider systems, rope walls are remarkably affordable. The primary materials – rope and wood – are readily available and relatively inexpensive. This makes them an ideal inexpensive room divider solution, especially for those on a tight budget or those looking for a temporary fix. Furthermore, the construction process is incredibly DIY-friendly, requiring basic tools and a moderate level of crafting skill, making it an accessible project for most homeowners and renters.
3. Flexibility and Non-Permanence
For renters, the impermanent nature of rope walls is a huge advantage. They can be installed and later removed without causing damage to the property, making them a perfect rent-friendly room divider. Even for homeowners, the flexibility to reconfigure spaces as needs evolve is a valuable asset. This modularity supports flexible space design, allowing you to easily adapt your layout for different functions, events, or simply when you desire a change in your environment.
Building Your Own Rope Wall: A Step-by-Step Guide
Morgan’s tutorial highlights the straightforward nature of this DIY room partition. Here’s a more detailed look at what you’ll need and how to bring this brilliant idea to life in your own space:
Materials You’ll Need:
- Rope: The star of the show! Consider different materials like natural cotton for a soft, bohemian look; jute or sisal for an earthy, rustic feel; or synthetic ropes for durability and vibrant colors. Choose a thickness that suits your aesthetic and provides the desired level of visual separation.
- Wood Boxes/Frames: These will serve as the top and bottom anchors for your rope wall. They need to be sturdy and custom-built to the dimensions of your desired wall length and height. You can use common lumber like pine or poplar.
- Drill and Drill Bits: Essential for creating evenly spaced holes in your wood boxes, precisely sized to accommodate your chosen rope thickness.
- Saw: To cut your wood to the correct lengths.
- Measuring Tape and Pencil: For accurate measurements and markings.
- Sandpaper: To smooth out any rough edges on your wood components.
- Wood Glue and Screws: For assembling the wood boxes.
- Stain or Paint (Optional): To finish your wood boxes to match your decor.
The DIY Process:
- Planning and Measurement:
Start by meticulously measuring the area where you intend to install your rope wall. Determine the desired length and height of the partition. These measurements will dictate the size of your wood boxes and the length of your rope sections. Decide on the spacing between each rope – closer spacing will offer more privacy, while wider spacing will maintain a greater sense of openness.
- Constructing the Wood Boxes:
Cut your chosen wood pieces to create the top and bottom frames. Each frame will consist of four sides, forming an open-ended box. Assemble these using wood glue and screws, ensuring they are sturdy and square. Once assembled, sand all surfaces smooth.
- Drilling the Rope Holes:
This step requires precision. On the top surface of both the upper and lower wood frames, mark the points for your rope holes according to your chosen spacing. Using a drill bit that is just slightly larger than the diameter of your rope, carefully drill through the marked spots. Ensure the holes are clean and free of splinters to allow for smooth rope threading.
- Preparing and Threading the Rope:
Cut individual sections of rope. Each section should be long enough to extend from the top frame to the bottom frame, plus extra length for knotting at both ends. Begin by threading a precut section of rope down through a hole in the top wood frame. Pull it through until an adequate length for knotting is exposed underneath. Tie a secure knot beneath the top frame. Repeat this for all holes in the top frame, ensuring each rope hangs freely and is taut.
- Securing the Bottom Frame:
With all ropes threaded and knotted to the top frame, position the bottom frame. Thread the free ends of the ropes through the corresponding holes in the bottom frame. Carefully pull each rope taut, ensuring consistent tension across all ropes, and tie a secure knot beneath the bottom frame. The key here is to make sure the knots are tucked neatly underneath the wood frames, giving the rope wall a clean, finished appearance. Once all ropes are secured, you can then attach the final side of the bottom box, if it was left open for easier knotting, completely obscuring the knots.
- Installation:
Once your rope wall unit is assembled, it can be installed. Depending on the size and weight, you might secure the top frame to the ceiling joists or wall studs, and the bottom frame to the floor or a sturdy base. Ensure it is firmly anchored to prevent wobbling.
Beyond the Workshop: Endless Applications for Rope Walls
The versatility of rope walls makes them an excellent solution for a multitude of spaces and needs:
- Loft Apartments: Perfect for creating a semi-private bedroom zone, a dedicated home office, or a cozy living area within a vast open floor plan. They provide loft apartment privacy without blocking light.
- Home Offices: Delineate a professional workspace within a shared living area, offering a visual boundary that aids focus.
- Studio Apartments: Cleverly separate sleeping, living, and dining areas in compact studio apartment ideas.
- Children’s Play Areas: Create a fun, enclosed space for kids that still allows parental supervision and light to pass through.
- Art Studios & Yoga Spaces: Establish different activity zones within a larger creative environment.
- Retail & Commercial Spaces: Fashion chic displays, temporary fitting rooms, or subtle divisions in open-plan stores and offices.
- Event Venues: Use them as temporary partitions or decorative backdrops for various events, easily installed and removed.
The Benefits That Set Rope Walls Apart
When considering modern room dividers, rope walls truly shine. They offer a unique blend of benefits:
- Enhanced Light and Airflow: Unlike solid barriers, rope walls maintain the flow of natural light and air, preventing spaces from feeling stuffy or dim.
- Visual Interest and Texture: The repetitive vertical lines and the tactile quality of the rope add a captivating design element that can elevate your interior decor.
- Sound Attenuation (Minor): While not soundproof, the ropes can offer a slight degree of sound dampening, creating a softer acoustic environment compared to completely open spaces.
- Customization Opportunities: Experiment with different rope materials (cotton, jute, sisal, synthetic), colors, thicknesses, and even weaving patterns to create a truly unique and personalized custom space divider.
Embrace the Open-Concept Revolution with Rope Walls
This project is undoubtedly filed under “brilliant” in my book. The genius of rope walls lies in their elegant simplicity and profound impact on how we perceive and utilize open areas. They offer a sophisticated yet attainable solution to a common design dilemma, transforming challenging open spaces into beautifully organized, multi-functional zones. I’m seriously considering building one for my own loft, appreciating how they provide that crucial sense of separation while allowing the space to remain wonderfully open and airy.
So, what are your thoughts on this innovative aesthetic room partition? Are you inspired to embark on your own rope wall journey and redefine your open concept living space? Share your ideas in the comments!
Photo courtesy of The Brick House