
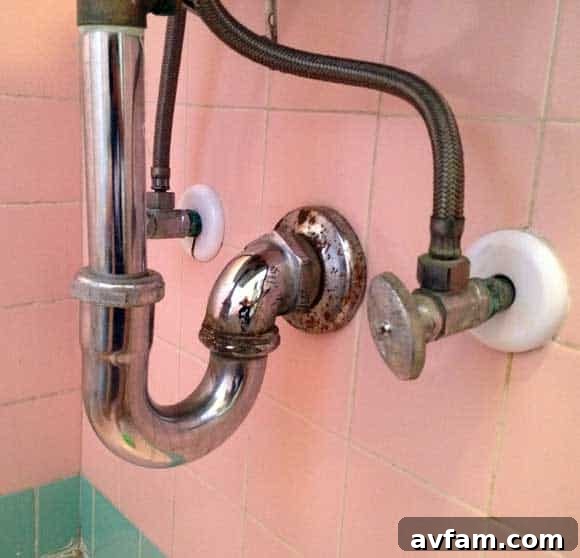
Solving the Mystery of a Slow Draining Sink: A P-Trap Replacement Saga
A slow draining sink is more than just an annoyance; it’s a tell-tale sign that something isn’t right within your home’s plumbing system. For months, our bathroom sink had been reluctantly letting water down the drain, a persistent problem that store-bought solutions like chemical drain cleaners and handheld drain snakes couldn’t resolve. When traditional methods fail, it’s time to roll up your sleeves and delve deeper – usually starting with the humble P-trap.
This article chronicles a journey into the unexpected complexities of home plumbing, particularly when dealing with an older house. We’ll cover the diagnosis of a stubborn clog, the challenges posed by aging galvanized steel pipes, and an innovative, if unconventional, solution to restore proper drainage. Prepare to learn about the intricacies of P-trap replacement, the perils of pipe corrosion, and practical tips for maintaining your plumbing system.
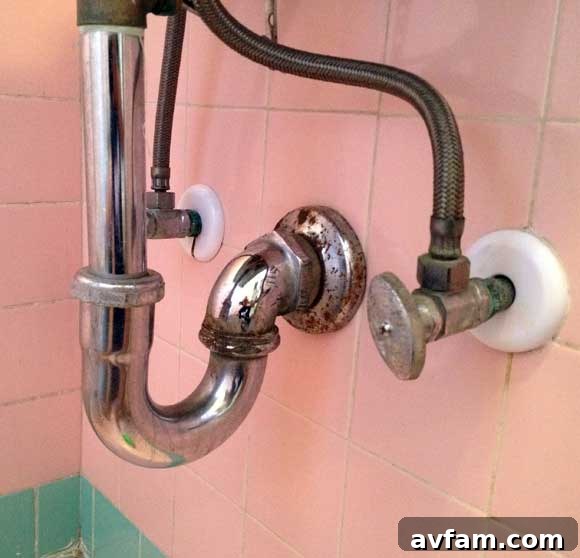
Understanding Your Sink’s Drainage System: The Role of the P-Trap
Before diving into the repair, it’s crucial to understand the components of your sink’s drain and, specifically, the critical function of the P-trap. The P-trap is the U-shaped or J-shaped section of pipe directly beneath your sink. Its primary purpose is twofold:
- Prevent Sewer Gas: The P-trap is designed to hold a small amount of water, creating a seal that prevents unpleasant sewer gases from entering your home through the drain opening.
- Trap Debris: It also acts as a catchment area for heavier debris like hair, jewelry, or other small items that accidentally fall into the drain, preventing them from traveling further down the plumbing system and causing more severe clogs.
A typical sink drain setup includes the tailpiece (the pipe extending down from the sink drain), the P-trap, and the trap arm (the horizontal pipe connecting the P-trap to the drain opening in the wall). Clogs can occur at any point, but often accumulate in the P-trap itself or the trap arm just beyond it.
Initial Troubleshooting and The Limits of Common Remedies
Our journey began like many others: with a persistently slow drain. Initially, we tried readily available solutions, hoping for a quick fix.
-
Chemical Drain Cleaners (e.g., Drano)
These products use harsh chemicals to dissolve organic matter. While sometimes effective for minor, fresh clogs, they come with significant drawbacks. They can be corrosive to certain pipe materials, harmful to the environment, and pose a danger to skin and eyes. For stubborn, deep-seated clogs, their efficacy is often limited, as they may simply pass through the obstruction without fully clearing it. Moreover, repeated use can potentially weaken older pipes, especially metal ones.
-
Handheld Drain Snakes (e.g., Zip-It)
A Zip-It tool or similar plastic drain snake is excellent for pulling out hair clogs that are close to the drain opening or within the upper part of the P-trap. Its barbed edges are designed to snag hair and pull it out. However, its reach is limited, and it’s less effective against solid blockages, mineral buildup, or clogs located deeper within the trap arm or wall pipe.
After exhausting these options without success, it became clear that a more direct approach was necessary. The next logical step was to physically remove the P-trap to inspect its contents and the connected piping.
The Unexpected Revelation: A Glimpse into Vintage Plumbing
Before attempting to remove any plumbing components, it’s always wise to prepare your workspace. Gather essential tools: a bucket to catch any residual water, adjustable wrenches or channel locks for loosening nuts, gloves for hygiene, and safety glasses. Placing a towel under the bucket can also help contain spills.
Our home, constructed in the 1950s, boasts a plumbing system characteristic of its era: galvanized steel. This material was a standard for residential plumbing for many decades, known for its strength and durability. However, galvanized steel has a finite lifespan, especially when exposed to water constantly. Over time, the zinc coating that protects the steel from rust erodes, leading to internal corrosion, mineral buildup, and eventually, the complete deterioration of the pipe itself.
As I began to twist the nut connecting the P-trap to the wall pipe, anticipating a routine loosening, something entirely unexpected happened. Instead of the nut unscrewing, the entire P-trap pulled away from the wall with minimal effort. A quick inspection revealed the startling truth: the threads on the galvanized steel wall pipe, where the P-trap was supposed to attach, had completely corroded and sheared off. This wasn’t just a loose connection; it was a pipe failure.
Identifying the True Culprit: A Deep-Seated Clog
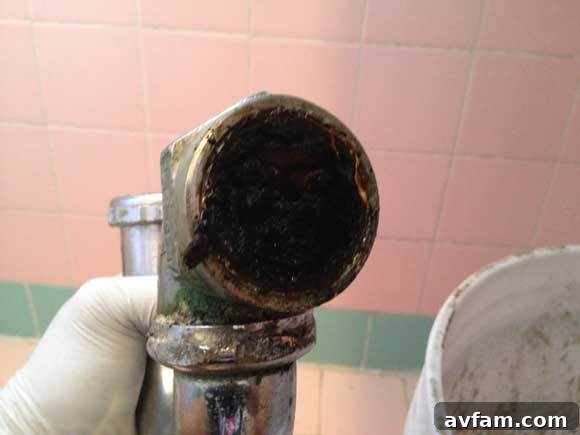
The sheared threads were a significant structural problem, but the real cause of our persistent slow drain was now dramatically exposed. With the P-trap detached, the interior of the wall pipe was laid bare. There, in plain view, was a substantial blockage:
A thick accumulation of black gunk and sediment completely obstructed the pipe. Only a small, barely perceptible channel remained open, allowing waste water to trickle through at an agonizingly slow pace.
Interestingly, the P-trap itself was relatively clear. This highlighted an important lesson: sometimes, the visible P-trap isn’t the primary site of the clog. Debris can bypass the trap and accumulate further down the line, especially in horizontal sections like the trap arm or within the wall pipe, where gravity and friction combine to create stubborn blockages. This black gunk is typically a cocktail of hair, soap scum, grease (even minimal amounts can build up), mineral deposits from hard water, and biofilm – a slimy matrix of bacteria that thrives in damp, dark environments. It creates a formidable barrier that chemical cleaners often can’t penetrate and basic drain snakes might only partially clear.
Clearing the Obstruction
With the obstruction clearly identified, the next step was to thoroughly clean out the wall pipe. Given its accessibility, I used a combination of tools to scrape and dislodge the hardened gunk. A small drain snake with a good auger head or even a stiff wire brush can be effective here. It’s crucial to remove as much of the material as possible to ensure unrestricted flow. After clearing the visible blockage, I flushed the pipe with plenty of hot water to wash away any remaining debris.
The Alignment Dilemma: When Old Meets New
With the clog successfully removed, I faced a new challenge: how to reattach the P-trap system when approximately half an inch of the galvanized steel pipe’s threaded section was simply gone. The old threads were corroded beyond repair, leaving a smooth, unthreaded stub of pipe extending from the wall.
My first attempt at a solution involved buying a new steel elbow and a new P-trap, hoping to somehow make it work. However, without the necessary threads for a secure connection, the new elbow couldn’t be properly tightened, and even if it could, the overall length of the new components didn’t align correctly with the existing bottom drain pipe. The geometry was off, and trying to force it would only lead to leaks or a perpetually misaligned system.
This situation often occurs when upgrading or repairing plumbing in older homes. Original components were often custom-fitted or installed when pipe standards were slightly different, or when corrosion has altered the effective length of the existing pipes. Standard replacement parts don’t always account for these discrepancies, turning a seemingly simple repair into a puzzle.
A Hybrid Solution: Adapting to the Obstacle
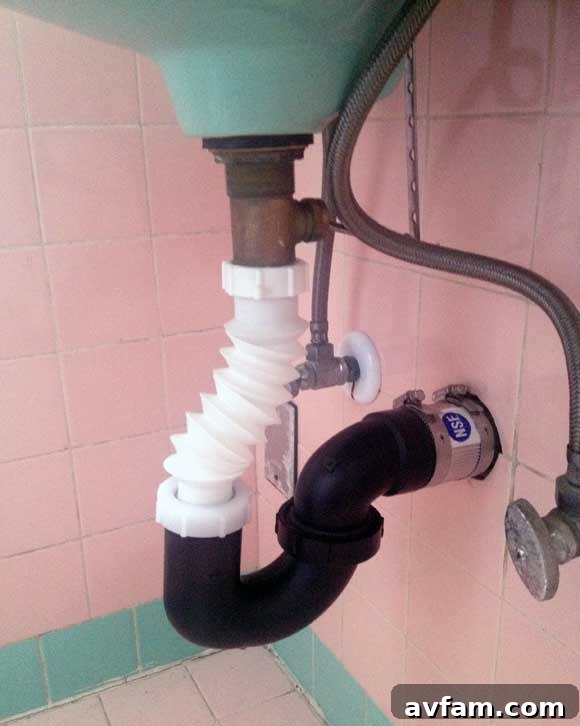
Several trips to the local home improvement store became part of the repair process. Each visit involved explaining the problem, considering different fittings, and often leaving with a few experimental pieces. This iterative approach is common in DIY plumbing, especially when encountering unique challenges posed by older installations. Eventually, a multi-component, hybrid solution emerged:
-
Cutting the Bottom Drain Pipe
To create the necessary space and flexibility for the new configuration, I had to shorten the existing bottom drain pipe that extends vertically from the sink. Using a hacksaw or a specialized PVC cutter, I carefully trimmed the pipe, ensuring a clean, straight cut. This provided the crucial extra room needed to fit the new components without straining the connections.
-
Introducing a Flexible Extender (The White Piece)
The key to bridging the alignment gap was a flexible drain extender. This corrugated plastic piece, often found in the plumbing aisle, is incredibly useful for situations where standard rigid pipes simply won’t line up. Its pliability allows for slight adjustments in angle and length, making it ideal for connecting misaligned drain components without complex re-piping.
-
Transitioning to Black ABS Pipe
Rather than trying to force another metal component onto the corroded galvanized steel, I opted to switch to black ABS (Acrylonitrile Butadiene Styrene) pipe for the majority of the new P-trap assembly. ABS is a lightweight, durable plastic pipe commonly used in drain, waste, and vent (DWV) systems. It’s easy to cut, solvent-weld, and is highly resistant to corrosion, making it an excellent modern alternative to older metal pipes. It also stands up well to hot water and common household chemicals.
-
Utilizing a Rubber Connector/Adapter
To securely connect the new ABS fitting to the existing galvanized steel wall pipe (which no longer had threads), a specialized rubber connector/adapter was used. These flexible connectors typically feature stainless steel clamps on both ends, allowing them to create a watertight seal between pipes of different materials and slightly different diameters. They are invaluable for transitioning from old plumbing materials to new ones, or for making repairs without needing to cut or thread new sections of metal pipe.
The assembly process involved connecting the flexible extender from the sink drain to the new ABS P-trap. The ABS P-trap then connected to a short section of ABS pipe, which was finally joined to the original galvanized steel wall pipe using the rubber adapter. Each connection was carefully tightened, ensuring a leak-free seal.
Long-Term Considerations and Maintenance
While the new setup might not possess the aesthetic appeal of pristine, polished galvanized steel (which, ironically, was already corroding), its functionality is undeniable. It works, and it works well.
-
Aesthetics vs. Practicality
In many DIY plumbing repairs, especially those involving older homes, the ultimate goal is functionality and reliability over pristine aesthetics. The combination of black ABS, a white flexible extender, and a rubber connector might not win any beauty contests, but it successfully restored proper drainage and solved a persistent problem. For hidden plumbing, practicality often trumps looks.
-
Maintenance of the Flexible Extender
One potential drawback of flexible extenders is their corrugated interior, which can sometimes trap hair and debris more easily than smooth-walled pipes. Therefore, it’s advisable to keep an eye on it. The good news is that these extenders are typically easy to remove and clean, making future maintenance straightforward. A quick unscrewing of the slip nuts, a thorough rinse, and reassembly should prevent future clogs from developing in this section.
-
Preventative Measures for Future Clogs
Now that the drain is flowing freely, implementing preventative measures is crucial. Using a drain screen or hair catcher in the sink can significantly reduce the amount of debris entering the drain. Regularly flushing the drain with hot water, especially after using soap or other products that contribute to buildup, can help. Occasionally, pouring a mixture of baking soda and vinegar, followed by hot water, can help break down minor accumulations before they become major clogs.
-
Knowing When to Call a Professional
While DIY plumbing can be empowering and cost-effective, it’s important to recognize when a problem exceeds your skill level or requires specialized tools. Issues like extensive pipe replacement, main drain line clogs, or complex re-routing are often best left to licensed plumbers. However, tackling a P-trap replacement and understanding your home’s drainage system is an excellent skill for any homeowner.
Conclusion: A Solved Mystery and a Running Sink
This repair transformed a frustrating slow drain into a fully functional sink, proving that even with unforeseen challenges like corroded pipes, a thoughtful, adaptive approach can lead to success. The journey involved diagnosing the real problem, understanding the limitations of existing materials, and creatively combining modern plumbing components to create a reliable solution. No longer do we have to worry about a slow drain, and the satisfaction of a successful home improvement project is its own reward.
Have you ever replaced or repaired your P-trap? What unique problems have you run into, and how did you solve them?