

The four most effective ways to double usable garage space are: sorting items by how often you use them, installing heavy-duty wall systems, mounting structural ceiling racks, and converting attic space with a motorized platform.
Putting these approaches into practice moves seasonal and infrequently used gear off the floor, immediately freeing room for vehicles and clear walkways.
Although most newer homes include garages, many of us still bump through the same clutter: storage bins pushed partway into parking space, bikes leaning against tools, and holiday decorations overtaking work surfaces. The problem is rarely a genuine shortage of square footage. Instead, the concrete floor becomes the default storage zone, creating a traffic bottleneck.
You don’t need to tear down walls or pull permits to reclaim the space. With a few focused weekend projects and properly specified hardware, you can clear the floor and restore function to your garage. Moving heavy seasonal tubs into the rafters with a steel attic lift or placing bikes and tools on vertical systems immediately increases usable space while keeping frequently used items accessible.
1. Sort by Frequency of Use
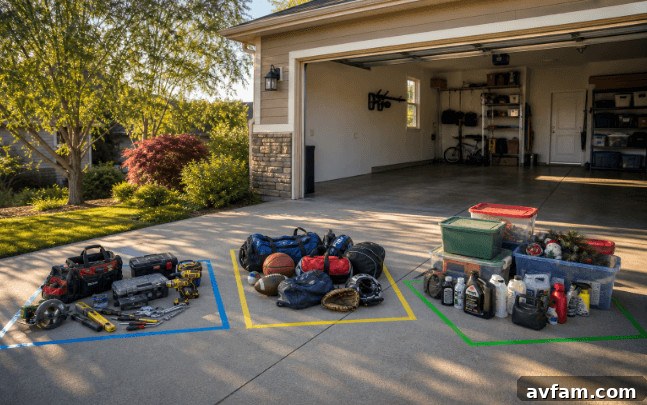
The real obstacle to a tidy garage is that things were never sorted properly in the first place. Buying storage hardware before you sort guarantees the same mess will return. Start by establishing a frequency-of-use framework, then decide what storage hardware you actually need.
Divide your items into three tiers:
- Daily access tier: Items you grab without thinking—keys, leashes, everyday hand tools, phone chargers. Keep these at eye level on hooks or in small labeled bins by the entry.
- Weekly use tier: Bikes, sports bags, brooms, and cleaning supplies. These should be off the floor but reachable without moving other things—wall-mounted racks and floor stands work well.
- Seasonal and annual tier: Holiday decorations, camping gear, spare tires, and large luggage. These belong overhead in ceiling racks or the attic, never on the floor or at eye level.
Be ruthless when sorting. Empty the garage, lay everything out, and test each item against the frequency tiers. Donate or discard anything not used in the last two years. This single step often clears a surprising amount of floor space before you spend a dollar or drill a hole.
| Key Insight: Sort first, buy storage second. Assign daily items to eye level, weekly items to walls, and seasonal items overhead to keep the floor clear. |
2. Put Your Walls to Work for Tools
Walls are often treated as decorative surfaces instead of valuable vertical storage. Activating wall space can reclaim large amounts of floor area and make tools and gear easy to access.
Choose a wall system that matches your needs and the weights involved. Common, effective options include slatwall panels, track-and-rail systems, and lockable steel cabinets.
- Slatwall panels: Aluminum or composite panels accept a range of hooks and bins and can be rearranged seasonally. Mount panels directly into studs at regular intervals to carry weight safely.
- Track and rail systems: Heavy-duty steel tracks with adjustable hooks are excellent for bikes and other bulky items. They typically provide higher load capacity per anchor point.
- Lockable steel cabinets: Ideal above a workbench for power tools and supplies that benefit from being dust-free and secured.
Always locate studs, use lag screws into framing, and avoid relying on drywall anchors for live loads. Use a level to ensure neat, functional installations—small alignment errors become obvious and irritating over time. Once the walls carry weekly-use gear, the floor clears enough to park a vehicle or create a functional workspace.
3. Hoist Bulky Seasonal Items onto Racks
The ceiling is an underused storage plane with strong framing behind it. Overhead racks provide high-visibility organization and keep seasonal tubs and gear out of the traffic pattern.
Select all-steel platforms with powder-coated finishes and adequate rated capacity. Check joist spacing and confirm mounting directly into joists—not into drywall or thin strapping. Use lag bolts driven into the joist center and tie racks into multiple joists to distribute load. Allow sufficient clearance from the garage door opener rails and other hardware when positioning racks.
- Platform selection: Choose sturdy steel racks rated for the expected load and finished to resist corrosion.
- Joist spacing verification: Confirm joist locations with a stud finder and verify by probing before drilling.
- Proper fastening: Use lag bolts into joist centers and anchor into multiple joists for heavy loads.
- Maintain clearance: Ensure racks do not interfere with the garage door opener rail or trolley—measure first.
Correctly installed ceiling racks create an immediate visual and functional transformation, placing seasonal gear safely above the hood of the car.

4. Turn the Attic into a Safe Storage Bay
For heavy, infrequently accessed items, the attic above the garage is ideal—provided you can access it safely. Carrying heavy totes up a ladder is risky and unnecessary when a motorized attic lift is an option.
A motorized platform lowers to floor level for loading and raises into the rafters, eliminating ladder climbs and reducing injury risk. Choose a steel lift rated for the intended loads with self-locking safety mechanisms, and confirm structural capacity of the framing before purchase.
Key considerations include joist dimensions and spacing, the position of the garage door opener rail relative to the hatch, and the need for a dedicated electrical circuit. Bringing in a licensed electrician or structural contractor for wiring and load verification is recommended. When configured correctly, an attic lift handles deep-storage items while ceiling racks and wall systems manage seasonal and weekly gear, respectively.
| Warning/Important: Never carry heavy totes up a ladder. A properly rated motorized attic lift with safety locks and a dedicated circuit removes fall risk and can handle several hundred pounds safely. |
Making It Happen
Approach the project with a realistic, sequenced plan rather than sporadic effort. A focused weekend schedule can complete the major steps and leave the garage usable right away.
- Saturday morning: Purge and sort everything. Empty bins, group items by frequency, and remove anything you no longer need.
- Saturday afternoon: Install wall storage—locate studs, hang slatwall or track systems, and load weekly-use gear.
- Sunday morning: Mount ceiling racks into joists, secure lag bolts, and hoist seasonal items overhead.
- Sunday afternoon: Measure attic openings and joist spacing. If an attic lift and electrician are available, prepare for lift installation.
Maintain the system by giving every new item a designated place when it enters the garage. If something doesn’t fit, remove an older item to preserve the cleared floor. Sticking to that rule keeps the space functional and tidy for the long term.
| Author Profile: Inventive Garage offers specialized garage and workshop storage solutions and organization systems designed to maximize usable space. |