
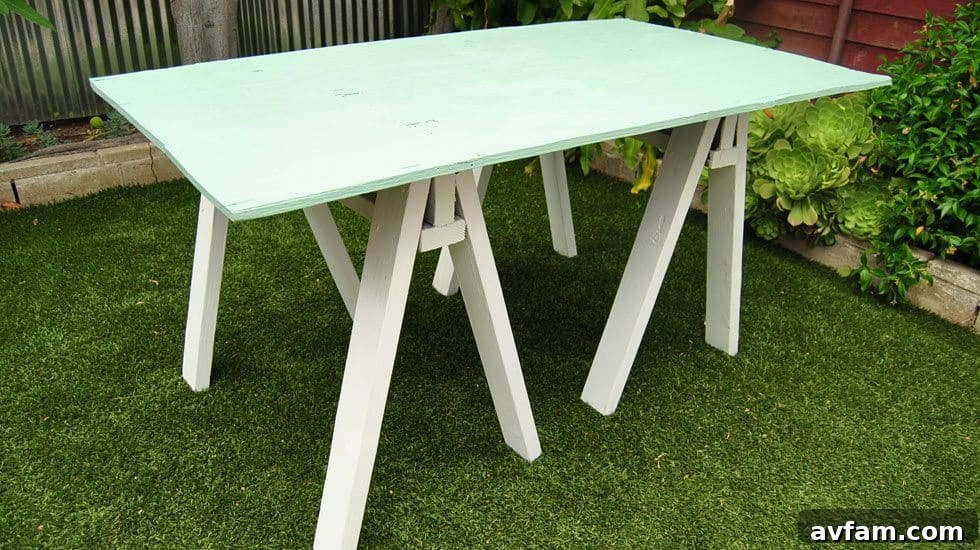
DIY Sawhorse Table: Crafting a Versatile and Affordable Outdoor Solution
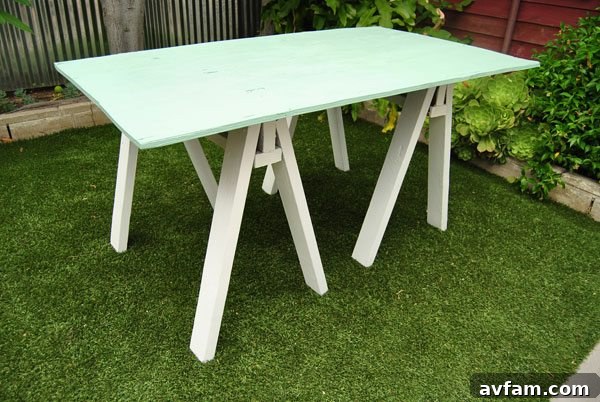
Are you in need of a robust, versatile, and budget-friendly table for your next outdoor gathering, workshop project, or simply as an extra surface around the house? Look no further than the humble yet incredibly functional sawhorse table! This guide will walk you through building your very own custom sawhorse table, a project that is not only satisfying but also surprisingly quick to complete. We originally needed an extra table for a party, and inspired by the practicality of traditional sawhorses, we decided to combine two custom-built sawhorse bases with a sturdy sheet of plywood and a fresh coat of paint. The result? A fantastic, adaptable sawhorse table that perfectly met our needs.
Why Build a Sawhorse Table? The Ultimate DIY Advantage
Choosing to build your own sawhorse table offers numerous benefits over purchasing a pre-made alternative. It’s a fantastic project for beginners and seasoned DIY enthusiasts alike, providing practical skills and a custom piece tailored to your exact needs.
- Unmatched Versatility: This table can seamlessly transition between various roles. Use it as a large dining table for backyard BBQs, a temporary workbench for home improvement projects, a display table for crafts, or even an extra surface for potting plants in the garden. Its modular design allows for easy setup and takedown.
- Cost-Effective: Constructed primarily from readily available 2×4 lumber and a sheet of plywood, the material cost for a sawhorse table is significantly lower than most store-bought outdoor tables. You get a robust piece of furniture without breaking the bank.
- Customizable Design: From the dimensions of the tabletop to the color of the paint, every aspect of your sawhorse table can be customized. Want a longer or wider table? Need a specific height? The DIY approach gives you complete control to match your aesthetic and functional requirements.
- Portability and Storage: One of the greatest advantages is its ease of storage. The plywood top can be lifted off the sawhorse bases, allowing both components to be stacked or stored flat, freeing up valuable space when the table is not in use. This makes it ideal for smaller patios or multi-purpose spaces.
- Skill-Building Project: For those new to woodworking, this project is an excellent way to learn fundamental skills such as measuring, cutting, sanding, and assembling with confidence. The sense of accomplishment upon completion is incredibly rewarding.
Project Overview: Your Guide to a Successful Build
Before diving into the construction, let’s get a clear understanding of what this project entails.
- Estimated Project Time: Approximately 2-4 Hours. While the core build can be completed in around two hours, this estimate doesn’t always account for drying time between paint coats or potential adjustments based on your experience level. Planning for half a day ensures a relaxed and thorough build.
- Challenge Level: Medium. This project is suitable for anyone with basic woodworking knowledge and comfort using power tools like a drill and a saw. No complex joinery or advanced techniques are required, making it an accessible entry point into furniture building.
Essential Tools & Supplies You’ll Need:
Gathering all your materials and tools before you start is crucial for a smooth and efficient build. Here’s a detailed list:
- Lumber:
- 8 pieces of 30″ 2x4s (for the legs) – These will form the sturdy uprights of your sawhorses.
- 6 pieces of 32.5″ 2x4s (for the central I-Beam structure of the sawhorses) – These pieces will create the robust horizontal support for the tabletop.
- 1 sheet of 4′ x 8′ ¾” plywood (for the tabletop) – This standard size offers ample surface area. Opt for exterior-grade plywood if your table will be permanently outdoors, as it’s designed to withstand moisture.
- Fasteners:
- Box of 2″ wood screws – Ensure you have plenty. These will be the primary fasteners for assembling your sawhorses and securing the tabletop.
- Sanding Supplies:
- Sandpaper grits: 180 (for initial smoothing) and 220 (for a finer finish) – Essential for creating a smooth, splinter-free surface ready for paint.
- Sanding blocks (optional, but helpful) – Provide a flat surface for even sanding.
- Power Tools:
- Drill/Driver with Phillips bit – Absolutely essential for quickly and efficiently driving screws. A cordless drill offers maximum flexibility.
- Circular Saw or Hacksaw – A circular saw is recommended for faster, straighter, and more accurate cuts. A hacksaw can work for smaller projects but will require more effort and time.
- Measuring & Marking:
- Measuring Tape – Accuracy is paramount for ensuring all pieces fit together correctly.
- Pencil – For marking cuts and screw points.
- Finishing Touches:
- Paint (and primer, if desired) – Choose an exterior-grade paint if your table will be outdoors to protect it from the elements. Consider a primer for better paint adhesion and durability.
- Paint brushes or rollers – For applying your chosen finish.
- Tack cloth – Critical for removing all dust particles before painting, ensuring a smooth finish.
- Safety Gear:
- Safety glasses – Always wear eye protection when cutting or drilling.
- Work gloves – Protect your hands from splinters and minor abrasions.
- Ear protection (especially with a circular saw) – Protect your hearing.
- Well-ventilated area – Important for both cutting and painting.
Step-by-Step Guide: Crafting Your Perfect Sawhorse Table
Follow these detailed instructions to construct a durable and beautiful sawhorse table.
Phase 1: Preparation and Cutting Your Lumber
- Measure and Mark Your Lumber: Begin by carefully measuring and marking your 2x4s. You’ll need eight pieces at 30 inches long for the legs of your two sawhorses, and six pieces at 32.5 inches long to form the central I-beams that will support the tabletop. Double-check your measurements to ensure accuracy – “measure twice, cut once” is a golden rule in woodworking.
- Prepare Your Workspace: Set up your cutting station in a well-ventilated area, preferably outdoors or in a garage with good air circulation. Ensure you have a stable surface, like a workbench or another set of sawhorses, to support your lumber. A table vise can be incredibly useful for securely holding the 2x4s while you cut, preventing movement and ensuring safer, straighter cuts.
- Execute Your Cuts: Using your circular saw (or hacksaw), carefully cut each 2×4 to its marked length. If using a circular saw, ensure the blade is set to the correct depth and always cut away from your body. Take your time to make clean, straight cuts.
Phase 2: Sanding and Pre-Finishing
Proper preparation of the wood is key to a professional-looking and lasting finish.
- Smooth All Surfaces with Sandpaper: Once all your lumber pieces are cut, it’s time to sand them. Start with 180-grit sandpaper to remove any rough edges, splinters, and saw marks. Work your way across all surfaces, including the ends, sides, and edges of each 2×4 and the plywood sheet. After a thorough pass with 180-grit, switch to 220-grit sandpaper for a smoother, finer finish that will be perfect for painting. Sanding blocks can help achieve an even pressure and a flatter finish.
- Clean the Wood Thoroughly: After sanding, there will be a fine layer of dust on all your wood pieces. Use a tack cloth to meticulously wipe down every surface. This step is critical because any dust left on the wood will compromise the adhesion of your paint, leading to a bumpy or flaky finish. Ensure the wood is completely clean and dry before proceeding.
- Paint Individual Pieces (Pre-Assembly): This project benefits greatly from painting the individual lumber pieces before assembly. It allows for more thorough coverage, especially in tight corners and joints that would be difficult to reach after the sawhorses are built. Apply your chosen paint, ensuring even coats. If using an exterior-grade paint, follow the manufacturer’s recommendations for application.
- Allow Ample Drying Time: After painting, lay out all your painted pieces in a clean, dust-free area to dry. Allow for the recommended drying time between coats, typically 2-4 hours, or as specified by your paint product. Depending on the weather and paint type, you may need multiple coats to achieve your desired color and protection. Patience here will pay off with a superior finish.
Phase 3: Assembling Your Sawhorse Bases
Now that your wood is cut, sanded, and painted, it’s time to bring the sawhorses to life.
- Construct the I-Beam Core: Take three of your 32.5-inch 2×4 pieces. To form the “T” shape, lay one flat and stand another on its edge vertically in the center of the first piece, perpendicular to it. Secure these two pieces together using wood screws. Make sure the screw points are strategically placed to avoid splitting the wood and create a strong joint. This forms the top and middle section of your I-beam.
- Complete the I-Beam Structure: Take the third 32.5-inch 2×4. This piece will form the bottom of the “I.” Place it parallel to the top piece, securing it to the bottom edge of the vertical “T” piece with wood screws. Ensure all connections are tight and square for maximum stability. Repeat steps 8 and 9 to build the second sawhorse’s I-beam.
- Attach the Legs to the I-Beam: Now, position the legs. Take one of the 30-inch leg pieces and place its end just underneath the “T” section of your I-beam, aligning it to the outside edge. Using four wood screws, secure the leg to the I-beam in a box-like pattern (two on each side of the leg’s attachment point). This “box shape” distribution of screws provides excellent stability and prevents the leg from twisting.
- Secure All Four Legs: Repeat step 10 for the remaining three legs, attaching them to their respective positions on the I-beam. Once all four legs are securely fastened, carefully turn the sawhorse onto its newly attached legs.
- Verify Sawhorse Balance and Stability: Before proceeding, gently rock each sawhorse to check its balance. Ensure all legs are firmly attached and that there’s no excessive wobble. Make any necessary adjustments by tightening screws or ensuring the legs are square to the I-beam. A stable base is crucial for a safe table.
Phase 4: Securing the Tabletop and Final Checks
The final steps involve attaching the plywood top and ensuring overall stability.
- Position and Mark the Plywood Tabletop: Carefully place your large plywood sheet on top of the two assembled sawhorses. Adjust its position until it’s centered and evenly spaced over both bases. Once satisfied with the placement, use your pencil to lightly mark the edges of where the top of each sawhorse sits underneath the plywood. These markings will guide your screw placement.
- Secure the Plywood Tabletop: Using your wood screws, begin to secure the plywood tabletop to the sawhorses. Drive screws down through the plywood into the top of the I-beams, following your pencil markings. Space the screws evenly, perhaps every 12-18 inches, to ensure the tabletop is firmly attached and won’t shift. You can countersink the screws slightly if you wish for a flush finish, then fill the holes and paint over them for a seamless look.
- Perform a Final Stability Check: With the tabletop now secured, give the entire table a final, thorough check for balance and stability. Gently push on different corners and edges to ensure there’s no rocking or excessive movement. A stable table is a safe table.
- Enjoy Your New Home-Built Sawhorse Table: Congratulations! You’ve successfully built a versatile, durable, and custom sawhorse table. Step back and admire your handiwork. This table is ready for its first outdoor party, creative project, or whatever use you envisioned for it.
Tips for Success and Customization
Elevate your sawhorse table with these additional considerations:
- Weatherproofing: For prolonged outdoor use, consider applying a clear polyurethane sealer or an outdoor-grade wood stain in addition to paint. This will provide an extra layer of protection against moisture, UV rays, and general wear and tear.
- Aesthetics: Experiment with different paint colors to match your outdoor decor. You could even stencil designs on the tabletop or use a vibrant color for the sawhorses and a neutral tone for the top. Stains can highlight the natural beauty of the wood if you prefer a more rustic look.
- Adding Mobility: For ultimate flexibility, consider attaching heavy-duty locking casters to the bottom of the sawhorse legs. This will allow you to easily roll the table around your patio or workshop and then lock it securely in place.
- Alternative Uses: Think beyond a party table! This design makes an excellent temporary desk for remote work, a sturdy potting bench, or even a robust workbench for garage projects.
Maintenance and Care for Longevity
To ensure your DIY sawhorse table lasts for many seasons, a little care goes a long way:
- Regular Cleaning: Wipe down the table surface regularly with a damp cloth to remove dirt, dust, and spills. For tougher grime, a mild soap solution can be used.
- Seasonal Protection: If the table is kept outdoors year-round, consider covering it with a waterproof furniture cover during harsh weather conditions or when not in use for extended periods.
- Reapply Finish: Depending on exposure to the elements, you may need to reapply paint, stain, or sealer every few years to maintain its protective qualities and appearance.
- Winter Storage: For colder climates, it’s best to disassemble the table and store the components in a dry shed or garage during the winter months to prevent damage from freezing and thawing cycles.
Building your own sawhorse table is a rewarding endeavor that yields a highly functional and adaptable piece of furniture. Whether it’s hosting memorable outdoor dinners, serving as a dynamic workspace, or simply adding character to your patio, this DIY project empowers you to create something truly useful and personal. Grab your tools, follow these steps, and enjoy the satisfaction of building a practical masterpiece for your home!