
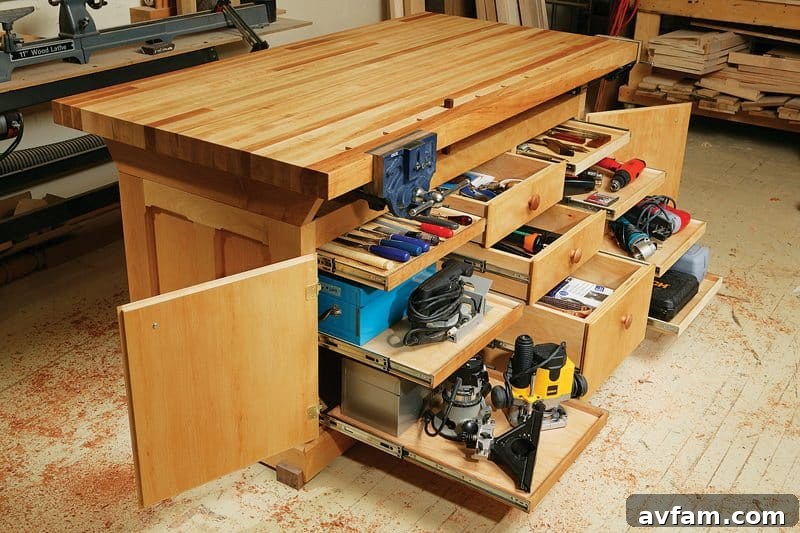
Every serious DIY enthusiast, professional tradesperson, or hobbyist knows the indispensable value of a well-organized and functional workspace. At the heart of any productive garage or workshop lies a robust and reliable workbench. While off-the-shelf options might seem convenient, a custom-built workbench offers unparalleled advantages, transforming your chaotic space into an efficient haven for creativity and craftsmanship. This comprehensive guide will delve into why a tailor-made workbench is an essential upgrade, covering everything from initial planning and thoughtful design to the final construction and finishing touches. Prepare to elevate your productivity and enjoy a workspace that truly works for you!
Understanding the Need for a Custom Workbench
Before embarking on any construction project, it’s crucial to understand the fundamental benefits and the ‘why’ behind building a custom workbench. This isn’t just about having a flat surface; it’s about creating a specialized tool that enhances every aspect of your work. Unlike generic, mass-produced benches, a custom workbench is designed to integrate seamlessly into your workflow, addressing your unique project requirements and maximizing the utility of your available space.
One of the foremost advantages of a custom workbench lies in its adaptability. Whether you’re a woodworker needing specialized dog holes and a sturdy vise, an electronics hobbyist requiring integrated power and ample component storage, or a mechanic working with heavy machinery, a custom build ensures your bench is perfectly equipped for the task at hand. This level of customization directly translates into increased efficiency, fewer interruptions, and a significantly more enjoyable working experience.
Moreover, the ergonomic benefits of a tailor-made workbench cannot be overstated. Standard workbench heights often lead to uncomfortable postures, resulting in back pain, arm strain, and reduced stamina during long projects. By customizing the height of your workbench to your specific stature and preferred working style – whether standing, sitting, or alternating – you can mitigate these issues. Incorporating features like adjustable height mechanisms or dedicated zones for specific tasks can further enhance comfort and prevent repetitive strain injuries, allowing you to work longer and more comfortably.
Finally, a custom workbench is a masterclass in space optimization. Garages and workshops come in all shapes and sizes, and often, space is a premium. A custom design allows you to utilize every inch effectively, fitting snugly into an alcove, wrapping around a corner, or even folding away when not in use. This intelligent use of space not only makes your workshop more functional but also helps maintain a cleaner, more organized environment, which is vital for safety and productivity.
Unlocking the Full Potential: Benefits of a Custom Workbench
The decision to invest time and effort into building a custom workbench yields a multitude of rewards that extend far beyond a simple workspace. These benefits collectively contribute to a more productive, safe, and enjoyable environment for all your DIY and professional endeavors.
- Ample and Dedicated Workspace: A custom workbench provides precisely the surface area you need. No more cramped conditions or working on makeshift tables. You can design it with large, unobstructed zones for assembly, smaller areas for intricate work, and even dedicated sections for specific tools, ensuring you always have enough room to work comfortably and safely. This eliminates the need to constantly move projects or tools, streamlining your workflow.
- Superior Organization and Efficiency: One of the biggest time-wasters in any workshop is searching for tools. A custom workbench integrates bespoke storage solutions – drawers of varying depths, open shelves for frequently used items, pegboards for hanging tools, and even specialized cubbies for power tool accessories. This dedicated organization means every tool has its place, enhancing your overall workflow, reducing clutter, and significantly cutting down on project time.
- Specialized Features and Integrated Solutions: This is where custom truly shines. Imagine a built-in router table, an integrated workbench vise for woodworking, strategically placed power outlets and USB charging ports, integrated dust collection ports, or even dedicated spaces for larger, fixed equipment like a drill press or bench grinder. These specialized features are designed to support your specific crafts, making complex tasks simpler and more efficient, all while keeping your main work surface clear.
- Personalized Aesthetics and Inspiring Environment: Beyond functionality, a custom workbench is an expression of your personality and craftsmanship. You have the freedom to choose materials, finishes, and design elements that resonate with your personal style. Whether you prefer the rustic charm of reclaimed wood, the sleek look of a modern design, or the robust utility of industrial components, your workbench can become a central, inspiring feature of your workshop, motivating you to tackle new projects with enthusiasm.
- Durability and Longevity: When you build a workbench yourself, you control the quality of materials and construction. Opting for high-grade lumber, robust fasteners, and durable finishes ensures your workbench will withstand years of heavy use, impacts, and exposure to various materials. This investment in quality means a workbench that will last a lifetime, far surpassing the lifespan of many mass-produced alternatives.
Determining Your Workbench Needs: A Pre-Construction Checklist
Before any wood is cut or fasteners are bought, a thorough assessment of your specific requirements is paramount. This foundational step will dictate the design, size, materials, and features of your perfect custom workbench. Ask yourself the following questions to lay the groundwork for a truly functional design:
- What are your primary projects? Are you mainly involved in fine woodworking, metal fabrication, automotive repairs, electronics, general home repairs, or crafting? Each discipline has unique demands regarding work surface hardness, stability, and specific tool integration.
- What tools do you use most frequently? List your essential hand tools, power tools, and any specialized equipment. This will inform your storage solutions (drawers, shelves, pegboards) and whether you need dedicated cutouts or mounting points for specific machinery.
- What are the typical dimensions and weight of your projects? Do you work on small, intricate items, or large, heavy assemblies? This dictates the required length, width, and overall load-bearing capacity of your workbench.
- Do you need mobility? Will your workbench stay in one place, or do you need to move it around your garage? If mobility is key, consider heavy-duty locking casters.
- What specialized operations will you perform? Do you require a clamping surface, a router table, a miter saw station, an area for soldering, or a space for finishing? Integrate these needs into your design from the outset.
- How much storage do you realistically need? Go beyond basic shelves. Think about tool organization specific to your habits – shallow drawers for small items, deep drawers for larger tools, or a French cleat system for flexibility.
- What is your budget? Determine a realistic budget for materials and any specialized hardware. This will help guide your choices without compromising essential functionality.
By thoughtfully answering these questions, you’ll develop a clear vision of the ideal custom workbench, ensuring it aligns perfectly with your individual working style and project demands.
Planning Your Custom Workbench: The Blueprint for Success
Proper planning is not just a recommendation; it is the cornerstone of any successful custom workbench build. Rushing this stage can lead to costly mistakes, wasted materials, and a workbench that ultimately falls short of your expectations. This section will guide you through the essential considerations for mapping out your workbench, ensuring every detail is accounted for before you even pick up a saw.
Think of this planning phase as creating the blueprint for your dream workshop hub. It’s an opportunity to visualize how the workbench will integrate into your existing space, how you will move around it, and how it will support your various projects. This involves more than just measurements; it’s about anticipating workflow, ensuring safety, and optimizing functionality to create a truly harmonious and efficient workspace.
Beyond the core structure, consider integrating future-proof elements. For instance, think about a flexible power infrastructure with multiple outlets and circuit protection. Plan for adequate task lighting that illuminates your work surface evenly, reducing eye strain and improving accuracy. Dust collection is another critical consideration, especially for woodworking; planning for ports and pathways during the design phase is far easier than retrofitting later. By thinking holistically, you can create a workbench that not only meets your current needs but also adapts to your evolving crafting journey.
Choosing the Right Location: Setting the Stage for Efficiency
The placement of your custom workbench is a critical decision that influences accessibility, workflow, and overall comfort. An improperly located workbench can hinder movement, create unnecessary shadows, and even pose safety risks. Take the time to evaluate your garage or workshop thoroughly, considering the following:
- Accessibility: Ensure easy access to all sides of the workbench, especially if you plan to work on larger projects that require movement around the piece. Avoid placing it in a way that blocks entryways, garage doors, or access to other essential tools and storage.
- Lighting: Natural light is invaluable. Position your workbench near windows if possible to take advantage of daylight, which reduces eye strain and provides accurate color rendition for finishing work. Supplement natural light with ample artificial lighting, focusing on task lighting directly over the work surface and general ambient lighting for the entire area.
- Ventilation: If you anticipate working with paints, solvents, glues, or producing a lot of sawdust, good ventilation is crucial. Locate your bench where it can benefit from open windows, exhaust fans, or a dedicated air filtration system to maintain a healthy breathing environment.
- Proximity to Utilities: Place your workbench close to electrical outlets to minimize the need for extension cords, which are trip hazards and can limit power tool performance. Consider adding new dedicated circuits if your existing electrical setup is insufficient for your power tool demands. Proximity to compressed air lines or water sources might also be beneficial depending on your projects.
- Workflow Integration: Think about the logical flow of your projects. If you often move from a miter saw to the workbench, and then to an assembly area, position your workbench strategically within this sequence. Create “zones” in your shop (e.g., cutting zone, assembly zone, finishing zone) and place your workbench as the central hub, facilitating smooth transitions between tasks.
Measuring Your Space: Precision is Key
The old adage “measure twice, cut once” applies not only to lumber but also to your planning. Accurate and meticulous measurements are fundamental to ensuring your custom workbench fits perfectly within your available space and functions without obstructions. Don’t eyeball it – grab a tape measure and a notepad.
- Overall Dimensions: Measure the total length, width, and height of the area where your workbench will reside. Account for any wall irregularities, support beams, or existing fixtures.
- Clearance and Movement: Beyond the workbench itself, consider the space you need around it. How much room do you require to pull out drawers, open cabinets, or operate a table saw or miter saw safely when placed near the bench? Allow sufficient clearance for your own movement, bending, and reaching.
- Door and Window Obstructions: Ensure your workbench, once built, will not impede the opening of garage doors, cabinet doors, or windows. Consider the swing radius of any doors in the vicinity.
- Existing Equipment: If you have large, stationary tools (e.g., air compressor, dust collector, refrigerator), make sure your workbench design does not block their access, operation, or maintenance.
- Visualization Tools: For complex layouts, consider drawing a scaled diagram of your garage floor plan. You can use graph paper or free online room planners. Even better, use painter’s tape on the floor to physically outline the proposed dimensions of your workbench. This tangible representation helps you identify potential bottlenecks, awkward clearances, or areas where the bench might feel too dominant or too small, allowing for adjustments before construction begins.
This meticulous approach to measurement ensures that your custom workbench is not just a standalone piece but an integral and harmonious part of your overall workshop layout.
Selecting Your Materials: Foundation of Durability and Functionality
The choice of materials is arguably one of the most critical decisions in building a custom workbench. It directly impacts the bench’s durability, stability, work surface integrity, and overall aesthetic. Prioritize quality and suitability for your intended use rather than simply opting for the cheapest options.
For the Workbench Frame (Base and Legs):
- Solid Wood (e.g., Douglas Fir, Pine, Oak): A popular choice for its strength and affordability. Dimensional lumber (2x4s, 2x6s, 4x4s) is excellent for constructing a sturdy frame. Hardwoods like oak or maple offer superior rigidity and impact resistance but come at a higher cost.
- Plywood (e.g., Construction Grade Plywood, Baltic Birch): Plywood is excellent for sheer strength and stability, particularly for shelves, cabinet carcasses, and sometimes for the frame itself when laminated. Baltic birch is prized for its void-free core and appealing edge grain.
- Steel or Aluminum: For an exceptionally robust, industrial-grade workbench, a metal frame offers incredible strength, fire resistance, and durability, especially suitable for heavy machinery, welding, or metalworking.
For the Workbench Top (Work Surface):
- Hardwood (e.g., Maple, Beech, Oak): The gold standard for woodworking benches. Hardwood tops are extremely durable, resist denting, and can be easily planed or sanded flat over time. They are heavy, providing excellent stability for hand tool work.
- MDF (Medium-Density Fiberboard): A smooth, flat, and stable material, excellent for assembly tables where a precise, even surface is crucial. It’s susceptible to water damage and not as impact-resistant as hardwood.
- Plywood (e.g., High-Quality Birch Plywood): A more economical alternative to hardwood, especially when laminated in layers to create a thick, stable top. It’s durable and versatile.
- Melamine or Laminate-faced Particle Board: Offers a slick, easy-to-clean surface, ideal for finishing work or as a sacrificial surface. Less durable against impacts.
- Steel Plate: Necessary for metalworking, welding, or very heavy-duty tasks.
Fasteners and Hardware:
- Screws and Bolts: Use construction-grade screws (e.g., structural screws, lag screws) for robust joinery. Bolts with washers and nuts provide superior strength for high-stress connections.
- Wood Glue: High-quality wood glue is essential for strengthening joints, especially in laminated tops or frame assemblies.
- Leveling Feet: Crucial for ensuring your workbench is stable on uneven garage floors.
- Casters: If mobility is desired, invest in heavy-duty locking casters that can support the full weight of the workbench plus your typical projects and tools.
Beyond structural integrity, consider the visual appeal. The right materials can complement your garage’s existing style. For a rugged, industrial look, combine steel with thick timber. For a more classic, inviting workshop, focus on natural wood finishes. The choice of materials not only determines the workbench’s performance but also contributes to the inspiring atmosphere of your dedicated workspace.
Designing Your Custom Workbench: Form Meets Function
With your planning complete and materials considered, the exciting phase of design begins. This is where your vision truly starts to take shape, translating your needs into a tangible blueprint. Designing a custom workbench is an art form, balancing aesthetics with absolute functionality to create a tool that not only performs flawlessly but also reflects your personal style and enhances your enjoyment of every project.
Your workbench should be more than just a flat surface; it should be an extension of your creative mind and a testament to your craftsmanship. Whether your preference leans towards the timeless appeal of a classic woodworking bench, the rugged practicality of an industrial station, or the minimalist efficiency of a modern design, the aesthetics of your workbench play a significant role. A well-designed bench doesn’t just look good; it inspires confidence, encourages meticulous work, and transforms your garage from a utilitarian space into a truly personalized haven for innovation.
Considering Workbench Styles: Tailoring to Your Craft
The world of workbenches offers a diverse range of styles, each optimized for different types of work and space constraints. Understanding these variations will help you choose or adapt a design that perfectly suits your specific needs:
- Traditional Woodworking Benches: These are often characterized by their heavy, solid hardwood tops, robust legs, and integrated vises (face vises and tail vises). They typically include dog holes for clamping workpieces securely across the surface. Traditional benches are incredibly stable, providing an ideal platform for hand tool work, planing, chiseling, and joinery. They are usually stationary and built for ultimate rigidity, making them a cornerstone for serious woodworkers.
- Modular Workbenches: Offering immense flexibility, modular workbenches are composed of interconnected units that can be rearranged or expanded as your needs evolve. This style is excellent for workshops where requirements might change over time, or for those who want the ability to reconfigure their space. They can often be equipped with casters for mobility and usually feature adaptable storage systems.
- Portable Workbenches: Designed for versatility and small spaces, portable workbenches are often lighter, sometimes foldable, and almost always equipped with casters. They are perfect for crafters who need to move their workspace, or for those who need a bench that can be tucked away when not in use. While generally less robust than traditional benches, modern portable designs can still offer significant stability for many tasks.
- Heavy-Duty Mechanic Benches: These benches are built to withstand immense weight and harsh conditions. They often feature steel frames, thick steel or extremely durable wood tops, and integrated tool chests. They are designed for automotive work, metal fabrication, and handling heavy machinery components.
- Electronics Workbenches: Characterized by anti-static surfaces, ample power strips, integrated lighting, and specialized storage for small components and testing equipment. Ergonomics for seated work are a priority in this style.
- Multi-Purpose Assembly Tables: Often large, flat, and extremely stable, these tables are designed primarily for assembling large projects. They may feature built-in clamps or sacrificial tops and are usually lower than a traditional workbench for easier access to large workpieces.
By carefully considering your primary activities, you can select a workbench style that enhances your capabilities rather than limits them, creating a workspace that is both efficient and enjoyable.
Incorporating Storage Solutions: The Key to an Organized Workshop
An effective workbench isn’t just about the work surface; it’s also a highly organized hub for your tools and materials. Thoughtful integration of storage solutions is paramount to maintaining efficiency, reducing clutter, and ensuring every tool is precisely where you need it, when you need it.
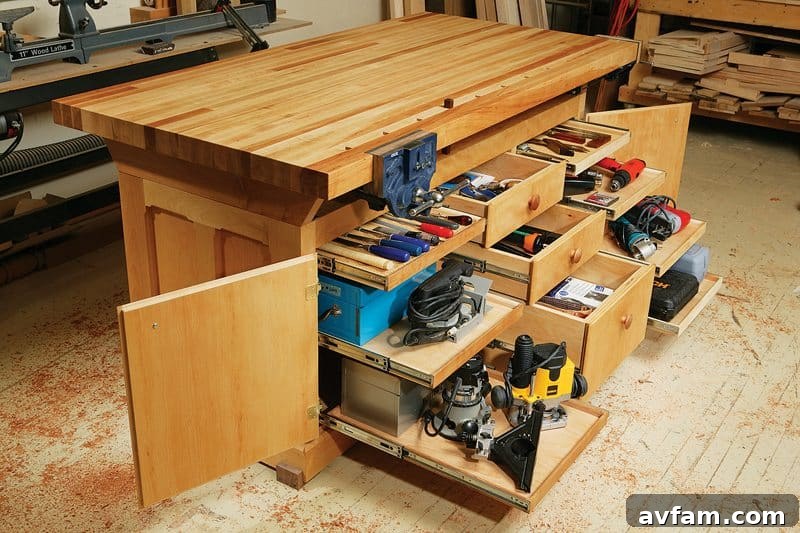
- Drawers: A cornerstone of workbench storage. Design drawers of various depths: shallow drawers for hand tools, fasteners, and small components, and deeper drawers for power tools, larger jigs, or specialized equipment. Full-extension drawer slides are highly recommended for easy access to items at the back. Consider custom inserts or dividers to keep tools neatly organized within the drawers.
- Shelves: Open shelving below the workbench provides quick access to frequently used items, project bins, or larger tools that don’t fit in drawers. Adjustable shelves offer flexibility for storing items of different heights. Ensure shelves are robust enough to handle the weight.
- Pegboards or French Cleat Systems: These vertical storage solutions on the wall behind or above the workbench are incredibly versatile. They allow you to hang hand tools, jigs, and accessories, keeping them visible and within easy reach. A French cleat system offers more robust hanging power and greater flexibility for rearranging tool holders.
- Overhead Storage: If ceiling height allows, consider overhead cabinets or shelves for less frequently used items, safety gear, or supplies. Ensure these are securely mounted and easily accessible via a sturdy step stool.
- Integrated Vises and Clamping Solutions: While not strictly storage, integrating vises directly into the workbench design (or planning for their addition) keeps them always ready for use without taking up valuable surface space. Similarly, dedicated areas for storing clamps prevent them from becoming a tangled mess.
- Specialized Compartments: Think about what you specifically need to store. Dedicated slots for saw blades, a small cabinet for sandpaper, magnetic strips for small metal tools, or even a built-in charging station for cordless tool batteries.
Visually, an organized workbench is also more appealing. A combination of open and closed storage can create a balanced look, allowing you to proudly display your most-used tools while neatly tucking away clutter. Remember, a place for everything and everything in its place is the mantra for an efficient workshop.
Planning for Power Tools and Equipment: Safe and Seamless Integration
Modern workshops heavily rely on power tools and specialized equipment. Integrating these into your workbench design requires careful forethought to ensure safety, efficiency, and a clutter-free environment. This isn’t just about plugging things in; it’s about creating a harmonious ecosystem for your powered tools.
- Power Outlets and Strips: Strategically place multiple electrical outlets along the back or sides of your workbench. Consider embedding power strips with surge protection directly into the workbench frame. If possible, run dedicated circuits for high-amperage tools to prevent tripping breakers. Ground Fault Circuit Interrupter (GFCI) outlets are a must for any workbench, providing crucial protection against electrical shocks.
- Cable Management: Design channels, clips, or conduits to route power cords and extension leads neatly. This prevents tripping hazards, keeps your work surface clear, and protects cables from damage. Consider built-in cable reels for easy retraction.
- Dust Collection Integration: If you use woodworking tools, integrating a dust collection system is vital for health and cleanliness. Plan for blast gates and hose connections near where power tools will be used. You might even design a workbench with a downdraft table for sanding operations.
- Dedicated Tool Stations: For tools like a router (for a router table), bench grinder, or drill press, consider building dedicated, reinforced sections into your workbench. This ensures stability for the tool and keeps it at an ergonomic height for operation. These stations can sometimes be designed to fold away or retract when not in use.
- Lighting: Beyond general shop lighting, integrate task lighting directly above your work area. LED strip lights or adjustable work lamps provide focused illumination, reducing shadows and improving accuracy for detailed tasks.
- Air Compressor Lines: If you use pneumatic tools, consider running dedicated air lines with quick-connect couplers to various points on or around your workbench.
- Safety Switches: For tools permanently mounted to your workbench, think about adding emergency stop buttons or foot-activated safety switches for quick power cutoff.
Prioritizing ergonomics in your layout is crucial. Position frequently used tools and their corresponding power sources within easy reach to minimize stretching and unnecessary movement. A well-planned power and equipment integration system not only enhances your workflow but also creates a significantly safer and more professional working environment.
Building Your Custom Workbench: Bringing Your Vision to Life
The moment has arrived to transform your meticulous plans and carefully selected materials into a tangible, functional custom workbench. This stage requires precision, patience, and adherence to safety protocols. By following a structured approach, you can ensure your build is sturdy, level, and exactly as you envisioned.
Approach the construction phase with a “measure twice, cut once” mentality. Each joint, every fastener, and every cut contributes to the overall integrity and longevity of your workbench. Embrace the process, paying close attention to detail, and soon you will have a robust and personalized workspace ready to tackle countless projects.
Preparing Your Materials: The Foundation of a Smooth Build
Before you start cutting or assembling, proper material preparation is essential. This step ensures accuracy, safety, and a smoother construction process:
- Organize and Inventory: Lay out all your lumber, hardware, and tools. Double-check your cut list against your materials to ensure you have everything needed and that quantities are correct. This prevents interruptions and last-minute trips to the hardware store.
- Safety First: Don your personal protective equipment (PPE): safety glasses, hearing protection, and gloves. Ensure your workspace is clear, well-lit, and free of tripping hazards.
- Accurate Cutting: Using your detailed cut list from the design phase, precisely cut all lumber and sheet goods to size. Take your time, use sharp blades, and verify each measurement before making the cut. Labeling cut pieces can prevent confusion during assembly.
- Edge Preparation: For plywood or MDF, consider edge banding or routing a slight chamfer or round-over on edges that will be frequently handled. This improves durability and comfort.
- Pre-drilling: For most screw connections in wood, pre-drilling pilot holes is highly recommended. This prevents wood splitting, especially near edges, and ensures screws drive in straight and securely. Countersink holes where screw heads need to be flush with the surface.
- Sanding and Smoothing: For visible surfaces or edges that will be handled, pre-sand lumber to remove splinters and rough spots. This saves time later and ensures a smoother finish.
By investing time in meticulous preparation, you set the stage for a confident and successful build, minimizing errors and maximizing the quality of your finished workbench.
Assembling Your Workbench: Bringing the Pieces Together
This is where your design comes to life. Follow your detailed plans step by step, focusing on accuracy and stability. Assembly typically proceeds in a logical sequence:
- Construct the Base Frame: Start by building the main framework that will support the workbench top. This usually involves assembling the long and short aprons (horizontal supports) with the legs. Use strong joinery methods – structural screws, lag bolts, or even mortise and tenon joints for advanced builders – combined with high-quality wood glue for maximum strength.
- Ensure Squareness and Levelness: As you assemble each section, constantly check for squareness using a framing square and ensure all components are level. An out-of-square or unlevel base will result in a wobbly or uneven workbench, which can compromise accuracy and safety. Use clamps to hold pieces firmly while fastening.
- Add Internal Supports and Shelving: Once the main frame is rigid, install any internal stretchers, drawer supports, or shelf cleats as per your design. These components add to the overall rigidity of the structure.
- Attach the Work Surface: Carefully position your prepared workbench top onto the assembled base. Ensure it’s centered and flush. Secure the top from underneath using screws or bolts. For solid wood tops, consider using fasteners that allow for seasonal wood movement (e.g., slotted holes or table top fasteners) to prevent warping or cracking.
- Install Drawers and Doors: If your design includes drawers or cabinets, install the drawer slides and hang the doors. Ensure they operate smoothly and are properly aligned.
- Install Leveling Feet or Casters: Finally, attach your chosen leveling feet to the bottom of the legs to compensate for uneven floors and fine-tune the workbench height. If opting for mobility, install heavy-duty, locking casters that can support the workbench’s full weight, plus any tools and projects.
Throughout the assembly process, patience is your best tool. Double-check all measurements and connections. A stable and durable workbench is the result of careful, deliberate work at every stage.
Adding Finishing Touches: Personalization and Protection
The finishing touches are what truly complete your custom workbench, adding both protection and personality. This stage transforms a functional structure into a proud centerpiece of your workshop.
- Protective Finish for the Work Surface: The work surface will endure the most abuse, so a durable finish is essential.
- Polyurethane or Varnish: Provides excellent abrasion, water, and chemical resistance. Apply multiple thin coats, sanding lightly between coats.
- Boiled Linseed Oil (BLO) or Tung Oil: Penetrates the wood, offering a natural, durable finish that is easy to repair. It won’t chip or scratch like a film finish.
- Epoxy Coating: For extreme durability and chemical resistance, especially for metalworking or automotive benches, a two-part epoxy resin topcoat can create an incredibly tough, seamless surface.
- Sacrificial Top: Some prefer to leave the primary workbench top unfinished and add a replaceable layer of MDF or hardboard that can be easily swapped out when it becomes too damaged.
- Edge Protection: Add trim or edge banding to exposed plywood edges for a cleaner look and added durability.
- Install Additional Storage Options: This is the time to mount pegboards, French cleat strips, magnetic tool holders, or any other specialized storage accessories you planned.
- Integrated Features: Install any remaining integrated components such as built-in vises, pop-up dog holes, power strips, task lighting, or dust collection ports. Ensure all electrical connections are safe and up to code.
- Personalization: Make your workbench uniquely yours. This could involve painting the base a specific color, stenciling your workshop’s name or logo onto a drawer front, or adding unique hardware. These creative touches instill a sense of pride and ownership.
- Tool Storage and Organization: Once the bench is complete, organize your tools into their new homes. This is often the most satisfying part, seeing your vision of a tidy and efficient workspace realized.
Building a custom workbench for your garage or workshop is more than just a construction project; it’s an investment in your passion, productivity, and personal satisfaction. By understanding your specific needs, meticulously planning, designing with creativity and functionality in mind, and executing the build with precision, you create a tailored workspace that empowers you to tackle any project with confidence and ease. Get ready to transform your garage into a hub of innovation and craftsmanship, where every project becomes a joyous endeavor!