
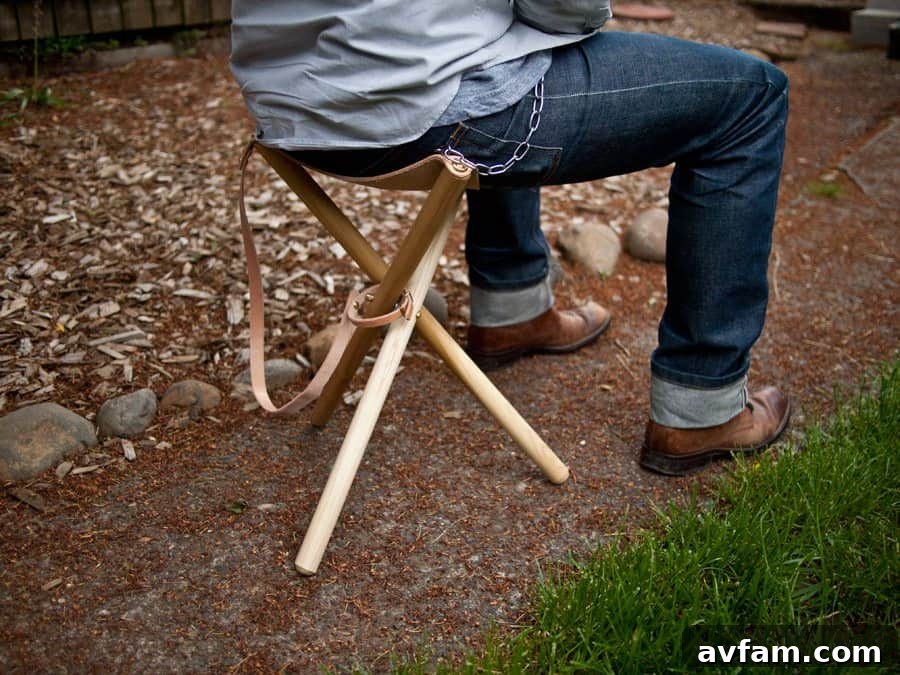
Craft Your Own Portable Tripod Camp Stool: A Stylish and Functional DIY Project
There’s a unique charm to spending time outdoors, whether it’s enjoying a vibrant open-air concert, cheering at a local sporting event, or simply relaxing by a campfire under the stars. Such experiences often call for comfortable and convenient seating. While the market is flooded with mass-produced, generic folding chairs that offer basic functionality, they rarely stand out. They’re often bulky, lack personal character, and can easily get lost in a sea of identical gear. Imagine having a lightweight, distinct, and highly portable seating option that not only serves its purpose beautifully but also reflects your personal style. This is where the charm of a DIY portable tripod camp stool comes in.
This engaging and straightforward DIY project allows you to create your very own custom stool for a mere fraction of the cost of many high-end commercial alternatives—typically around $25 in supplies. Not only will you save money, but you’ll also gain the immense satisfaction of crafting something with your own hands. This isn’t just another seat; it’s a conversation starter, a unique piece of gear that truly won’t get lost in the crowd, embodying both practicality and bespoke aesthetics for all your outdoor adventures. Embrace the joy of handmade craftsmanship and equip yourself with a truly personal piece of portable furniture.
The Allure of the DIY Tripod Stool: More Than Just a Seat
Why bother making your own tripod stool when off-the-shelf options are readily available? The answer lies in a blend of practical advantages and the intrinsic value of craftsmanship. A handmade tripod stool offers unparalleled portability, personalized style, and a durability often unmatched by cheaper mass-produced items. It’s an investment in comfort, uniqueness, and your own creative skills.
Unrivaled Portability and Versatility for Every Occasion
One of the primary advantages of a tripod stool is its exceptional portability. Designed with three legs that typically fold or collapse together, these stools are inherently compact and lightweight. Unlike bulkier folding chairs that can be cumbersome to carry and store, a tripod stool can often be slung over a shoulder, clipped to a backpack, or easily stowed in a car without taking up much precious space. This makes it an ideal companion for a vast array of activities, providing instant, comfortable seating wherever your adventures take you:
- Camping and Backpacking: A sturdy perch around the campfire or a comfortable spot to rest tired legs after a long hike, without adding significant weight to your pack.
- Fishing Trips: Stable seating on uneven riverbanks or lake shores, allowing you to focus on your catch in comfort.
- Outdoor Concerts and Festivals: A stylish way to enjoy music without sitting on damp ground, offering a clear view over seated crowds.
- Sporting Events: A quick and easy seat that distinguishes itself from the usual sea of generic chairs, making it easy to spot your spot.
- Picnics and Park Outings: Instant comfort wherever you decide to lay your blanket, perfect for enjoying a meal or simply relaxing.
- Gardening and Workshop Use: A practical low stool for tasks that require crouching or kneeling, reducing strain on your back and knees.
- Photography and Art: A stable and discreet seat for long sessions in the field, allowing artists and photographers to maintain focus and comfort.
Its inherent versatility makes it a must-have for anyone who appreciates convenient and adaptable outdoor gear that enhances their experience without complication.
Embrace Personal Style and Stand Out from the Crowd
Beyond its core functionality, a DIY tripod stool offers an incredible opportunity for personalization. Forget the drab, mass-produced aesthetics that make every outdoor setup look the same. With a handmade stool, you get to meticulously choose your materials, finishes, and colors, thereby creating a piece that truly reflects your individual taste and personality. Imagine selecting rich, supple leather for a classic, sophisticated look that will age beautifully, or opting for durable, vibrant canvas for a more rugged and adventurous vibe. You can stain the wooden dowels to match existing gear, paint them a bold color, or simply leave them natural for a timeless, rustic appeal. This unparalleled level of customization ensures your stool is not just functional, but also a unique accessory that complements your outdoor ensemble and garners admiring glances.
Durability, Sustainability, and the Joy of Craftsmanship
When you build something yourself, you gain complete control over the quality of the components and the assembly process. By selecting robust materials and assembling them with care and precision, your DIY tripod stool can be far more durable and long-lasting than many commercially available options that often cut corners on materials. This commitment to quality also aligns perfectly with sustainable practices, reducing the need for frequent replacements and minimizing waste. Furthermore, the act of making something with your own hands is an incredibly rewarding experience. It fosters a deep connection to your gear, making it more cherished and valued. It’s a simple project that builds practical skills, boosts confidence, and provides a tangible sense of accomplishment that lasts far beyond the initial build.
Gathering Your Essentials: Materials for Your Portable Stool
Creating your portable tripod stool requires a careful selection of materials that balance strength, durability, and aesthetics. The beauty of this project lies in its relative simplicity and the ability to source most components from a local hardware store, craft supplier, or online retailer. Choosing the right materials ensures your stool will be both sturdy and visually appealing.
The Foundation: Sturdy Wooden Dowels
For the legs of your stool, you’ll need three high-quality wooden dowels. These form the core structure, so their strength is paramount. The recommended specifications are:
- Dimensions: Three 1 1/8″ diameter dowels, each precisely cut to 24″ in length. This specific diameter offers an excellent balance of strength and manageability, providing a stable base without being overly bulky or heavy. The 24-inch length results in a comfortable seating height for most adults, ensuring your stool is practical and ergonomic for a variety of uses.
- Wood Type: Opt for a hardwood species known for its resilience and load-bearing capabilities. Excellent choices include oak, maple, birch, or even a strong, knot-free pine. Hardwoods are preferred for their superior strength and resistance to bending, warping, or breaking, ensuring your stool can withstand regular outdoor use and varying conditions.
- Preparation: Before assembly, it’s wise to lightly sand your dowels to smooth any rough edges or splinters. Consider applying a wood sealant, stain, or outdoor-grade varnish. This not only enhances the wood’s natural beauty but also provides crucial protection against moisture, UV rays, and general wear and tear, significantly extending the lifespan of your stool and preserving its appearance.
The Connectors: Robust Steel and Brass Hardware
The hardware you choose is critical for the stool’s structural integrity and its essential folding mechanism. You’ll need an assortment of steel and brass components to securely assemble the legs and create smooth pivot points:
- Pivot Bolts, Nuts, and Washers: A central pivot point is absolutely essential for the folding action of the tripod legs. You’ll need a strong, appropriately sized bolt (or possibly multiple smaller ones for individual leg pivots, depending on the design) with corresponding locknuts and washers. Steel is excellent for its sheer strength and load capacity, while brass can be used for washers or decorative elements for its aesthetic appeal and inherent corrosion resistance. Ensure all hardware selected is outdoor-grade or rust-resistant to withstand the elements.
- Securing Hardware: Additional smaller bolts, screws, or rivets may be required to firmly attach the seat material to the dowel ends, depending on your chosen seat design and the level of reinforcement desired.
- Sourcing: All necessary hardware can typically be found in the fasteners aisle of any reputable local hardware store or through specialized online suppliers. Don’t hesitate to ask for advice on appropriate sizes, materials, and types for outdoor use to ensure maximum durability and safety.
The Comfort: Durable Seat Material
The seat is where your personal style truly shines and where comfort is prioritized. You have a couple of excellent choices, each with its own distinct advantages and aesthetic:
- Leather: For a premium, classic, and incredibly durable seat, high-quality leather is an excellent choice. Look for thick, full-grain leather that will develop a beautiful, rich patina over time with use. Leather offers superb tear resistance, is naturally water-resistant to a degree, and provides a comfortable, supple seating surface that will conform to your shape, enhancing comfort over time.
- Heavy Canvas: A more budget-friendly and equally robust option is heavy-duty canvas. This could be duck canvas, marine-grade canvas, or even military-grade canvas (like Cordura) for extreme durability. It offers exceptional tear resistance, breathability, and can be treated or purchased pre-treated for enhanced water resistance. Canvas comes in a wide array of colors and patterns, allowing for significant customization to match your personal aesthetic.
- Other Options: For specialized needs, consider ballistic nylon for extreme durability and water resistance, or even a heavy denim for a casual, rugged look that’s still quite strong.
- Seat Dimensions & Attachment: The seat material will need to be cut into a triangular or slightly rounded triangular shape, with reinforced corners or edges where it attaches to the dowels. You can use strong stitching, metal grommets, or rivets for a secure and long-lasting attachment that can withstand repeated use and stress.
Essential Tools for a Seamless Build
One of the most appealing aspects of this DIY project is that it doesn’t require an extensive workshop full of specialized, expensive equipment. The tools needed are relatively basic, making it an accessible project even for novice DIYers. However, having the right tools on hand will ensure a smoother, more precise assembly, and a higher quality finished product.
- Power Drill: An indispensable tool for creating pilot holes and the main holes for your pivot bolts. A cordless drill offers greater flexibility for working outdoors or in areas without convenient power outlets. Ensure you have a range of sharp drill bits suitable for wood, accurately matching the diameters of your chosen hardware.
- Screwdriver: Depending on your specific hardware, you might need a Phillips head, flathead, or a specific hex driver. Always match the screwdriver bit precisely to the fastener head to prevent stripping the screw or damaging the tool.
- Socket Wrench Set: Absolutely essential for tightening nuts securely onto bolts, providing a much firmer and more reliable hold than pliers. Ensure you have the correct socket size for your chosen nuts before you begin assembly.
- Measuring Tape or Ruler: Accuracy is paramount when cutting dowels and marking drill points. A good quality, durable tape measure or a precise ruler will ensure all your pieces are consistent and your stool is balanced.
- Pencil or Marker: For clearly marking cutting lines and drilling locations on both your wood and fabric components. A fine-tip marker is often best for fabric.
- Saw (Optional): If your dowels don’t come pre-cut to the required 24 inches, a hand saw, miter saw, or even a hacksaw will be necessary. A miter saw will provide the cleanest and most accurate cuts, contributing to a professional finish.
- Sandpaper: Various grits (e.g., 120-grit for initial smoothing of rough edges, 220-grit for a finer, silky finish) will be extremely useful for preparing the wooden dowels and ensuring a smooth, splinter-free surface.
- Heavy-Duty Scissors or Box Cutter: For cleanly and accurately cutting your chosen seat material. Ensure they are sharp to prevent fraying.
- Safety Gear: Always prioritize safety during any DIY project. Wear safety glasses to protect your eyes from sawdust and flying debris, and consider gloves to protect your hands during sanding, drilling, and assembly.
The Rewarding Process: Bringing Your Stool to Life
While full, detailed instructions are best found at the source, the general process of assembling your tripod stool is remarkably intuitive and highly satisfying. It typically involves cutting the dowels to the specified length (if necessary), carefully drilling the precise pivot holes at the appropriate points on each dowel, assembling the three legs with your chosen hardware to create a functional and smooth folding mechanism, and finally, securely attaching the durable seat material. This logical, step-by-step approach ensures each component contributes to a robust and aesthetically pleasing final product, ready for adventure.
The beauty of this project is not just in the finished product but deeply embedded in the creative journey itself. As you work through the steps, you’ll witness your raw materials—simple wood, fabric, and metal—transform into a functional, unique piece of outdoor gear. It’s an unparalleled opportunity to engage with fundamental woodworking and textile skills, resulting in a valuable item you’ll be immensely proud to use, display, and share. Each component you fashion and assemble adds to the story of your stool, making it truly yours.
Care and Maintenance for Longevity
To ensure your custom-made tripod stool lasts for many seasons of adventure and continues to look its best, a little regular care and maintenance go a long way. Protecting your investment ensures you’ll enjoy its benefits for years to come:
- Regular Cleaning: For canvas seats, a simple brush-down to remove loose dirt or spot cleaning with a mild soap and water solution will suffice. Leather seats can be wiped with a damp cloth and occasionally treated with a high-quality leather conditioner to prevent drying, cracking, and to maintain its supple texture.
- Hardware Check: Periodically inspect all bolts, nuts, and screws. Outdoor use and repeated folding can cause hardware to loosen over time, so retighten as necessary to maintain stability and prevent wear.
- Wood Protection: If your wooden dowels are sealed or varnished, check for any signs of wear, chipping, or fading. Reapply a protective finish every few years, or as needed, especially if the stool is frequently exposed to harsh weather conditions, to maintain its integrity and appearance.
- Proper Storage: When not in use, always store your stool in a dry, covered area, away from direct sunlight and extreme temperatures. Prolonged exposure to moisture, UV rays, and temperature fluctuations can degrade both wood and fabric over time.
By diligently following these simple care tips, your handmade tripod stool will remain a reliable, comfortable, and cherished companion for countless outdoor experiences and a testament to your craftsmanship.
Embrace the DIY Spirit for Your Next Adventure
In a world increasingly dominated by mass production and disposable goods, creating something with your own hands offers a unique sense of achievement and a profound, tangible connection to the items you use daily. A DIY portable tripod camp stool is much more than just a piece of outdoor furniture; it’s a statement of individuality, a commitment to quality, and a joyful testament to the rewards of making. It’s a versatile, durable, and stylish solution for all your outdoor seating needs, promising both unparalleled comfort and distinctive flair wherever your adventures take you. Equip yourself not just with a stool, but with a story.