
Restore Your Wood Furniture: Expert Tips for Removing Stubborn Water Stains
Discovering unsightly water rings or cup marks on your beloved wood furniture can be incredibly frustrating. Whether it’s a heirloom dining table, a cherished antique, or a modern piece, these blemishes can significantly detract from its beauty and finish. Before you consider costly refinishing services, we’re here to share a range of effective, DIY-friendly techniques that can help you banish those stubborn water stains and restore your furniture’s original luster.
Like many homeowners, we love hosting friends and family. Despite our best efforts with coasters and napkins, the occasional stray glass or hot mug invariably leaves its mark on our wood surfaces. Our dining room table, a precious gift from Laura’s grandmother, holds immense sentimental value, beautifully fitting our small space while serving as a functional centerpiece. Similarly, a stylish side table from Design Within Reach, perfectly positioned for drinks, has also fallen victim to these common household accidents.
Both pieces, though not antiques, are treasured for their history, functionality, and aesthetic appeal. Faced with these water-stained challenges, we embarked on a mission to find practical, non-invasive solutions to avoid the expense and hassle of a full re-finish. Our online search led us to several popular and easy-to-implement remedies, focusing on those that required minimal time, effort, and investment.
The most promising and frequently recommended home remedies for removing white water rings from wood furniture typically rely on mild abrasion, oil penetration, or moisture absorption/evaporation. After careful consideration, we decided to put the following common techniques to the test:
- Toothpaste Technique: Utilizing the mild abrasives found in common household toothpaste.
- Mayonnaise and Ashes Method: A unique approach that uses the oil in mayonnaise to displace moisture.
- Baking Soda and Water Paste: Leveraging the gentle abrasive and absorbent properties of baking soda.
We applied each method to our stained furniture, and the results were truly insightful. Read on to discover which techniques proved most effective and how you can replicate our success in your own home.
Understanding Water Stains on Wood
Before diving into the solutions, it’s helpful to understand what causes these frustrating marks. White water stains (or “blushing”) occur when moisture gets trapped in the wood’s protective finish, typically shellac or lacquer, creating a cloudy appearance. This doesn’t necessarily mean the wood itself is damaged, but rather the finish has reacted to the moisture. Darker stains, however, usually indicate that the water has penetrated through the finish and into the wood grain, which can be a more challenging problem requiring professional intervention.
Our focus here is on those common white or cloudy rings, which are prime candidates for DIY removal. Remember, always test any method on an inconspicuous area of your furniture first to ensure it doesn’t cause damage or discoloration.
Method 1: The Toothpaste Technique
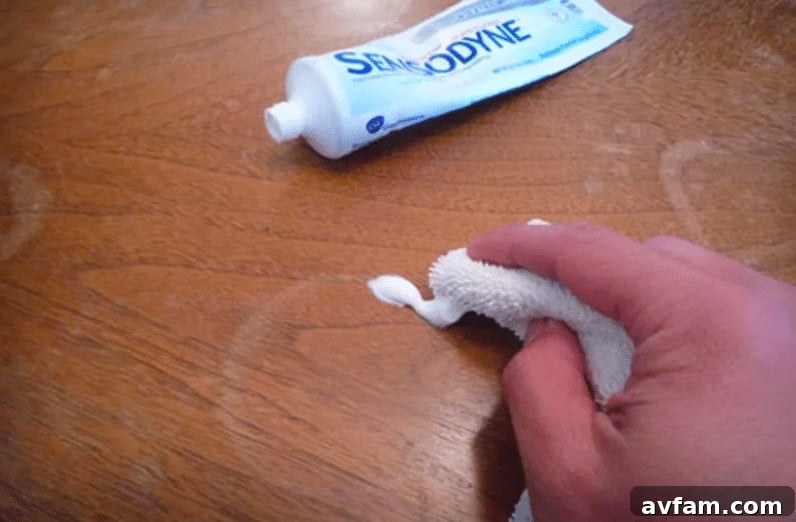
This technique is a household legend for a reason. The secret lies in the mild abrasives present in white toothpaste – ingredients like baking soda or silica – which gently buff away the fogged layer of the finish without causing deep scratches. It’s crucial to use a plain white toothpaste, not a gel variety, as gels lack these essential abrasive compounds.
Step-by-Step Guide:
- Preparation: Ensure the stained area is clean and dry.
- Apply Toothpaste: Dab a small, pea-sized amount of white, non-gel toothpaste directly onto the water stain ring. You truly don’t need much.
- Gentle Rubbing: Using a soft cloth (like a microfiber towel) or a paper towel, gently rub the toothpaste along the line of the stain. Work with the grain of the wood if possible.
- Observe Results: We were genuinely astonished by how quickly the stain began to disappear or lighten! This method works via gentle abrasion, not by extracting water, so prolonged waiting isn’t necessary. After just a couple of minutes of gentle rubbing, you should see noticeable improvement.
- Wipe Clean: Once the stain is gone or significantly faded, wipe away any toothpaste residue with a clean, damp cloth, then immediately dry the area with another clean, dry cloth.
- Polish (Optional): For best results, follow up with a high-quality furniture polish to restore shine and provide a protective layer.
Important Caution: Less is more with this technique. Avoid scrubbing too hard or for too long, and try to keep the toothpaste confined to the stain itself. Excessive scrubbing or extending beyond the stain’s perimeter could potentially wear away the finish and top layer of wood, creating a larger, more noticeable mark. If the stain isn’t completely gone, you can repeat the process carefully.
Method 2: Mayonnaise and Ashes
This unconventional method has gained significant traction in the DIY community. The theory behind it is twofold: the oil in the mayonnaise is believed to draw out the moisture trapped in the wood finish, while the ashes (typically cigarette ashes due to their fine texture) act as a very mild abrasive, similar to toothpaste, to gently buff the surface. Neither of us smokes, so cigarette ashes weren’t readily available, but we decided to test the mayonnaise on its own.
Step-by-Step Guide:
- Preparation: Clean and dry the stained area.
- Apply Mayonnaise (and Ashes): Apply a generous dollop of regular mayonnaise (full-fat works best) directly onto the water stain. If you have fine ashes (from cigarettes or a fireplace, ensuring they are completely cool), mix a small pinch into the mayonnaise to create a paste.
- Let it Sit: This is a key step where patience is paramount. We let the mayonnaise sit for approximately 3 hours. Many sources recommend leaving it on overnight for maximum effect, especially for older or more stubborn stains. The longer contact time allows the oils to penetrate and work their magic.
- Wipe Away: After the recommended sitting time, gently wipe away the mayonnaise (and ash mixture) with a clean, soft cloth.
- Clean and Dry: Use a separate clean, damp cloth to remove any greasy residue, then immediately dry the area thoroughly with a dry cloth.
- Evaluate Results: To our surprise, even the mayonnaise sans ashes proved effective! The water stain was noticeably less prominent, and importantly, we didn’t have to engage in any scrubbing, unlike with the toothpaste. Given that the water stains on our table had been present for at least nine months, we were skeptical about moisture extraction, but the method still delivered positive results, likely due to the oil’s ability to “re-lubricate” and blend the compromised finish.
Tip for Ash Alternatives: If you don’t have ashes, a tiny sprinkle of baking soda mixed with the mayonnaise can provide a similar gentle abrasive action, combining the benefits of both methods. Always be gentle and test first.
Method 3: Baking Soda and Water
Baking soda is a versatile household staple known for its mild abrasive and absorbent qualities, making it another excellent candidate for tackling water stains. When mixed with water, it forms a gentle paste that can help lift the cloudiness from the wood finish.
Step-by-Step Guide:
- Create a Paste: In a small metal or glass bowl, mix baking soda with a small amount of water to form a thick paste. A good starting ratio is 2 parts baking soda to 1 part water. You want it thick enough to stay on the stain but not too dry to crumble.
- Apply and Gently Scrub: Dab a small amount of the paste onto a clean, soft rag or paper towel. Gently rub the paste along the water mark line, moving with the wood grain.
- Observe Results: We found that the stain quickly started to recede with this method. While perhaps not as dramatically fast as the toothpaste, it certainly made a significant difference. We experimented with a slightly thicker paste, but it didn’t seem to offer much additional benefit; a moderate consistency works best.
- Wipe Clean: Once satisfied with the results, wipe away the baking soda paste with a clean, damp cloth, ensuring all residue is removed.
- Dry Thoroughly: Immediately dry the area with a clean, dry cloth to prevent new water marks.
Alternative Combination: As hinted in our conclusion, a mixture of baking soda and a tiny bit of white toothpaste can create a powerful hybrid solution, combining the best aspects of both abrasives. Experiment cautiously to find what works best for your specific stain and furniture finish.
Additional Effective Methods for Water Stains
Beyond our three primary tests, several other common household items can be surprisingly effective against white water marks:
The Iron Method (for White Stains)
This method works by using gentle heat to evaporate the trapped moisture within the finish. It’s particularly effective for fresh, white water rings.
- Preparation: Ensure the stained area is clean and completely dry.
- Cover the Stain: Place a clean, dry cotton cloth, an old t-shirt, or a tea towel over the water stain. Make sure it’s free of any prints or dyes that could transfer.
- Apply Gentle Heat: Set an iron to a low, non-steam setting. Briefly press the warm iron onto the cloth directly over the stain for about 5-10 seconds. Lift the iron and check the stain.
- Repeat if Necessary: If the stain persists, slightly move the cloth to a fresh spot and repeat the process, checking frequently. Do not leave the iron in one spot for too long, as this can burn or damage the finish.
- Finish: Once the stain is gone, allow the wood to cool, then polish as usual.
Petroleum Jelly (Vaseline)
Similar to mayonnaise, petroleum jelly is thought to work by displacing the moisture in the finish over an extended period.
- Apply: Rub a generous amount of petroleum jelly over the water stain.
- Let it Sit: Leave the petroleum jelly on for several hours, or even overnight.
- Wipe Clean: Wipe away the jelly with a clean cloth. The stain should have faded or disappeared.
- Polish: Buff the area with a furniture polish.
Preventive Measures: Protecting Your Wood Furniture
The best way to deal with water stains is to prevent them from occurring in the first place. Incorporating these simple habits can save you a lot of trouble:
- Always Use Coasters: This is the golden rule. Provide coasters for every guest and ensure they are used under all glasses, mugs, and bottles.
- Use Placemats and Tablecloths: For dining tables, placemats and tablecloths offer an additional layer of protection against spills and heat.
- Wipe Spills Immediately: Accidents happen. If a spill occurs, blot it up immediately with a soft, dry cloth. Do not rub, as this can spread the liquid or push it deeper into the finish.
- Regular Dusting and Polishing: A well-maintained and polished surface is more resistant to moisture. Use a quality furniture polish or wax periodically to create a protective barrier.
- Control Humidity: Extreme fluctuations in humidity can affect wood. A humidifier or dehumidifier can help maintain a stable environment, which is beneficial for all wood furniture.
Conclusions and Our Top Recommendation
After testing these popular home remedies, we can confidently say that all three techniques—toothpaste, mayonnaise (even without ashes), and baking soda with water—demonstrated varying degrees of success in removing or significantly lightening water stains on our wood furniture. Each offers a cost-effective and relatively low-risk alternative to professional refinishing.
However, in our experience, the toothpaste technique emerged as the clear standout. Its immediacy and effectiveness were truly impressive, quickly tackling the stains with minimal effort. The mayonnaise method also yielded good results, particularly for those who prefer a less abrasive approach and don’t mind the longer waiting time. The baking soda paste was a solid performer, making a noticeable difference, especially when used with gentle persistence.
Looking ahead, we’re keen to explore further by trying a baking soda/toothpaste mixture, and perhaps sourcing some fine ashes to combine with mayonnaise, to see if these variations can yield even more dramatic improvements. While these methods won’t completely restore heavily damaged finishes or deep dark stains that have penetrated the wood itself, they are incredibly effective for the common white water rings that cloud the surface.
Even with lighter stains, our cherished furniture pieces will eventually benefit from a professional polish and possibly a minor refinish to fully restore their original luster. But for now, we are immensely satisfied with the transformation, having reclaimed tables with much lighter and less noticeable blemishes. It’s a testament to the power of simple household items in tackling common household problems.
Have you tried any of these techniques, or discovered another successful method for removing water circles from your wood furniture? We’d love to hear which technique worked best for you in the comments below!