
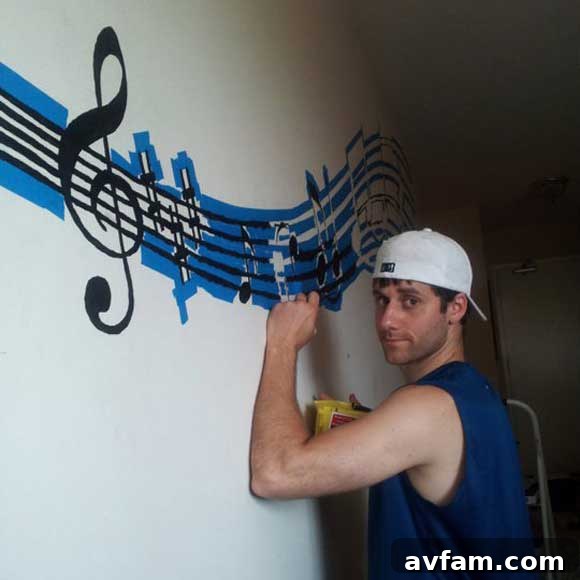
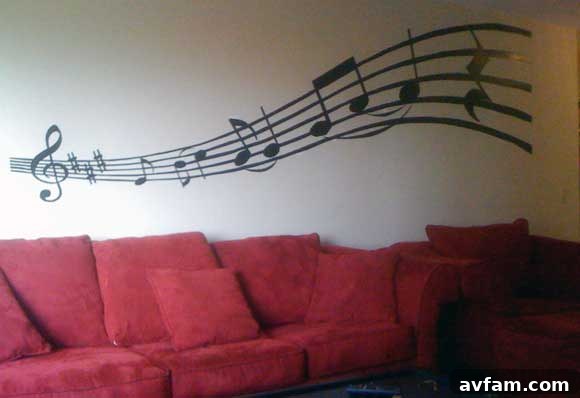
Transforming a blank wall into a captivating work of art might seem like a daunting task reserved for professional artists, but what if we told you it’s a perfectly achievable DIY project? Our friend Nick, driven by his passion for music, embarked on a creative journey to integrate his love for melodies into the very fabric of his new home’s design. The result was a stunning, personalized wall mural that became an instant focal point. The great news is, you can easily replicate Nick’s innovative approach and bring your unique vision to life, creating your own custom wall mural using a design of your choice and the straightforward techniques he perfected.
This comprehensive guide will walk you through every step of the process, from selecting your ideal image to the final brushstroke. We’ll delve into the necessary tools and materials, offer detailed instructions, and provide valuable tips to ensure your DIY wall mural project is a resounding success. Get ready to unleash your inner artist and infuse your living space with unparalleled character and charm!
Why Create Your Own DIY Wall Mural?
Beyond simply adding visual interest, a custom wall mural offers a myriad of benefits that make it an exceptional home decor choice:
- Unleash Personal Expression: Unlike mass-produced art, a DIY mural is a direct reflection of your personality, interests, and style. It allows you to tell a story or evoke a specific mood that resonates deeply with you.
- Budget-Friendly Transformation: Hiring a professional artist for a large-scale mural can be quite costly. By tackling it yourself, you significantly reduce expenses, making grand artistic statements accessible on a modest budget.
- Tailored to Your Space: You have complete control over the size, color palette, and design elements, ensuring the mural perfectly complements your room’s dimensions and existing decor.
- Enhance Ambiance: A thoughtfully designed mural can dramatically alter the feel of a room, creating a focal point, adding depth, or even making a small space feel larger.
- Rewarding Experience: The process of bringing your vision to life with your own hands is incredibly satisfying. Each stroke is a step towards a unique masterpiece that you can proudly claim as your own.
Essential Tools and Materials for Your Wall Mural Project
Before you dive into the creative process, gathering the right tools and materials is crucial for a smooth and successful project. Here’s an expanded list of everything you’ll need:
- Tape Measure: Essential for accurately measuring your wall space and your projected image segments. Precision here ensures your mural fits perfectly.
- Computer with Image Editing Software: A desktop or laptop computer running software like Adobe Photoshop, GIMP (a free alternative), or even user-friendly online tools like Canva. This is where you’ll manipulate and prepare your chosen image.
- Digital Projector: A key piece of equipment that allows you to project your design onto the wall. Consider the brightness (lumens) and resolution for a clear image, especially in well-lit rooms. A stable tripod or surface for the projector is also recommended.
- Pencil (HB or H grade): For lightly tracing your projected image outlines onto the wall. An HB or H pencil creates lines that are visible enough to follow but easy to erase or paint over without leaving dark marks.
- Ruler: Indispensable for creating crisp, straight lines, particularly for geometric patterns or architectural elements within your design.
- Paint: High-quality interior latex or acrylic paints are generally recommended for wall murals due to their durability and ease of cleanup. Choose colors that match your desired aesthetic. Consider sample pots to test colors on your wall before committing.
- Painter’s Tape: Crucial for creating sharp, clean edges. Opt for medium-tack painter’s tape to avoid damaging your wall’s surface. Various widths can be useful for different details.
- Drop Cloths: Protect your floors, furniture, and any nearby surfaces from accidental paint splatters. Old sheets or plastic sheeting work well.
- Paint Brushes (Assorted Sizes): You’ll need a range of brushes. Small artist brushes (e.g., sizes 0-4) are perfect for intricate details and fine lines. Medium brushes (1/2″ to 1″) are great for filling in smaller areas. Larger brushes (2″ to 3″) or rollers can be used for broad strokes and filling in larger sections.
- Paint Cup/Tray: For holding and mixing your paints. Reusable plastic containers or disposable paint trays are practical choices.
- Optional: Level: To ensure your projected image and traced lines are perfectly horizontal or vertical.
- Optional: Eraser: For correcting any tracing mistakes.
- Optional: Step Stool or Ladder: For reaching higher sections of your wall comfortably and safely.
Step-by-Step Guide: Crafting Your Custom Wall Mural
Follow these detailed instructions to transform your chosen wall into a personalized masterpiece, just like Nick did with his musical inspiration.
Phase 1: Planning and Digital Design
This phase involves all the foundational work on your computer, preparing your image for projection. While steps 3-8 involve software, even a simpler project can be achieved with careful projection and a keen eye.
- Discover Your Vision – Image Selection: Begin by finding the perfect image that resonates with you and your space. Explore online image banks, art archives, or even use a personal photograph or drawing. Nick found a beautiful musical score that he adapted. Consider the complexity of the image; simpler designs are generally easier for first-timers, but with patience, intricate details are certainly possible. Think about the overall aesthetic you want to achieve – modern, classic, abstract, or illustrative.
- Define Your Canvas – Wall Measurement: Accurately measure the rectangular area of your wall where the mural will reside. Use your tape measure to determine both the width and height. Note these measurements down carefully, as they will be critical for your digital design and projection. Ensure the wall surface is clean, dry, and free of dust or debris for optimal paint adhesion.
- Digital Canvas Creation: Open your image editing software (e.g., Photoshop, GIMP). Create a new file with the exact dimensions (width and height) of the wall section you just measured. Set the resolution to a reasonable DPI (dots per inch), typically 72-150 DPI is sufficient for projection onto a large surface.
- Scale and Position Your Image: Drag your chosen image file into the digital canvas you just created. Resize it carefully to fit the dimensions of your wall area. Hold down the Shift key while resizing to maintain the aspect ratio and prevent distortion. Position the image exactly where you envision it on the wall.
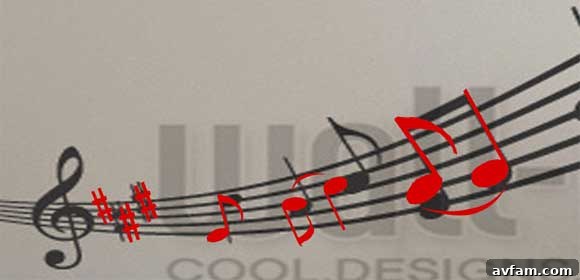
- Personalize Your Design: Now is the time for creative customization. If you have specific ideas or want to alter the image, do so now. Nick, for example, replaced the original musical notes in his chosen image with notes from a song that held special meaning to him. You might change colors, add text, simplify complex areas, or combine elements from multiple images. This step truly makes the mural uniquely yours.
- Projector Setup and Calibration: Set up your projector in the room, positioning it as far back from the wall as possible to achieve the largest projection size. Ensure the projector is stable and level. Open a test image on your computer and project it full screen. Measure the size of this projected image on the wall. This measurement is crucial because your wall might be too large for a single projection, requiring you to project your design in sections. Make sure your computer settings allow images to open full screen, edge to edge, to maximize the projection area.
- Segmenting Your Masterpiece: If your mural design is larger than what your projector can display in a single go, you’ll need to divide your digital image into manageable segments. In your image editing software, place clear markers (e.g., thin lines or guides) on your master image, dividing it into chunks that are the size of your projector’s maximum display area. Critically, ensure there’s at least one inch of overlap between each section. This overlap is vital for seamlessly aligning subsequent projected segments on the wall.
- Saving Your Segments: Once your master image is marked, carefully crop and save each marked section as its own individual image file. Label them clearly (e.g., “Mural_Section_1”, “Mural_Section_2”) to maintain order during the projection phase. This step ensures you have projector-sized pieces ready to display.

Phase 2: Projection and Tracing
This is where your digital design takes physical form on your wall.
- First Projection – Laying the Foundation: Open the first segmented image on your computer and project it onto the designated area of your wall. Carefully adjust the projector’s position, focus, and keystone correction (if available) until the image is sharp, level, and positioned exactly where you want the mural to begin. Use your level to double-check that the projection is perfectly straight.
- The Art of Tracing: With your pencil, meticulously trace the outlines of the projected image onto the wall. Use light pressure to create lines that are easy to paint over and won’t show through your final paint layers. For any straight lines within your design, use a ruler to ensure crisp, clean edges. Take your time with this step, as accuracy here will significantly impact the final look of your mural.
- Seamless Transitions – Projecting Subsequent Segments: Once the first segment is fully traced, open the second image segment on your computer. Carefully move the projector to align this new projection with the previously traced section. Use the one-inch overlap you designed in step 7 to perfectly match the edges. This overlap acts as a guide, ensuring a continuous flow. Once aligned, trace the second segment. Repeat this process for all remaining segments until your entire design is penciled onto the wall.
Phase 3: Painting and Finishing Touches
Now, bring your traced outlines to life with vibrant color!
- Precision with Painter’s Tape: To achieve impeccably clean and sharp lines, apply painter’s tape along the outlines of your traced design. Press the tape down firmly to prevent paint from bleeding underneath. This technique is particularly effective for geometric shapes, straight lines, or bold color blocks. For intricate curves or highly detailed areas where tape isn’t practical, you will need to freehand those sections later.
- Bringing Color to Life: Begin painting! Start by carefully applying paint along the edges of your taped sections or freehand areas using a smaller artist’s brush. This creates a clean boundary. Once the edges are defined, switch to larger brushes or a roller to fill in the larger areas. Apply multiple thin coats rather than one thick coat to achieve a smooth finish and prevent drips. Remember to use your drop cloths to protect your floor. Allow each color to dry completely before applying adjacent colors, especially if they are light and dark. For freehand areas, a tiny brush is your best friend for getting a super clean edge line before filling in the center with a thicker brush.
Tips for a Flawless DIY Wall Mural
Here are some additional insights to help you achieve professional-looking results:
- Practice Makes Perfect: If you’re new to painting, practice your brush strokes and techniques on a scrap piece of cardboard or an inconspicuous wall section first.
- Good Lighting is Key: Work in a well-lit environment to see your lines and colors accurately. Natural light is ideal, but good artificial lighting will suffice.
- Take Breaks: Painting a mural can be physically demanding. Step back periodically to rest your eyes and assess your progress from a distance. This also helps you spot any inconsistencies.
- Don’t Rush the Process: Patience is your greatest ally. Rushing can lead to mistakes, uneven lines, or messy paintwork.
- Test Your Colors: Before applying paint to your mural, test your chosen colors on a small, hidden section of the wall or a separate piece of paper to see how they dry and appear in your room’s lighting.
- Consider a Primer: If your wall is dark or unevenly painted, applying a coat of good quality primer can create a uniform base for your mural colors, making them pop more vibrantly.
- Sealing for Durability: For added protection and longevity, especially in high-traffic areas, consider applying a clear, non-yellowing matte or satin varnish over your finished mural once it’s completely dry.
Troubleshooting Common Mural Painting Issues
Even with careful planning, sometimes challenges arise. Here’s how to address a few common issues:
- Wobbly Lines: If your freehand lines aren’t as steady as you’d like, use a smaller brush and take deep breaths. You can also carefully use painter’s tape as a guide even on curves by cutting it into small, flexible pieces. Minor imperfections often blend into the overall design once the mural is complete.
- Paint Bleed Under Tape: This usually happens if the tape isn’t pressed down firmly enough, or if too much paint is applied in one go. To minimize bleed, press the tape firmly, especially along the edges. Apply thin coats of paint, pulling the brush away from the tape. Remove the tape when the paint is still slightly damp (but not wet), pulling it at a 45-degree angle.
- Uneven Projection: If your projected image appears distorted or not perfectly level, adjust your projector’s position, tilt, and focus. Many projectors have keystone correction settings to correct trapezoidal distortions. Ensure your projector is on a stable, flat surface.
- Pencil Marks Showing Through Paint: If your pencil lines are too dark and show through lighter paint colors, you can gently erase them with a soft eraser *before* painting, or ensure your paint has good opacity and apply extra thin coats over the marks.
Embrace Your Inner Artist!
Creating your own wall mural is a deeply rewarding experience that allows you to infuse your home with unparalleled personality and artistic flair. Nick’s music-inspired mural is a testament to what can be achieved with a clear vision, a few essential tools, and a willingness to embrace the DIY spirit. The satisfaction of stepping back and admiring a large-scale piece of art that you’ve meticulously crafted with your own hands is truly immense.
So, gather your materials, choose a design that speaks to your soul, and prepare to embark on an exciting creative adventure. Whether it’s a vibrant landscape, an abstract pattern, a beloved quote, or a personal symbol, your wall mural will be a unique reflection of you. We can’t wait to see what amazing creations you’ll bring to life!
Thanks again, Nick, for sharing your fantastic process and inspiring us all! Your mural looks absolutely brilliant!