
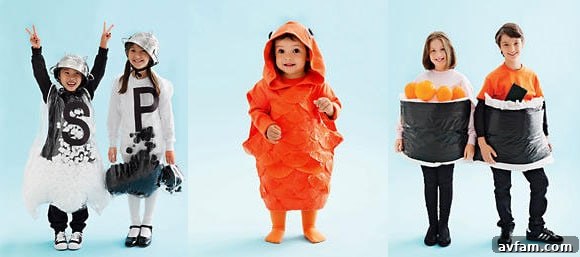
With Halloween just around the corner, the pressure to find the perfect costume can be immense. Many of us find ourselves in a last-minute scramble, only to discover that the best store-bought options are long gone, leaving us with limited choices or uninspiring outfits. But don’t despair! This year, ditch the generic store shelves and unleash your creativity with easy, impactful DIY Halloween costumes that are as fun to make as they are to wear. We’ve curated a fantastic selection of budget-friendly and time-efficient costume ideas that promise big impact for both you and your children, proving that you don’t need a massive budget or weeks of planning to create something truly memorable.
Our hand-picked collection focuses on simplicity and charm, using everyday materials you might already have around the house or can easily procure without breaking the bank. From clever food-inspired ensembles to whimsical characters, these costumes are designed to minimize stress and maximize Halloween spirit. Get ready to transform ordinary items into extraordinary outfits that will surely garner compliments and create lasting memories. Let’s dive into these imaginative and easy-to-create costume ideas!
Charming Salt and Pepper Shakers
Transform your little ones into an adorable and iconic duo with these delightful Salt and Pepper Shaker costumes. This idea is not only incredibly simple to assemble but also highly recognizable, making it a surefire hit at any Halloween gathering. It’s a fantastic choice for siblings or best friends looking for a coordinated and memorable look that stands out from the crowd.
Materials Needed:
- Two clear garment bags (or large, clear plastic trash bags for a similar effect)
- Black construction paper
- Double-stick tape
- Styrofoam peanuts (for ‘salt’)
- Black pompoms (for ‘pepper’)
- Two stainless steel colanders (lightweight ones work best)
- Black and white shoelaces or thin ribbon
Step-by-Step Directions:
- Begin by preparing the garment bags. Carefully enlarge the existing opening at the top of each clear garment bag. The goal is to make the hole spacious enough for your child’s head to comfortably fit through without tearing the plastic.
- Next, cut armholes on the sides of each bag and leg holes at the bottom. Ensure these openings are generous enough for easy movement, allowing your child to walk and play without feeling restricted.
- With black construction paper, meticulously cut out a bold capital “S” for one costume and a distinct capital “P” for the other. Use double-stick tape to firmly attach the “S” to one garment bag and the “P” to the other, placing them prominently on the front of each costume.
- Once the children have stepped into their respective bags, it’s time for the fun part! Fill the “S” bag with Styrofoam peanuts to represent the white salt granules. For the “P” bag, fill it generously with black pompoms, creating the appearance of freshly ground pepper. Adjust the filling to achieve a full, shaker-like silhouette while ensuring comfort for the child.
- To complete the look, carefully place a stainless steel colander on top of each child’s head, resembling the shaker caps. Secure the colanders gently but firmly by tying them with black and white shoelaces or ribbon, ensuring they don’t slip off while maintaining comfort.
Adorable Sushi Rolls
Who knew being delicious could be so easy? This Sushi Roll costume is an incredibly cute and comfortable choice, perfect for little foodies. It’s a whimsical and unique idea that guarantees smiles and might even make people hungry! The soft, padded design ensures comfort for a night of trick-or-treating or party fun.
Materials Needed:
- Four soft pillows (standard bed pillows or throw pillows work well)
- Strong packing tape
- Four lawn-sized trash bags (black or dark green for the seaweed effect)
- Styrofoam peanuts (to simulate rice)
- Small orange balloons (for fish roe or masago)
- One green t-shirt (rolled up to represent cucumber)
- Double-stick tape
Step-by-Step Directions:
- To create the base of the sushi roll, strategically place two pillows around the front of your child’s midsection and two more around the back. The pillows should encircle their torso, creating a plump, roll-like shape.
- Once the pillows are positioned correctly, use strong packing tape to snugly wrap around them, securing them firmly in place against your child’s body. Ensure the tape is tight enough to hold the pillows but not so tight that it restricts breathing or movement.
- For each child, take two lawn-sized trash bags and fold them in half lengthwise. Affix one folded bag to the outside of the front pillows and the other to the outside of the back pillows. Secure these trash bags tightly at the seams with more packing tape, creating the dark “seaweed” wrap around the “rice.”
- Now, it’s time to add the delicious fillings! Fasten small clusters of Styrofoam peanuts onto the tops of the pillows with double-stick tape to represent the fluffy white rice.
- For colorful accents, inflate a few small orange balloons and attach them with double-stick tape to mimic vibrant fish roe. Alternatively, roll up a green t-shirt tightly and secure it with double-stick tape to symbolize a crisp cucumber filling. Feel free to mix and match these “ingredients” for a custom sushi look!
Gleaming Goldfish
Dive into Halloween with an adorable Goldfish costume! This charming and simple DIY project transforms a plain hooded sweatshirt into a shimmering aquatic marvel, perfect for toddlers and young children. The layered cupcake liners create a fantastic scale-like texture, bringing this beloved pet to life in a most creative way. It’s comfortable, warm, and utterly captivating.
Materials Needed:
- Approximately 40-50 orange cupcake liners (for a toddler-size; adjust quantity for larger sizes)
- One oversize orange hooded sweatshirt
- Hot-glue gun and glue sticks
- One Ping-Pong ball
- Sharp scissors
- Permanent marker (black works best)
Step-by-Step Directions:
- Begin by preparing your cupcake liners. Take each orange cupcake liner and carefully cut it in half. You’ll be left with crescent-shaped pieces.
- Using a hot-glue gun, start attaching these halved cupcake liners to the oversize orange hoodie. Begin at the bottom hem of the sweatshirt and work your way upwards, layering them in rows. Ensure the curved edges of the liners are facing downward, mimicking the natural flow of fish scales. Continue layering until the entire body of the sweatshirt is covered, creating a rich, textured effect.
- Next, prepare the goldfish eyes. Carefully cut a Ping-Pong ball in half using sharp scissors. Exercise caution during this step.
- On the flat, cut side of each Ping-Pong ball half, draw a distinct circle in the center using a permanent marker. Then, color in the circles completely to create bold, visible pupils.
- Finally, hot-glue the Ping-Pong ball halves onto the seam of the hood, positioning them appropriately to resemble prominent goldfish eyes. Ensure they are securely attached to withstand the rigors of Halloween fun.
Vibrant Hula Dancers
Bring the spirit of the islands to your Halloween celebration with these enchanting Hula Dancer costumes! Witnessing these girls transform into vibrant performers in just one afternoon is truly inspiring. The secret lies in simple, readily available materials re-purposed with a creative touch. This costume is perfect for those who love color, movement, and a touch of tropical flair. It’s also an excellent opportunity to incorporate musical elements with a DIY ukulele, adding an extra layer of authenticity and fun to the ensemble.
Tools and Materials Needed:
- Two rope-style mop heads (for the skirts)
- One pack of assorted self-adhesive gift bows (for leis, headpieces, and bracelets)
- One pair of inexpensive flip-flops
- Two cereal boxes (one standard small size, one mini size for the ukulele)
- One roll of paper towels (for the ukulele neck)
- One box of brass paper fasteners (for ukulele details)
- Cloth ribbon (approximately 2 inches wide)
- Hot-glue gun and glue sticks
- Transparent tape
- Double-sided tape
- Foam cup (for tracing circles)
- Utility knife or sharp scissors
- Three long rubber bands (for ukulele strings)
Skirt How-To:
- Take two rope-style mop heads and carefully cut each down its center seam, separating them into four individual panels of fringe. Lay these panels side by side, ensuring they are aligned.
- Measure and cut a piece of 2-inch-wide cloth ribbon. The ribbon should be the exact length of the combined mop head panels, plus an additional 12 inches on each side to allow for comfortable tying around the waist.
- Using a hot-glue gun, apply a thin bead of glue along the top edges of the mop head panels. Carefully fold the cloth ribbon in half over these glued edges, pressing firmly to secure the mop head fringe to the ribbon. This creates a sturdy waistband for the skirt.
Lei, Headpiece, and Bracelets How-To:
- Cut various lengths of ribbon to create the desired accessories: a longer piece for the lei, a shorter one for the headpiece, and two small pieces for the bracelets.
- For the lei, create about six evenly spaced crimps or folds in the ribbon. Secure each crimp with a small piece of transparent tape, ensuring the ribbon lies flat and comfortably around the neck when worn.
- Affix an assortment of self-adhesive gift bows in various sizes and vibrant colors to each ribbon, covering them generously. Loop the ends of the finished ribbons and secure them firmly with double-sided tape to create closed loops for the lei, headpiece, and bracelets.
- Enhance the flip-flops by affixing one large, eye-catching gift bow to the top of each strap with double-sided tape or a dot of hot glue, adding a festive touch to the footwear.
Ukulele How-To (Optional but highly recommended for extra charm):
- You will need one small cereal box and one mini cereal box. Carefully flatten both boxes, then cut along one side of each. Reassemble the boxes inside out using tape, creating a clean, unprinted surface.
- Using a foam cup as a stencil, trace a perfect circle on the center of the small cereal box. Carefully cut out this circle using scissors or a utility knife, creating the soundhole of the ukulele. Approximately 1 1/2 inches below this hole, attach three brass fasteners in a straight line, which will serve as anchor points for the strings.
- Cut approximately 2 inches off one end of a paper-towel tube. Use the remaining longer section of the tube to trace one circle on the top of the small cereal box (above the soundhole) and another on the bottom of the mini cereal box. Cut out these circles precisely.
- Attach three more brass fasteners to the front of the mini cereal box, aligning them to correspond with the fasteners on the small box. To connect the boxes to the paper-towel tube, apply hot glue to the inside edges of the holes you cut in both cereal boxes. Carefully insert one end of the paper-towel tube into each glued hole, ensuring a secure and stable connection.
- For the ukulele strings, stretch three long rubber bands between the brass fasteners on the small cereal box and those on the mini cereal box, creating playable strings for the instrument.
DIY Milk Jug Storm Trooper Helmet
Channel the power of the Galactic Empire with an ingenious and surprisingly simple DIY Stormtrooper helmet made from a humble milk jug! This creative costume piece is a fantastic way to transform an everyday recyclable into an iconic sci-fi accessory. It’s an ideal project for young Star Wars fans, combining crafting fun with imaginative play, all while being incredibly budget-friendly.
Materials Needed:
- One clean, empty gallon-sized plastic milk jug
- White spray paint (plastic-friendly)
- Black permanent marker or black acrylic paint and a fine brush
- Scissors or a utility knife
- Sandpaper (fine-grit)
- Hot-glue gun (optional, for reinforcing)
- Elastic string or thin strap (optional, for securing)
Step-by-Step Directions:
- Ensure your milk jug is thoroughly clean and dry. Carefully cut the bottom off the milk jug, creating an open cylinder. This will be the main body of the helmet. The handle portion will typically face forward or backward, depending on how you orient it.
- Using scissors or a utility knife, carefully cut out the visor opening for the eyes. A classic Stormtrooper visor shape is a narrow, horizontal rectangle with slightly rounded ends. You may also cut out small mouth vents or other details characteristic of a Stormtrooper helmet. Always supervise children during cutting.
- Lightly sand the exterior of the milk jug with fine-grit sandpaper. This helps the spray paint adhere better. Wipe off any dust.
- In a well-ventilated area, apply several thin, even coats of white spray paint to the outside of the milk jug. Allow each coat to dry completely before applying the next. The goal is to achieve a uniform, opaque white finish.
- Once the paint is thoroughly dry, use a black permanent marker or black acrylic paint and a fine brush to meticulously add the distinctive black details of a Stormtrooper helmet. This includes the ‘tear lines’ below the eyes, the small rectangles on the cheeks, and any other black accents on the side vents or mouth area. Reference a picture of a Stormtrooper helmet for accuracy.
- (Optional) For a more secure fit, you can hot-glue a piece of elastic string or a thin strap inside the helmet, allowing it to be worn under the chin. You can also add some foam padding inside for comfort.
- Allow all paint and glue to dry completely before wearing. Your DIY Stormtrooper helmet is now ready for intergalactic adventures!
Creating your own Halloween costumes doesn’t have to be a daunting task. As you can see, with a little creativity and some common household items, you can craft truly memorable and unique outfits for this festive season. These DIY projects not only save money but also add a personal touch that store-bought costumes often lack. Imagine the pride your children will feel wearing a costume they helped create, or the conversations sparked by your clever homemade ensemble.
From the charming simplicity of Salt and Pepper shakers to the tropical delight of Hula Dancers and the epic appeal of a Milk Jug Stormtrooper, these ideas offer something for everyone. Remember, the goal is to have fun, express creativity, and make lasting memories. So, gather your materials, invite your family to join in the crafting, and get ready for a Halloween that’s uniquely yours. Happy haunting and happy crafting!