
Restore Your Outdoor Oasis: The Ultimate Guide to Deck Refinishing
Is your beloved deck showing signs of wear and tear, fading under the harsh sun, or succumbing to the elements? Over time, even the most robust wooden decks can lose their luster, becoming weathered, gray, and splintery. But don’t despair! Restoring your deck to its former glory is a rewarding project that not only enhances your home’s curb appeal but also significantly extends the life of your outdoor living space. Deck refinishing is a crucial maintenance task that protects your investment, ensuring countless more seasons of enjoyment. While it might seem like a daunting task, with the right preparation, tools, and techniques, this weekend project is entirely achievable for most homeowners.
A beautifully maintained deck is more than just a surface; it’s the heart of your outdoor entertaining, a serene spot for morning coffee, and a safe play area for children. Neglecting its upkeep can lead to costly repairs down the line, including wood rot, warping, and structural damage. This comprehensive guide will walk you through every essential step of the deck refinishing process, from initial cleaning and meticulous preparation to selecting the perfect finish and applying it like a pro. Get ready to transform your tired deck into a stunning, resilient outdoor oasis!
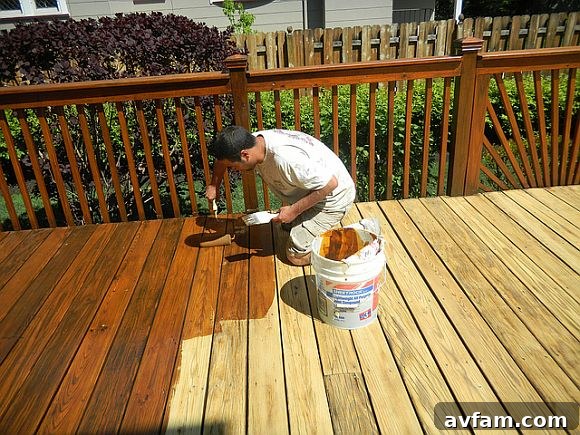
Getting Started: Essential Preparation for Deck Refinishing
Before you even think about applying a new finish, thorough preparation is paramount. Think of deck refinishing as an art project where the canvas must be perfectly clean and smooth. This initial stage is crucial for ensuring the new finish adheres properly, lasts longer, and looks impeccable.
1. Clear the Deck and Inspect for Damage
Begin by removing all furniture, planters, grills, toys, and anything else from your deck surface. This not only gives you a clear workspace but also allows for a comprehensive inspection. Look for:
- Loose or Damaged Boards: Replace any rotted, cracked, or severely warped boards.
- Protruding Nails or Screws: Hammer down or re-secure any fasteners that have popped up, as these can be a safety hazard and interfere with sanding.
- Splinters: Note areas with excessive splintering; these will require extra attention during sanding.
- Wood Rot: Pay close attention to areas where water tends to pool or near the house siding. Repair or replace any sections affected by rot.
2. Protect Surrounding Areas
Deck cleaners, strippers, and stains can be harmful to plants, grass, and even your home’s siding. Cover nearby shrubs, flowerbeds, and the base of your house with plastic sheeting or tarps. Use painter’s tape to protect any adjacent walls or trim that you don’t want stained.
3. Safety First: Gear Up!
Always prioritize safety. When working with deck cleaners, strippers, and even stains, protective gear is essential:
- Eye Protection: Safety glasses or goggles are a must.
- Gloves: Chemical-resistant gloves will protect your hands from harsh chemicals.
- Long Sleeves and Pants: To prevent skin exposure.
- Respirator Mask: Especially important when using chemical strippers, sanding, or spraying finishes.
The Cleaning Phase: Removing Dirt, Grime, and Mildew
A clean deck is the foundation of a successful refinishing project. You have several options for achieving a pristine surface, each with its own advantages.
Option A: Power Washing Your Deck
Power washing can be a fast and effective way to remove accumulated dirt, grime, and loose wood fibers. However, it requires a careful hand. Use a pressure washer with a wide-angle tip (e.g., 25-degree or 40-degree) and keep the nozzle moving at least 12 inches from the wood surface. Too much pressure or holding the nozzle too close can damage the wood, creating unsightly furrows and splinters that are difficult to sand out. For heavily soiled decks, you can use a deck cleaning solution specifically designed for pressure washers, following the manufacturer’s instructions.
Option B: Manual Scrubbing with a Deck Cleaner
For those without a power washer, or if you prefer a gentler approach, manual scrubbing is an excellent alternative. Apply a high-quality deck cleaner (such as an oxygenated bleach-free outdoor cleaner like OxiClean Outdoor, or a dedicated deck brightener) generously to the deck surface. Allow it to penetrate for the recommended time, then scrub vigorously with a stiff-bristle brush. This method is particularly effective for removing mold, mildew, algae, and ground-in dirt. Ensure you rinse the deck thoroughly with a garden hose until all traces of the cleaner are gone. Residue can interfere with stain adhesion.
The Importance of Drying
Regardless of your cleaning method, the deck must be completely dry before moving on to stripping or sanding. This typically takes 24 to 48 hours, depending on humidity levels and sunlight. Rushing this step can trap moisture beneath the new finish, leading to peeling and premature failure.
Stripping Away Old Finishes: A Fresh Start
If your deck has an existing stain or sealer that is peeling, flaking, or simply not the look you want, a chemical stripper is usually necessary. This step is critical for ensuring the new finish penetrates and adheres properly, creating a uniform appearance.
Using a Chemical Deck Stripper
Apply the deck stripper evenly across the surface according to the product’s instructions. Allow it to dwell for the recommended time, usually 15-30 minutes. You’ll likely see the old finish begin to bubble or lift. Do not let the stripper dry on the wood. Keep the surface wet by misting with water if necessary. Once the stripper has worked its magic, use a stiff-bristle brush or a pressure washer (on a low setting with a wide tip) to carefully remove the loosened finish. Rinse thoroughly to neutralize the stripper and wash away all residue. Some strippers may require a separate brightener or neutralizer step after rinsing; always check the product’s guidelines. Again, allow the deck to dry completely.
Sanding for Perfection (Often Overlooked, but Crucial!)
While stripping removes old finishes, sanding takes your deck preparation to the next level. It creates a smooth, even surface, opens the wood grain for better stain absorption, and eliminates any lingering splinters, fuzziness from power washing, or mill glaze (a hard, shiny surface on new wood that prevents stain penetration). Sanding is perhaps the most overlooked yet vital step for a truly professional-looking and long-lasting finish.
- Equipment: For larger areas, a random orbital sander is ideal. For deck boards, a pole sander with a sandpaper attachment can save your back. For railings and intricate areas, a detail sander or hand sanding will be necessary.
- Grit Progression: Start with a medium-grit sandpaper (e.g., 60 or 80-grit) to remove imperfections and open the grain. Follow up with a finer grit (e.g., 100 or 120-grit) for a smooth finish. Avoid going too fine, as this can close the wood grain and hinder stain absorption.
- Technique: Always sand in the direction of the wood grain. Overlap your passes slightly to ensure even sanding.
- Dust Removal: After sanding, thoroughly sweep or vacuum the deck to remove all sawdust. A leaf blower can also be effective. You want a dust-free surface for optimal finish adhesion.
Choosing the Perfect Deck Finish: Stain, Sealer, or Paint?
This is where your deck’s aesthetic transformation truly begins. The market offers a vast array of finishes, each with unique properties, durability, and appearance. Your choice will depend on the desired look, the level of protection you need, and how often you’re willing to reapply.
1. Deck Stains
Stains are the most popular choice for decks, offering both color and protection while allowing the wood’s natural grain to show through (to varying degrees).
- Clear Stains/Sealants: Provide excellent water repellency and UV protection, but offer no color. They emphasize the natural wood tone. Reapplication is typically needed every 1-2 years.
- Semi-Transparent Stains: Add a hint of color while allowing most of the wood grain and texture to remain visible. They offer good UV protection and can last 2-3 years.
- Semi-Solid Stains: Provide more opacity than semi-transparent stains, partially obscuring the wood grain but still allowing some texture to show. They offer superior UV protection and durability, often lasting 3-4 years.
- Solid Stains: Deliver an opaque, paint-like finish that completely covers the wood grain. They offer the highest level of UV protection and can last up to 4-5 years, but they will eventually peel or flake like paint if not properly prepped and applied. They are ideal for older, weathered decks where you want to hide imperfections.
Oil-Based vs. Water-Based Stains:
- Oil-Based Stains: Tend to penetrate deeper into the wood, offering excellent protection and a rich, traditional look. They are durable but can take longer to dry and clean up with mineral spirits.
- Water-Based Stains: Are easier to clean up with water, dry faster, and typically have lower VOCs. Modern water-based formulations offer excellent durability and come in a wide range of colors.
2. Deck Paint
While some homeowners opt for deck paint, it’s generally not recommended for horizontal walking surfaces. Paint forms a film on top of the wood, which is prone to chipping, cracking, and peeling, especially with heavy foot traffic and exposure to the elements. If you choose paint, ensure it’s specifically formulated for decks and porches, and be prepared for more frequent maintenance.
Factors to Consider When Choosing Your Finish:
- Wood Type: Some woods (like cedar or redwood) naturally resist rot and insects and may only need a clear sealant, while others (like pine or fir) benefit from more robust staining.
- Desired Aesthetic: Do you want to highlight the natural wood or completely change its color?
- Durability & Maintenance: How often are you willing to reapply? More opaque stains generally last longer.
- UV Protection: Crucial for preventing graying and degradation of the wood.
- Mildew Resistance: Important in humid climates.
- Traffic: High-traffic areas may benefit from more durable, penetrating finishes.
Pro Tip: Always test your chosen finish on an inconspicuous area of the deck or a scrap piece of the same wood. This will give you a true representation of the color and sheen before committing to the entire project.
Applying Your Deck Finish: Techniques for a Flawless Coat
With your deck meticulously prepared and your finish chosen, it’s time for the most satisfying step: application. Proper technique ensures an even, durable, and beautiful result.
Ideal Weather Conditions
Check the weather forecast! Apply your finish on a clear, dry day with temperatures between 50°F (10°C) and 90°F (32°C). Avoid direct hot sunlight, which can cause the finish to dry too quickly, leading to lap marks. High humidity can also prolong drying times.
Application Tools
- Sprayers: A paint sprayer (airless or pump sprayer) is excellent for covering large areas quickly and efficiently, especially railings, spindles, and hard-to-reach spots. Practice on a scrap piece of wood first to get the hang of an even spray pattern and avoid overspray. Always have back-brushing tools ready.
- Rollers: A paint roller with an extended handle is perfect for applying stain to the deck surface. Use a roller cover designed for stains or rough surfaces (typically a 3/8-inch nap). Rollers provide a consistent coat and are faster than brushing for large, flat areas.
- Brushes: High-quality brushes are indispensable for cutting in edges, detailed work around railings, stairs, and vertical surfaces. Natural bristles are often preferred for oil-based stains, while synthetic bristles work well with water-based products.
- Applicator Pads: Lambswool or synthetic applicator pads on a pole can also provide a smooth, even finish for deck boards.
The Application Process
Work in small, manageable sections, usually 2-3 boards at a time, from one end of the deck to the other. Always apply stain to the entire length of the board to avoid lap marks.
- Stir Thoroughly: Stir the finish frequently throughout the application to ensure pigments are evenly distributed.
- Apply Evenly: Apply the finish in a thin, even coat. Avoid puddling or over-application, which can lead to stickiness or uneven drying.
- Back-Brush or Back-Roll: If using a sprayer or roller, immediately follow up by lightly brushing or rolling over the wet stain in the direction of the wood grain. This helps work the stain into the wood, removes excess, and ensures a uniform appearance, preventing streaks and drips.
- Edges and Railings: Use a brush for precise application on edges, railings, and any other intricate areas.
- Second Coat (If Needed): Most deck stains recommend one generous coat, but check your product’s instructions. If a second coat is advised, allow the first coat to dry completely (usually 4-24 hours) before applying.
Ongoing Maintenance and Longevity
Your deck refinishing project doesn’t end when the last coat dries. Regular maintenance will significantly extend the life of your new finish and keep your deck looking its best for years to come.
- Regular Cleaning: Sweep your deck frequently to remove leaves and debris. Annually, give it a gentle cleaning with a mild soap and water solution, or a dedicated deck cleaner, and a soft brush.
- Monitor for Wear: Keep an eye out for signs of wear, especially in high-traffic areas or spots exposed to constant sun and rain.
- Water Bead Test: A simple way to check if your deck needs re-sealing or re-staining is the water bead test. Sprinkle some water on the deck surface. If the water beads up, your finish is still protecting. If it soaks into the wood, it’s time to consider reapplication.
- Spot Treatment: Address small areas of wear or damage promptly to prevent them from spreading.
Refinishing your deck is an investment of time and effort, but the rewards are undeniable. A well-maintained deck not only enhances your home’s value but also provides a beautiful, safe, and enjoyable space for relaxation and entertainment. By following these detailed steps, you can confidently tackle this DIY project and enjoy the renewed beauty and durability of your outdoor sanctuary for many seasons to come.
Is refinishing your deck on your summer project list? We’d love to hear about your experience and see your results! Share your deck transformation stories with us.
Photo: Flickr.com/OlgerFallasPainting